About The Project
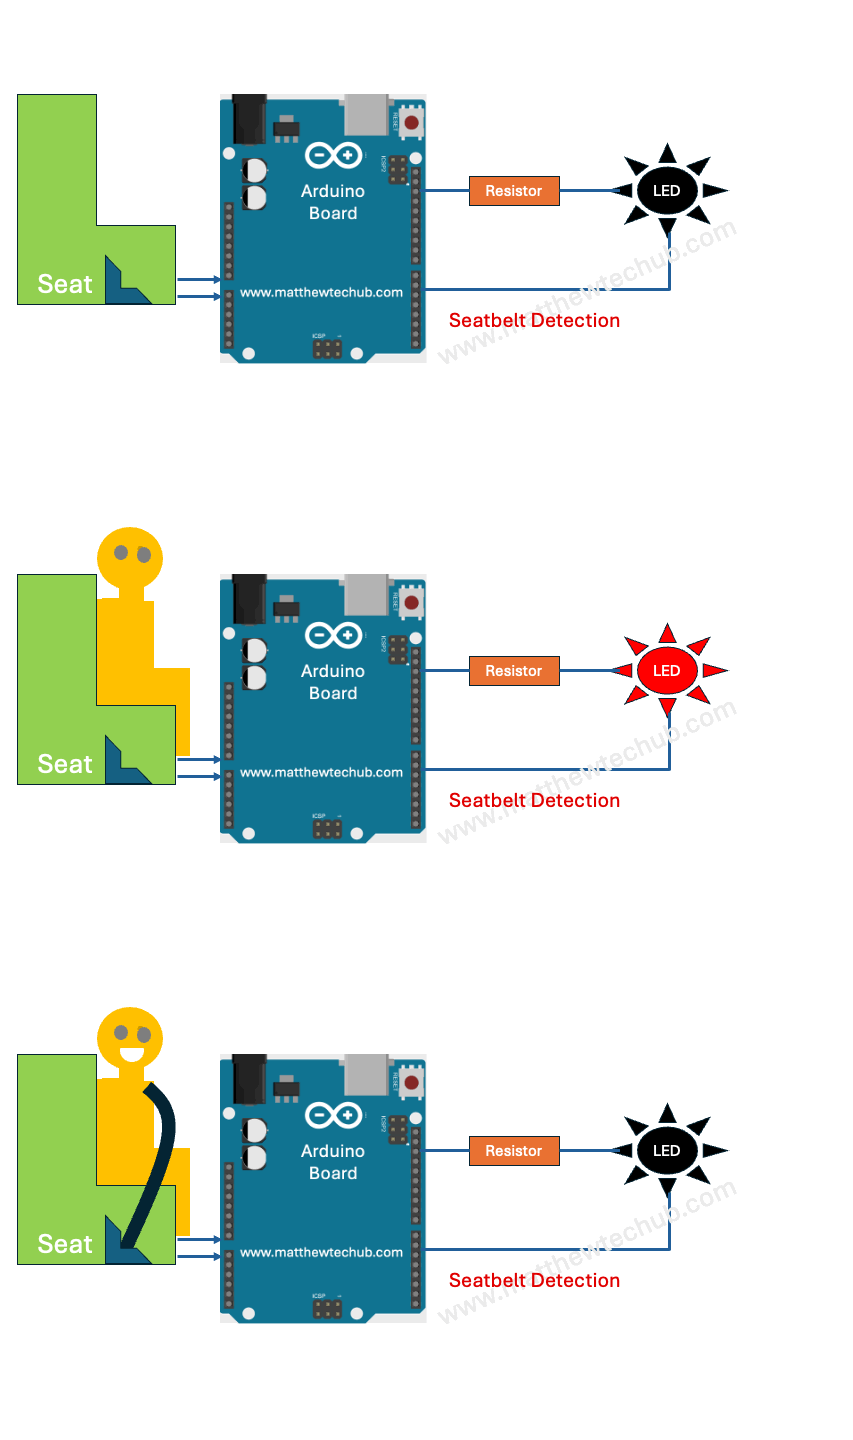
In this project, we will learn how to create a car seat belt sensor. The system will check if the driver has properly fastened the seat belt. If the seat belt is not fastened, an LED will turn on to alert the driver.
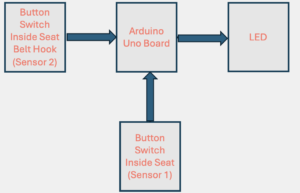
Block Diagram
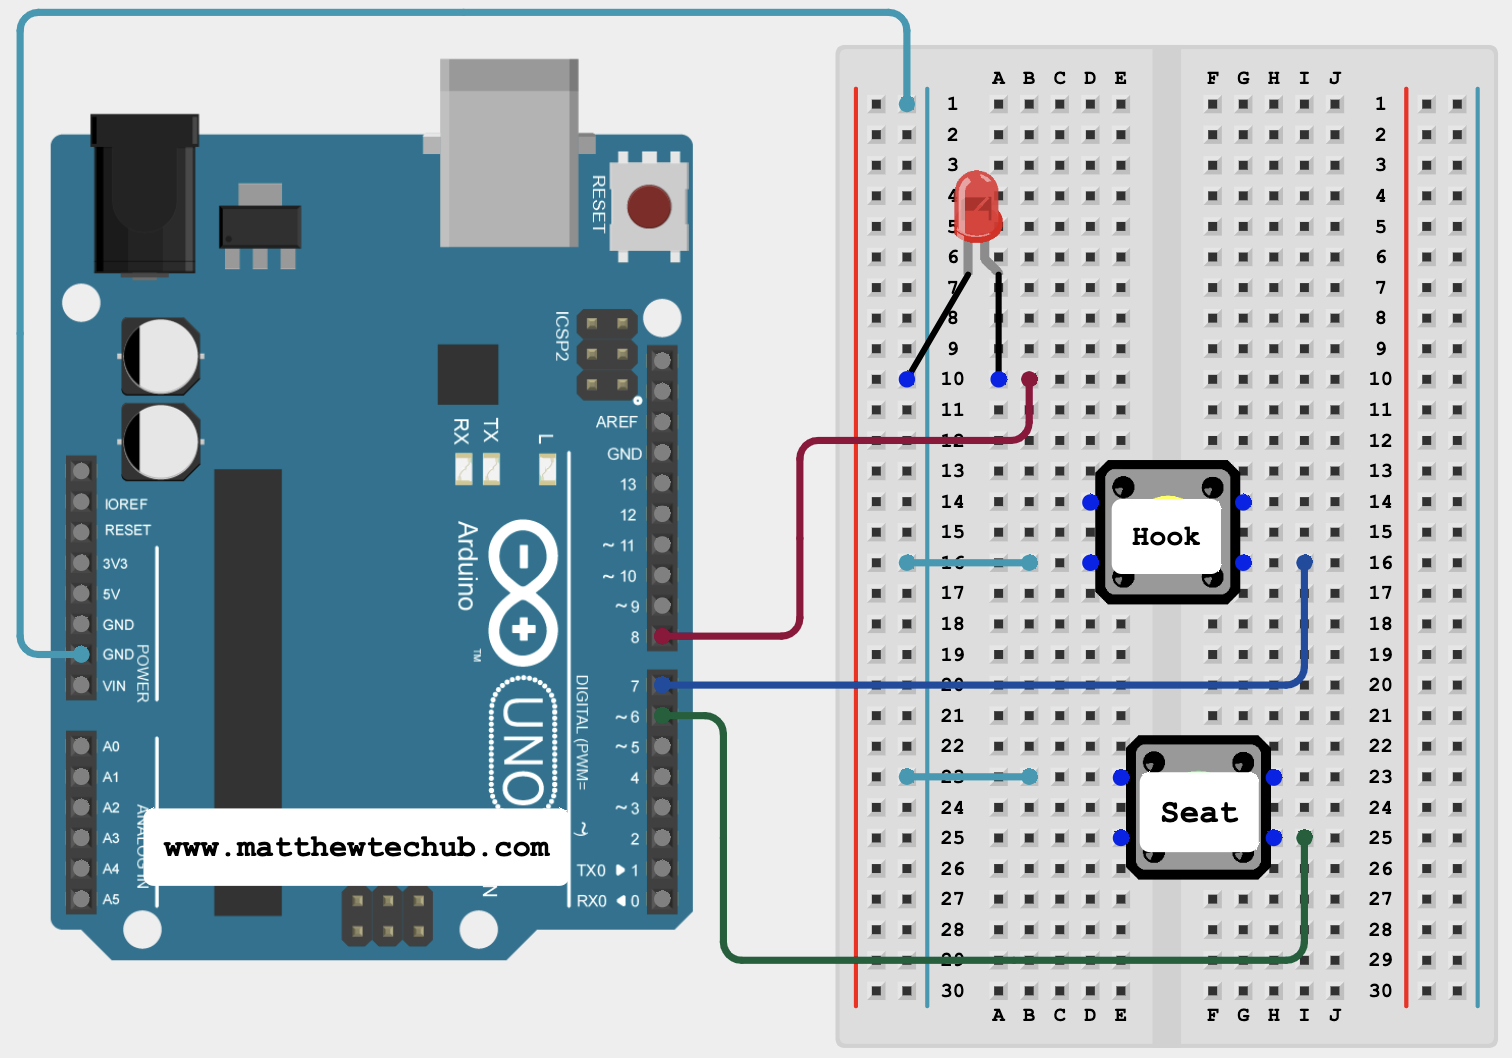
Circuit Wiring
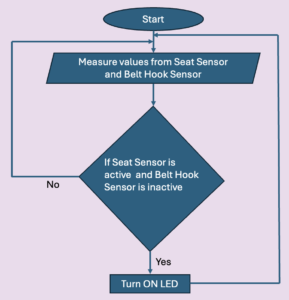
Flow Chart
Program Code
// www.matthewtechub.com
// seat belt sensing with two button switch
// buzzer can be used instead of led
// sensor-1 initialise
const int buttonPin1 = 6;
// sensor-2 initialise
const int buttonPin2 = 7;
const int ledPin = 8;
int buttonState1;
int buttonState2;
void setup() {
    pinMode(ledPin, OUTPUT);
    pinMode(buttonPin1, INPUT_PULLUP);
    pinMode(buttonPin2, INPUT_PULLUP);
    Serial.begin(9600);
}
void loop() {
    buttonState1 = digitalRead(buttonPin1);
    buttonState2 = digitalRead(buttonPin2);
    if (buttonState1 == LOW) {
        if (buttonState2 == HIGH) {
            digitalWrite(ledPin, HIGH);
        } else
            digitalWrite(ledPin, LOW);
    } else
        // to switch off led when button swich-1 is released
    digitalWrite(ledPin, LOW);
    delay(500);
    Serial.println();
}- This code checks the state of two buttons representing seat belt sensors.
- If the first button is pressed and the second button is not pressed, the LED (or buzzer) will turn on to alert the driver.
- The LED (or buzzer) will turn off if either the first button is not pressed or both buttons are pressed.
- The code includes serial output for debugging purposes and a delay to debounce the button presses.
Code Explanation
const int buttonPin1 = 6;
// sensor-2 initialise
const int buttonPin2 = 7;
const int ledPin =8;
int buttonState1;
int buttonState2;
- buttonPin1 = 6: This defines pin 6 as the input pin for the first button. This button senses the presence of the driver in the seat.
- buttonPin2 = 7: This defines pin 7 as the input pin for the second button. This button senses the presence of the seat belt in the seat belt hook.
- ledPin = 8: This defines pin 8 as the output pin for the LED (or buzzer).
- buttonState1: Stores the state of the first button (pressed or not pressed).
- buttonState2: Stores the state of the second button (pressed or not pressed).
void setup() {
pinMode(ledPin, OUTPUT);
pinMode(buttonPin1, INPUT_PULLUP);
pinMode(buttonPin2, INPUT_PULLUP);
Serial.begin(9600);
}
- pinMode(ledPin, OUTPUT): Configures the LED pin as an output.
- pinMode(buttonPin1, INPUT_PULLUP): Configures the first button pin as an input with an internal pull-up resistor. This means the pin will read HIGH when the button is not pressed and LOW when it is pressed.
- pinMode(buttonPin2, INPUT_PULLUP): Configures the second button pin similarly.
- Serial.begin(9600): Initializes serial communication for debugging purposes.
void loop() {
buttonState1 = digitalRead(buttonPin1);
buttonState2 = digitalRead(buttonPin2);
if (buttonState1 == LOW) {
if (buttonState2 == HIGH) {
digitalWrite(ledPin, HIGH);
} else {
digitalWrite(ledPin, LOW);
}
} else {
digitalWrite(ledPin, LOW);
}
delay(500); // Add a delay of 500 milliseconds
Serial.println(” b1″);
Serial.print(buttonState1);
Serial.println(” b2″);
Serial.print(buttonState2);
}
- buttonState1 = digitalRead(buttonPin1): Reads the current state of the first button (presence of the driver in the seat belt).
- buttonState2 = digitalRead(buttonPin2): Reads the current state of the second button (presence of the seat belt in the seat belt hook).
- if (buttonState1 == LOW): Checks if the first button is pressed. If it is pressed:
- if (buttonState2 == HIGH): Checks if the second button is not pressed. If true, it turns on the LED (or buzzer) by setting ledPin to HIGH.
- else: If the second button is pressed, it turns off the LED (or buzzer) by setting ledPin to LOW.
- else: If the first button is not pressed, it turns off the LED (or buzzer) by setting ledPin to LOW.
- delay(500): Adds a 500 milliseconds delay to debounce the button presses.
- Serial.println(” b1″) and Serial.print(buttonState1): Print the state of the first button to the serial monitor.
- Serial.println(” b2″) and Serial.print(buttonState2): Print the state of the second button to the serial monitor.
Try Yourself
Modify the program code to check whether the car doors are properly closed when the driver is in his seat.


