About The Project
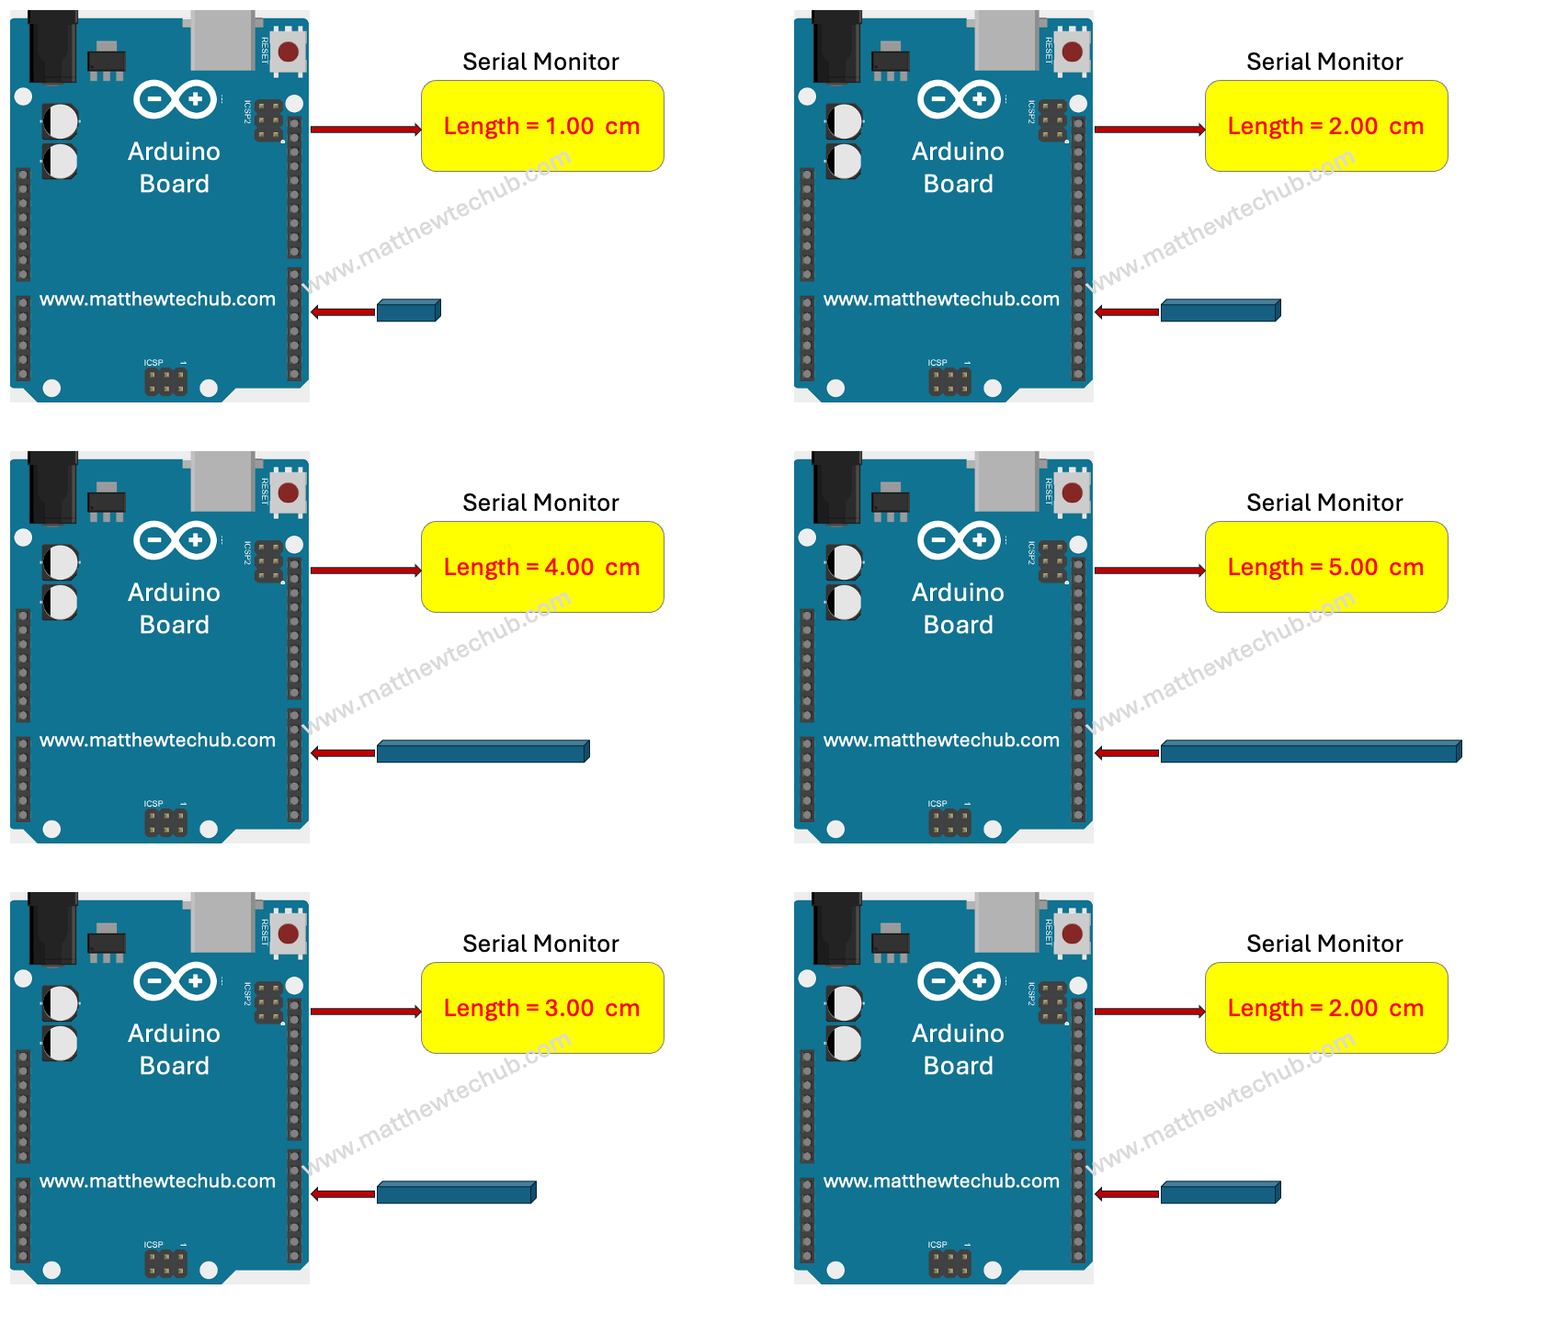
In this project, we are learning how to measure linear displacement (length) using a rheostat.
Circuit Wiring

A rheostat is a variable resistor that allows the adjustment of electric current by manually changing its resistance. It typically consists of a resistive element with a sliding or rotating contact that can be moved to vary the resistance.
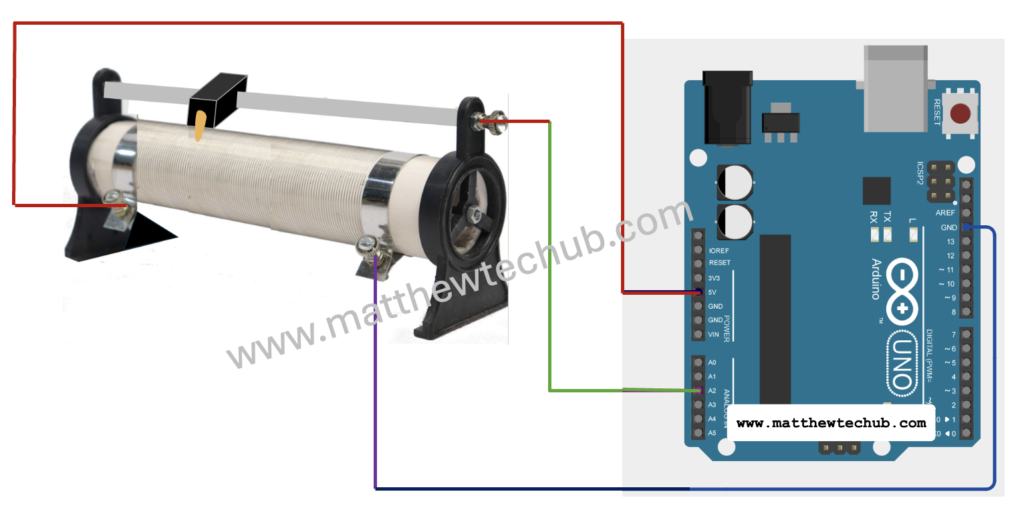
By adjusting the sliding contact, the resistance of the rheostat changes. One fixed terminal of the rheostat is connected to the Vcc pin (+5V), while the other fixed terminal is connected to the GND pin. This configuration allows the rheostat to function as a voltage divider circuit. The voltage at the sliding contact serves as a measure of linear displacement. When the sliding contact moves towards the Vcc side, the voltage at the sliding contact increases; conversely, it decreases when the sliding contact moves towards the GND side. This voltage is mapped to distance using Arduino programming.
Programme Code
// www.matthewtechub.com

// length measurement

const int midPin = A2;  // Pin connected to the potentiometer

int value;              // Variable to store the analog reading

float length;            // Variable to store the calculated length

void setup() {

  pinMode(midPin, INPUT);

  Serial.begin(9600);

}

void loop() {

  // Read the analog value from the rheostat

  value = analogRead(midPin);

  // Map the analog value (0-1023) to the length (0- 30cm)

  length = (float)value * 30 / 1023.0;

  // Print the analog value and calculated length to the serial monitor

  Serial.print("value: ");

  Serial.println(value);

  Serial.print("Length (cm): ");

  Serial.println(length);

  delay(1000);  // Delay for stability and readability

}Code Explanation
const int midPin = A2; // Pin connected to the potentiometer (rheostat)
int value; // Variable to store the analog reading
float length; // Variable to store the calculated length
- midPin: Defines the Arduino pin number (A2) to which the potentiometer (rheostat) is connected.
- value: Integer variable used to store the analog reading obtained from the potentiometer.
- length: Float variable used to store the calculated length based on the analog reading.
void setup() {
pinMode(midPin, INPUT); // Configures midPin (2) as an input pin to read analog data
Serial.begin(9600); // Initializes serial communication with baud rate 9600
}
- pinMode(midPin, INPUT);: Configures midPin (A2) as an input pin, indicating it will read analog data from the potentiometer.
- Serial.begin(9600);: Initializes serial communication between Arduino and the connected computer at a baud rate of 9600 bits per second. This allows data to be sent and received via the Serial Monitor.
void loop() {
value = analogRead(midPin); // Reads the analog value from midPin (2) and stores it in ‘value’
length = (float)value * 30 / 1023.0; // Maps the analog value (0-1023) to the length (0-30 cm)
Serial.print(“Value: “); // Prints the label “Value: ” to the Serial Monitor
Serial.println(value); // Prints the analog value to the Serial Monitor
Serial.print(“Length (cm): “); // Prints the label “Length (cm): ” to the Serial Monitor
Serial.println(length); // Prints the calculated length to the Serial Monitor
delay(1000); // Delays for 1000 milliseconds (1 second) for stability and readability
}
- analogRead(midPin);: Reads the analog voltage value from the potentiometer connected to midPin (A2) and assigns it to the variable value.
- Length Calculation:
- length = (float)value * 30 / 1023.0;: Converts the analog reading (value) into a length value. The Arduino’s analog-to-digital converter (ADC) provides values from 0 to 1023 for voltages from 0 to 5 volts. Here, it is scaled to represent a length ranging from 0 to 30 cm. (Assume length of the rheostat is 30 cm)
- Serial Output:
- Serial.print(“Value: “);: Prints the label “Value: ” to the Serial Monitor.
- Serial.println(value);: Prints the analog value (stored in value) to the Serial Monitor followed by a newline character (\n).
- Serial.print(“Length (cm): “);: Prints the label “Length (cm): ” to the Serial Monitor.
- Serial.println(length);: Prints the calculated length (stored in length) to the Serial Monitor followed by a newline character (\n).
