About The Project
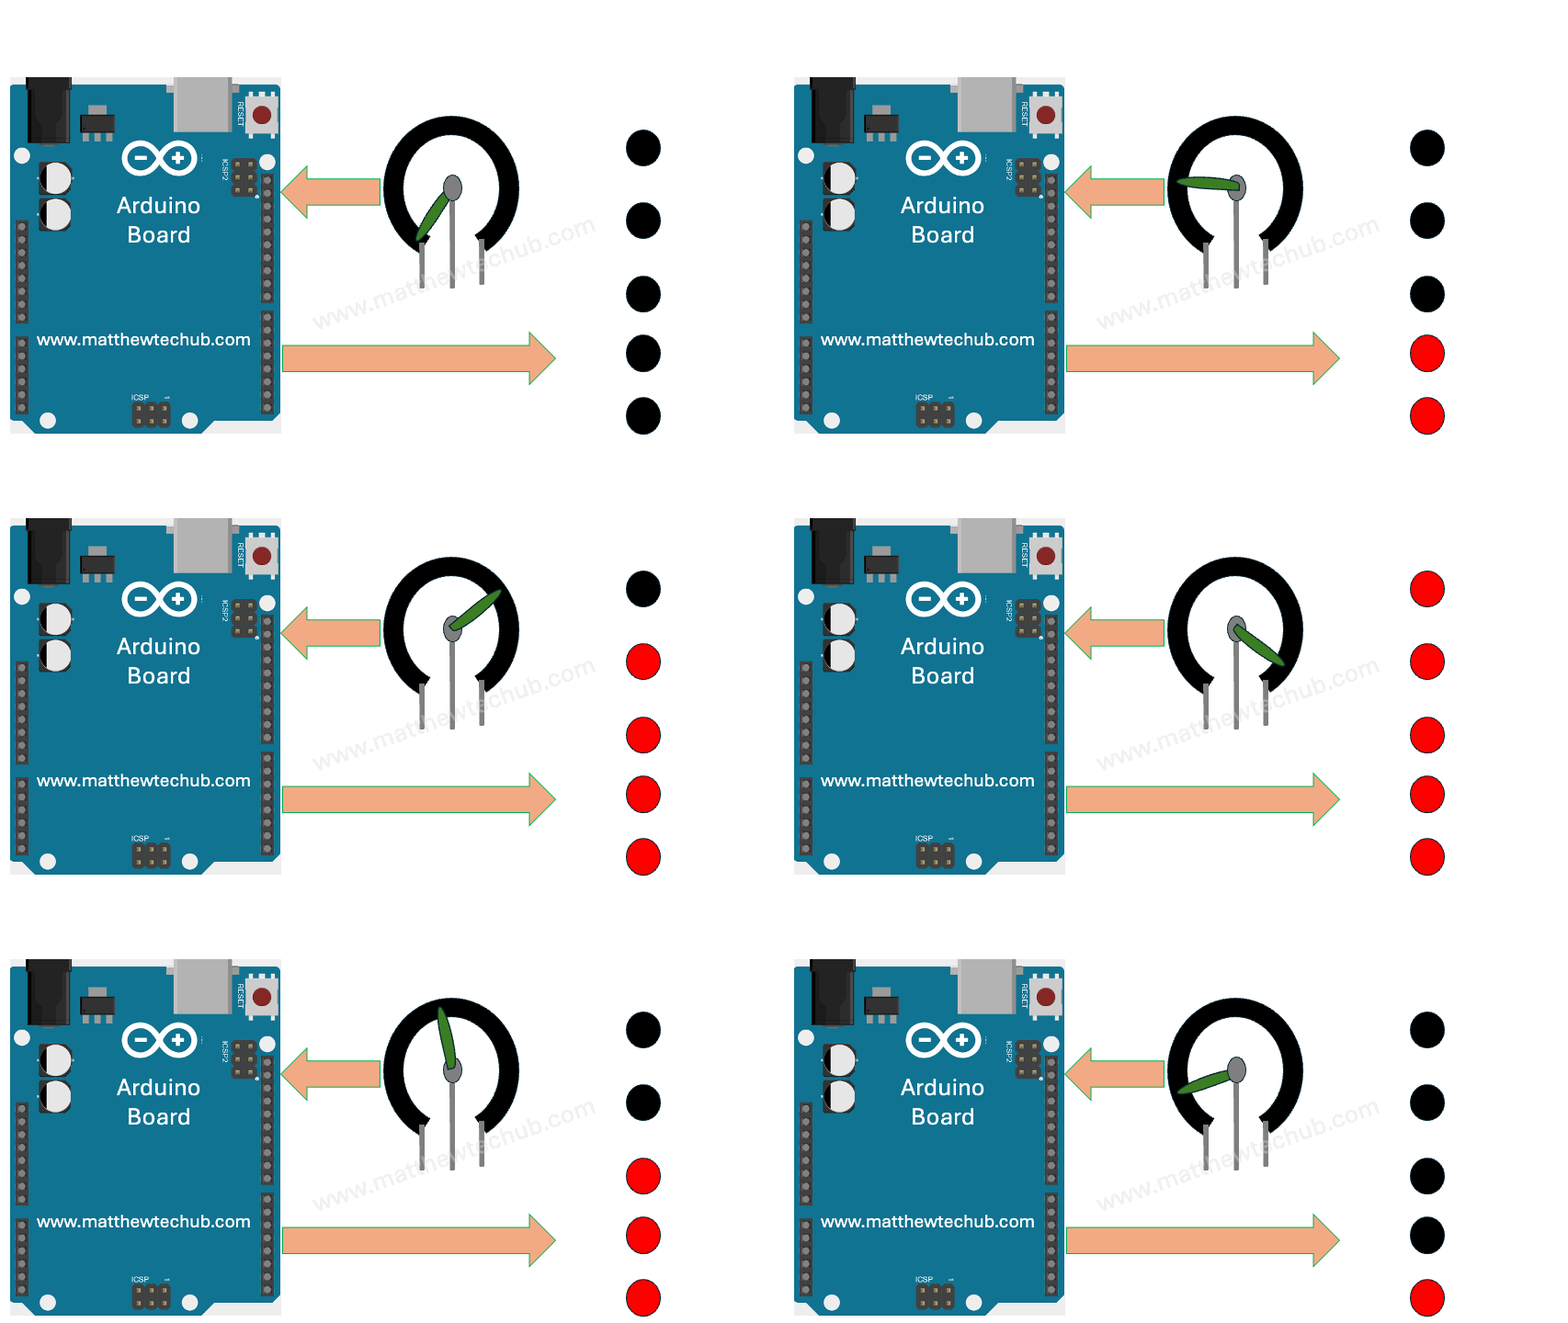
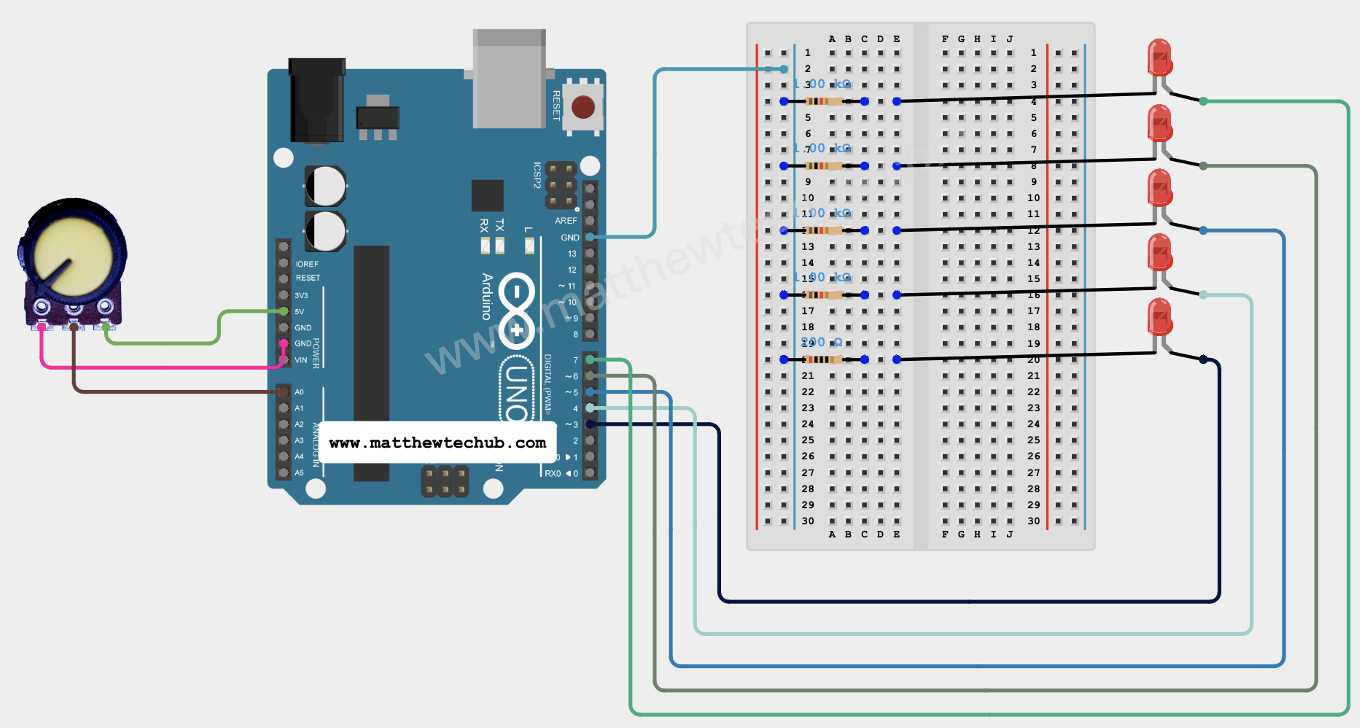
In this project, we will learn how to create an Arduino program that turns on 5 LEDs in sequential order based on the varying resistance of a potentiometer.
Circuit Wiring
Program Code
C++
// www.matthewtechub.com
// led tower - pot
const int potPin = A0;
// Pin connected to the potentiometer
const int ledPins[] = {3, 4, 5, 6, 7};
 // Pins connected to the LEDs
const int numLeds = 5; // Number of LEDs

void setup() {
  // Set all LED pins as outputs
  for (int i = 0; i < numLeds; i++) {
    pinMode(ledPins[i], OUTPUT);
    digitalWrite(ledPins[i], LOW);
    // Ensure all LEDs are initially off
  }
}

void loop() {
  int potValue = analogRead(potPin);
  // Read the value from the potentiometer
  int ledCount = map(potValue, 0, 1023, 0, numLeds);
  // Map the potentiometer value to the number of LEDs

  // Turn on LEDs based on the mapped potentiometer value
  for (int i = 0; i < numLeds; i++) {
    if (i < ledCount) {
      digitalWrite(ledPins[i], HIGH);
    } else {
      digitalWrite(ledPins[i], LOW);
    }
  }

  delay(50); // Small delay for stability
}
This Arduino program reads the value from a potentiometer and uses it to control a set of 5 LEDs in a sequential order. As the resistance of the potentiometer changes, the number of LEDs that are turned on varies from 0 to 5. The potentiometer value is mapped to the range of the LEDs, and the LEDs light up according to the mapped value, providing a visual representation of the potentiometer’s position.
Code Explanation
C++
const int potPin = A0;
// Pin connected to the potentiometer

const int ledPins[] = {3, 4, 5, 6, 7};
// Pins connected to the LEDs

const int numLeds = 5;
// Number of LEDs
Variable Declarations
- potPin: This variable holds the pin number where the potentiometer is connected. A0 is an analog pin on the Arduino.
- ledPins: This array holds the pin numbers where the LEDs are connected.
- numLeds: This constant holds the number of LEDs being used (5 in this case).
C++
void setup() {
  // Set all LED pins as outputs
  for (int i = 0; i < numLeds; i++) {
    pinMode(ledPins[i], OUTPUT);
    digitalWrite(ledPins[i], LOW);
    // Ensure all LEDs are initially off
  }
}
Setup Function
- void setup(): This function runs once when the Arduino is powered on or reset.
- LED Initialization:
- The for loop sets each LED pin as an output using pinMode(ledPins[i], OUTPUT).
- It also ensures that all LEDs are initially turned off by setting each pin to LOW with digitalWrite(ledPins[i], LOW).
C++
void loop() {
  int potValue = analogRead(potPin);
  // Read the value from the potentiometer

  int ledCount = map(potValue, 0, 1023, 0, numLeds);
  // Map the potentiometer value to the number of LEDs

  // Turn on LEDs based on the mapped potentiometer value
  for (int i = 0; i < numLeds; i++) {
    if (i < ledCount) {
      digitalWrite(ledPins[i], HIGH);
    } else {
      digitalWrite(ledPins[i], LOW);
    }
  }

  delay(50); // Small delay for stability
}Loop Function
- void loop(): This function runs repeatedly in a loop after the setup() function.
- Reading the Potentiometer:
- int potValue = analogRead(potPin); reads the value from the potentiometer. The analogRead function returns a value between 0 and 1023.
- Mapping the Potentiometer Value:
- int ledCount = map(potValue, 0, 1023, 0, numLeds); maps the potentiometer value (0-1023) to a range corresponding to the number of LEDs (0-5). The map function translates the potentiometer’s value to a range that can be used to determine how many LEDs should be lit.
- Controlling the LEDs:
- The for loop iterates through each LED pin. If the current index i is less than ledCount, the LED is turned on by setting the pin to HIGH (digitalWrite(ledPins[i], HIGH)). Otherwise, the LED is turned off (digitalWrite(ledPins[i], LOW)).
- Delay:
- delay(50); introduces a short delay of 50 milliseconds to stabilize the readings and prevent rapid flickering of the LEDs.
Try Yourself
Place a buzzer instead of the top LED (ledPin 7) so that we can hear a warning sound when the value reaches the maximum limit.

