about The Project
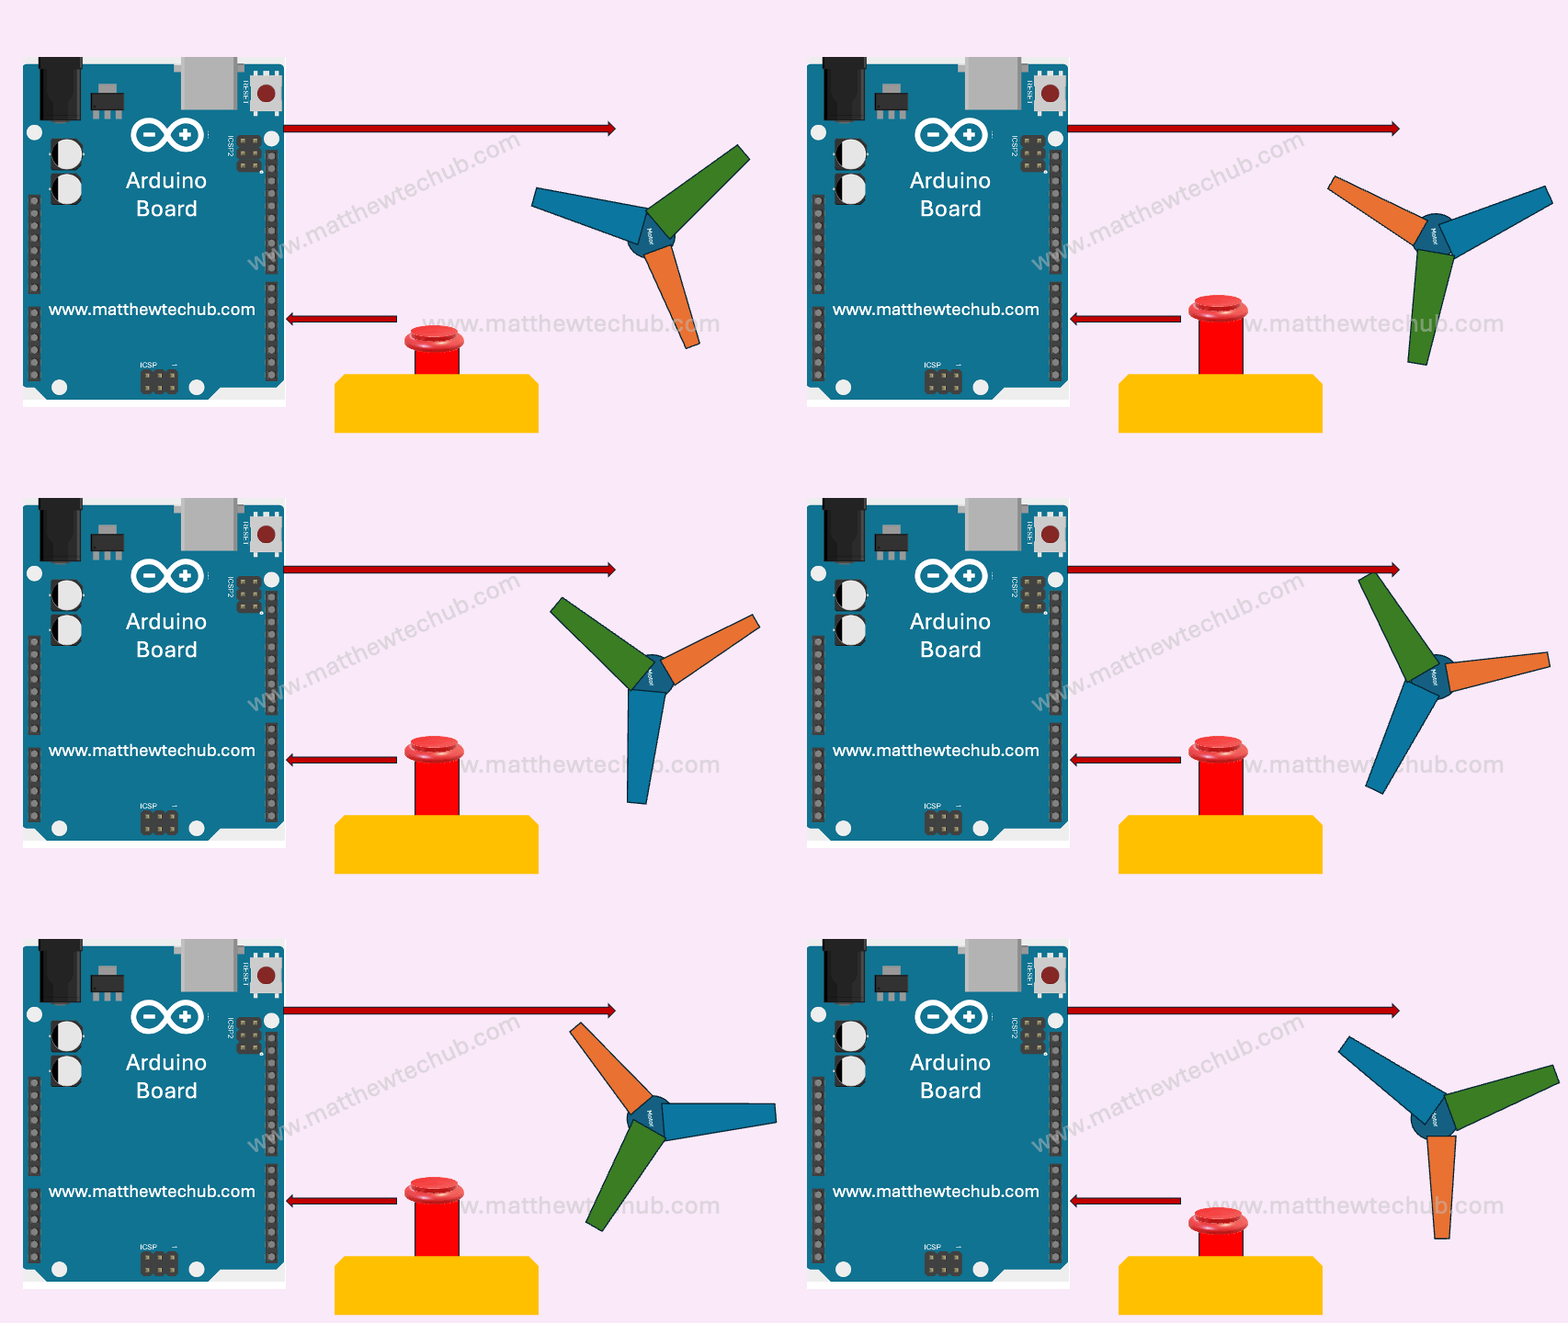
In this project, we will explore how to control the direction of a DC motor using a single button switch. When the button is pressed, the motor rotates in one direction. Pressing the button again reverses the motor’s direction. This allows us to toggle the motor’s rotation direction with each press of the button.
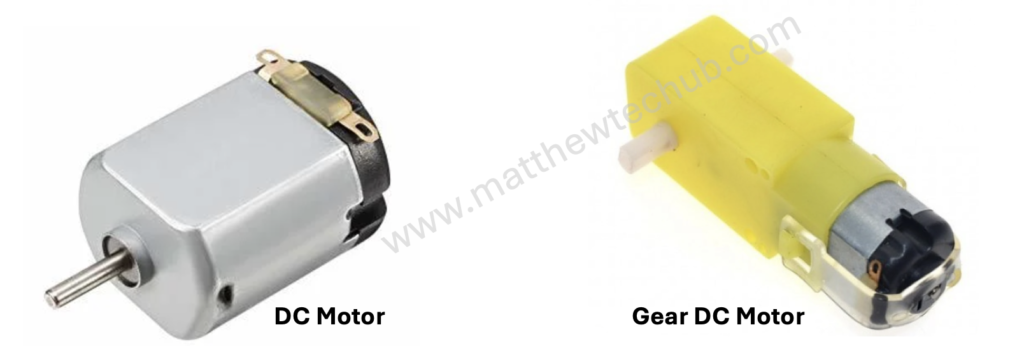
DC Motor

A DC motor is a device that turns electrical energy into mechanical motion. When you run electricity through the motor, it creates a magnetic field that makes a part of the motor spin. This spinning motion is what powers things like fans, toys, and even electric cars.
The direction of motion in a DC motor is determined by the direction of the electrical current flowing through the motor’s windings. Changing the polarity of the voltage applied to the motor (i.e., swapping the positive and negative connections) will reverse the direction of the current flowing through the motor’s windings.
The speed of a DC motor is directly proportional to the applied voltage. Increasing the voltage increases the motor speed, while decreasing the voltage reduces the motor speed.
Geared DC motors are commonly used in many applications. The gear reduction in these motors allows for lower output speeds while maintaining high torque. This is essential for applications that require precise and controlled movements, such as robotics, conveyor belts, and automated machinery.
L298N
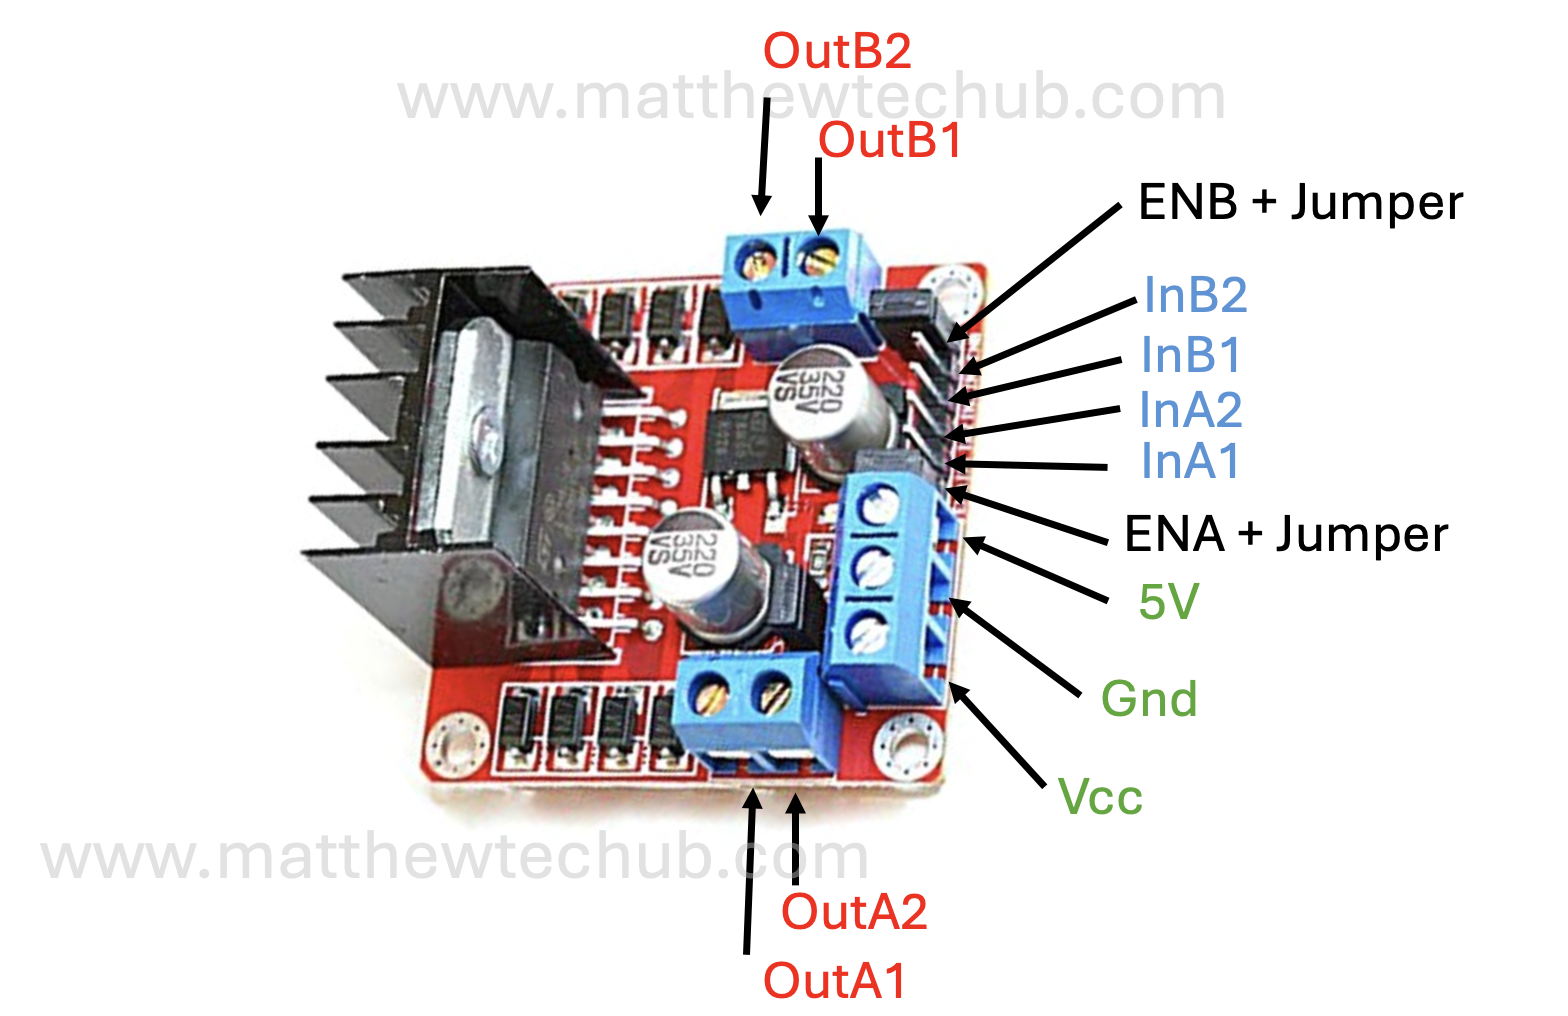
The L298N is a popular dual H-bridge motor driver integrated circuit (IC) that allows you to control the speed and direction of two DC motors or control one stepper motor.
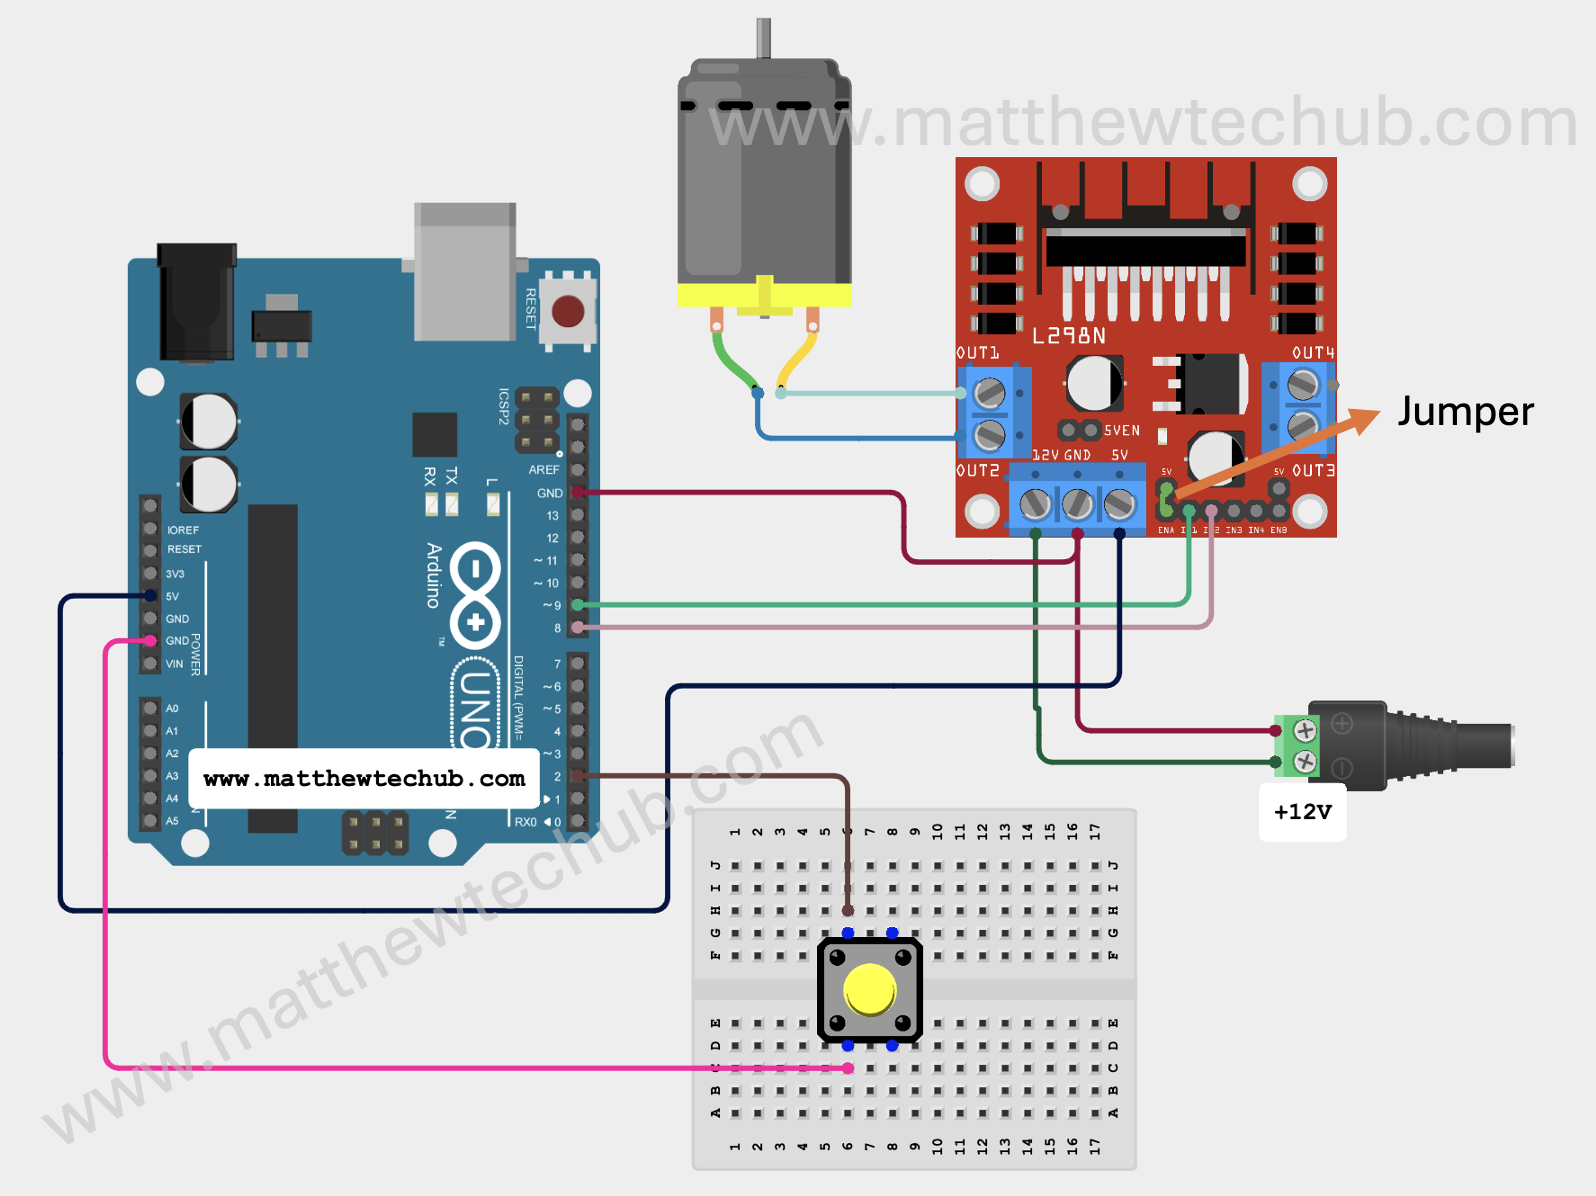
Circuit Wiring
Note that there is a jumper connected to the ‘EnableA’ pin to achieve maximum rotation speed. Otherwise, there is a chance of electromagnetic interference, which may result in unpredictable behaviour.
Program Code
// www.matthewtechub.com
// Constants for motor and button
const int motorPin1 = 9;    // Pin connected to motor input 1
const int motorPin2 = 8;   // Pin connected to motor input 2
const int buttonPin = 2;    // Pin connected to push button

// Variables to store the button state
bool buttonState = false;    // Current state of the button
bool lastButtonState = false; // Previous state of the button
bool motorDirection = false; // Motor direction state

void setup() {
  // Set motor pins as output
  pinMode(motorPin1, OUTPUT);
  pinMode(motorPin2, OUTPUT);

  // Set button pin as input
  pinMode(buttonPin, INPUT_PULLUP); // Use internal pull-up resistor

  // Initialize motor to stop
  digitalWrite(motorPin1, LOW);
  digitalWrite(motorPin2, LOW);
}

void loop() {
  // Read the button state
  buttonState = digitalRead(buttonPin);

  // Check if the button is pressed (LOW because of pull-up resistor)
  if (buttonState == LOW && lastButtonState == HIGH) {
    // Toggle motor direction
    motorDirection = !motorDirection;

    // Update motor direction
    if (motorDirection) {
      digitalWrite(motorPin1, HIGH);
      digitalWrite(motorPin2, LOW);
    } else {
      digitalWrite(motorPin1, LOW);
      digitalWrite(motorPin2, HIGH);
    }
  }

  // Save the current button state as the last state for the next loop
  lastButtonState = buttonState;
}
This Arduino program controls the direction of a DC motor using a single button switch. When the button is pressed, the motor’s direction toggles between forward and reverse.
Code Explanation
const int motorPin1 = 9;    // Pin connected to motor input 1
const int motorPin2 = 8;    // Pin connected to motor input 2
const int buttonPin = 2;    // Pin connected to push button
- motorPin1: Digital pin 9 on the Arduino, connected to the first input of the motor driver.
- motorPin2: Digital pin 8 on the Arduino, connected to the second input of the motor driver.
- buttonPin: Digital pin 2 on the Arduino, connected to a push button.
// Variables to store the button state
bool buttonState = false;    // Current state of the button
bool lastButtonState = false; // Previous state of the button
bool motorDirection = false; // Motor direction state
- buttonState: Stores the current state of the button (pressed or not pressed).
- lastButtonState: Stores the previous state of the button to detect changes.
- motorDirection: Indicates the current direction of the motor (true for one direction, false for the opposite direction).
void setup() {
  // Set motor pins as output
  pinMode(motorPin1, OUTPUT);
  pinMode(motorPin2, OUTPUT);

  // Set button pin as input
  pinMode(buttonPin, INPUT_PULLUP);
// Use internal pull-up resistor

  // Initialize motor to stop
  digitalWrite(motorPin1, LOW);
  digitalWrite(motorPin2, LOW);
}
- pinMode(motorPin1, OUTPUT) and pinMode(motorPin2, OUTPUT): Configure the motor control pins as outputs.
- pinMode(buttonPin, INPUT_PULLUP): Configure the button pin as an input with an internal pull-up resistor. This keeps the pin at HIGH by default and changes to LOW when the button is pressed.
- digitalWrite(motorPin1, LOW) and digitalWrite(motorPin2, LOW): Ensure the motor is stopped initially by setting both motor control pins to LOW.
void loop() {
  // Read the button state
  buttonState = digitalRead(buttonPin);
- buttonState = digitalRead(buttonPin): Read the current state of the button and store it in buttonState.
  // Check if the button is pressed (LOW because of pull-up resistor)
  if (buttonState == LOW && lastButtonState == HIGH) {
    // Toggle motor direction
    motorDirection = !motorDirection;

    // Update motor direction
    if (motorDirection) {
      digitalWrite(motorPin1, HIGH);
      digitalWrite(motorPin2, LOW);
    } else {
      digitalWrite(motorPin1, LOW);
      digitalWrite(motorPin2, HIGH);
    }
  }

  // Save the current button state as the last state for the next loop
  lastButtonState = buttonState;
}
- if (buttonState == LOW && lastButtonState == HIGH): This condition checks for a button press event. The button is pressed when buttonState is LOW, and this condition also ensures it was just pressed by comparing it to the previous state (lastButtonState was HIGH).
- motorDirection = !motorDirection: Toggle the motor direction. If it was true, it becomes false, and vice versa.
- if (motorDirection): Based on the new direction, set the motor pins accordingly:
- digitalWrite(motorPin1, HIGH); digitalWrite(motorPin2, LOW);: Rotate the motor in one direction.
- digitalWrite(motorPin1, LOW); digitalWrite(motorPin2, HIGH);: Rotate the motor in the opposite direction.
- lastButtonState = buttonState: Update lastButtonState to the current button state for the next iteration of the loop. This allows the code to detect the next button press.
Modified Code with Helper Functions
//www.matthewtehub.com
// Constants for motor and button
const int motorPin1 = 9;    // Pin connected to motor input 1
const int motorPin2 = 8;   // Pin connected to motor input 2
const int buttonPin = 2;    // Pin connected to push button

// Variables to store the button state
bool buttonState = false;    // Current state of the button
bool lastButtonState = false; // Previous state of the button
bool motorDirection = false; // Motor direction state

void setup() {
  // Set motor pins as output
  pinMode(motorPin1, OUTPUT);
  pinMode(motorPin2, OUTPUT);

  // Set button pin as input
  pinMode(buttonPin, INPUT_PULLUP); // Use internal pull-up resistor

  // Initialize motor to stop
  stopMotor();
}

void loop() {
  // Read the button state
  buttonState = digitalRead(buttonPin);

  // Check if the button is pressed (LOW because of pull-up resistor)
  if (buttonState == LOW && lastButtonState == HIGH) {
    // Toggle motor direction
    motorDirection = !motorDirection;

    // Update motor direction
    if (motorDirection) {
      rotateMotorForward();
    } else {
      rotateMotorBackward();
    }
  }

  // Save the current button state as the last state for the next loop
  lastButtonState = buttonState;
}

void rotateMotorForward() {
  digitalWrite(motorPin1, HIGH);
  digitalWrite(motorPin2, LOW);
}

void rotateMotorBackward() {
  digitalWrite(motorPin1, LOW);
  digitalWrite(motorPin2, HIGH);
}

void stopMotor() {
  digitalWrite(motorPin1, LOW);
  digitalWrite(motorPin2, LOW);
}Code Explanation
// Constants for motor and button
const int motorPin1 = 9;    // Pin connected to motor input 1
const int motorPin2 = 8;    // Pin connected to motor input 2
const int buttonPin = 2;    // Pin connected to push button
- motorPin1: Digital pin 9 on the Arduino, connected to the first input of the motor driver.
- motorPin2: Digital pin 8 on the Arduino, connected to the second input of the motor driver.
- buttonPin: Digital pin 2 on the Arduino, connected to a push button.
// Variables to store the button state
bool buttonState = false;    // Current state of the button
bool lastButtonState = false; // Previous state of the button
bool motorDirection = false; // Motor direction state
- buttonState: Stores the current state of the button (pressed or not pressed).
- lastButtonState: Stores the previous state of the button to detect changes.
- motorDirection: Indicates the current direction of the motor (true for one direction, false for the opposite direction).
void setup() {
  // Set motor pins as output
  pinMode(motorPin1, OUTPUT);
  pinMode(motorPin2, OUTPUT);

  // Set button pin as input
  pinMode(buttonPin, INPUT_PULLUP);
// Use internal pull-up resistor

  // Initialize motor to stop
  stopMotor();
}- pinMode(motorPin1, OUTPUT) and pinMode(motorPin2, OUTPUT): Configure the motor control pins as outputs.
- pinMode(buttonPin, INPUT_PULLUP): Configure the button pin as an input with an internal pull-up resistor. This keeps the pin at HIGH by default and changes to LOW when the button is pressed.
- stopMotor(): Calls the function to stop the motor, ensuring it is stopped initially.
void loop() {
  // Read the button state
  buttonState = digitalRead(buttonPin);

  // Check if the button is pressed (LOW because of pull-up resistor)
  if (buttonState == LOW && lastButtonState == HIGH) {
    // Toggle motor direction
    motorDirection = !motorDirection;

    // Update motor direction
    if (motorDirection) {
      rotateMotorForward();
    } else {
      rotateMotorBackward();
    }
  }

  // Save the current button state as the last state for the next loop
  lastButtonState = buttonState;
}
- buttonState = digitalRead(buttonPin): Read the current state of the button and store it in buttonState.
- if (buttonState == LOW && lastButtonState == HIGH): This condition checks for a button press event. The button is pressed when buttonState is LOW, and this condition also ensures it was just pressed by comparing it to the previous state (lastButtonState was HIGH).
- motorDirection = !motorDirection: Toggle the motor direction. If it was true, it becomes false, and vice versa.
- if (motorDirection): Based on the new direction, set the motor pins accordingly:
- rotateMotorForward(): Call the function to rotate the motor forward.
- rotateMotorBackward(): Call the function to rotate the motor backward.
- lastButtonState = buttonState: Update lastButtonState to the current button state for the next iteration of the loop. This allows the code to detect the next button press.
Helper Functions
void rotateMotorForward() {
  digitalWrite(motorPin1, HIGH);
  digitalWrite(motorPin2, LOW);
}
- rotateMotorForward(): Sets motorPin1 HIGH and motorPin2 LOW, making the motor rotate in the forward direction.
void rotateMotorBackward() {
  digitalWrite(motorPin1, LOW);
  digitalWrite(motorPin2, HIGH);
}
- rotateMotorBackward(): Sets motorPin1 LOW and motorPin2 HIGH, making the motor rotate in the reverse direction.
void stopMotor() {
  digitalWrite(motorPin1, LOW);
  digitalWrite(motorPin2, LOW);
}
stopMotor(): Sets both motorPin1 and motorPin2 LOW, stopping the motor.
More About Modified Code with Helper Functions
Motor Control via Helper Functions:
- The modified code introduces helper functions rotateMotorForward(), rotateMotorBackward(), and stopMotor() to handle motor control.
- The loop() function calls these helper functions instead of directly manipulating the motor pins.
Code Modularity and Readability:
- The modified code is more modular and readable because the motor control logic is separated into distinct functions.
- This separation makes the loop() function cleaner and easier to understand.
Try Yourself
Try to control two motors with a single button switch.


