About The Project
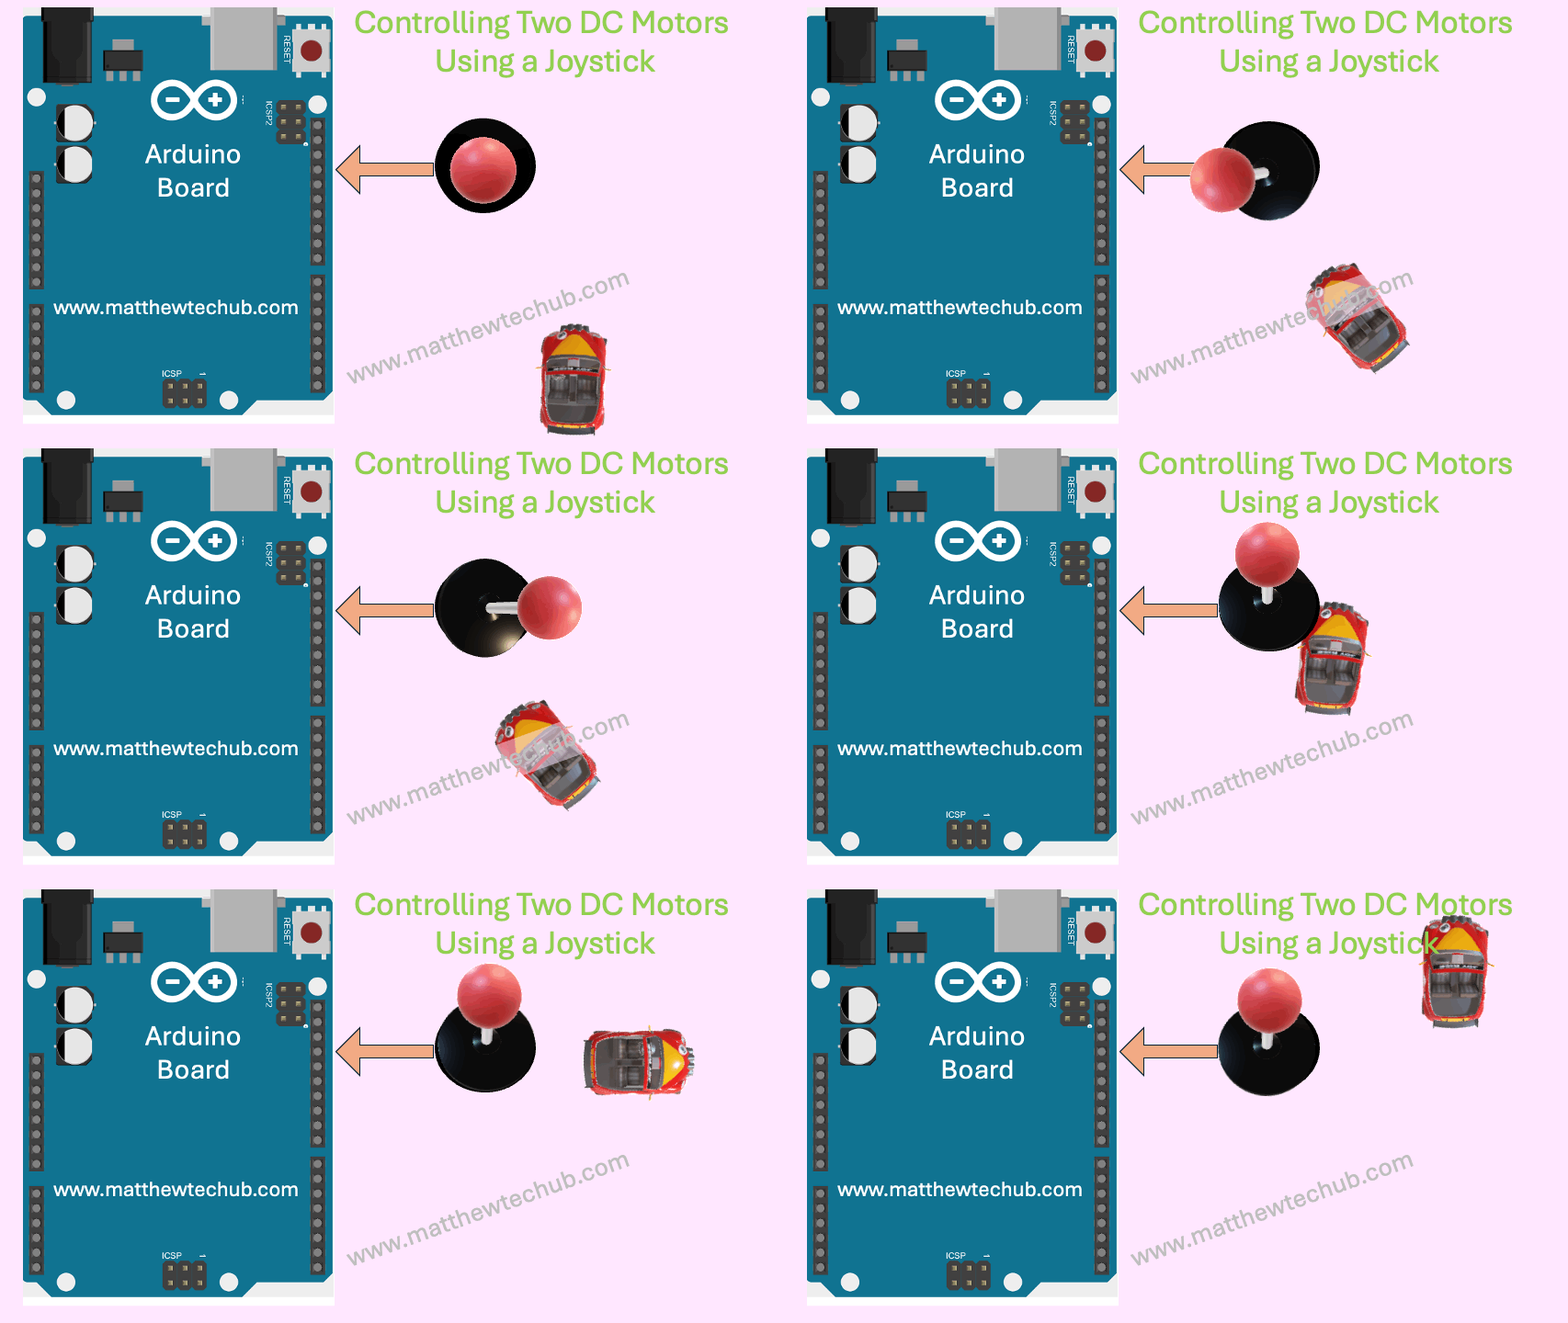
In this project, we’ll demonstrate how to control the speed and direction of two DC motors using an L298N motor driver module and a joystick, mimicking the control system found in electric cars.
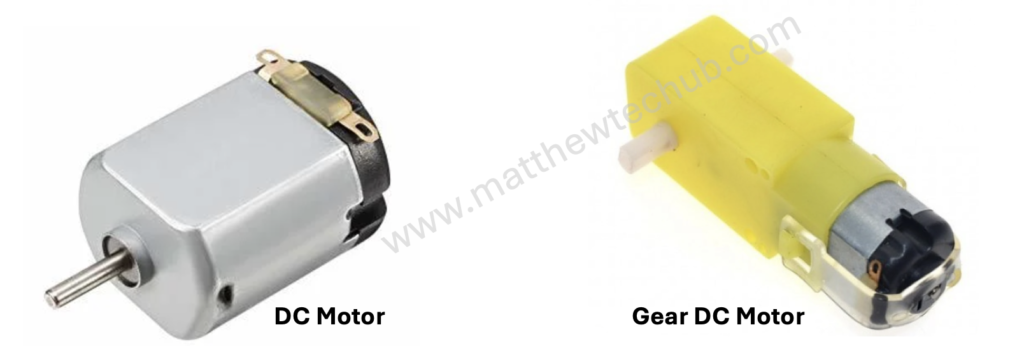
DC Motor
A DC motor is a device that turns electrical energy into mechanical motion. When you run electricity through the motor, it creates a magnetic field that makes a part of the motor spin. This spinning motion is what powers things like fans, toys, and even electric cars.
The direction of motion in a DC motor is determined by the direction of the electrical current flowing through the motor’s windings. Changing the polarity of the voltage applied to the motor (i.e., swapping the positive and negative connections) will reverse the direction of the current flowing through the motor’s windings.
The speed of a DC motor is directly proportional to the applied voltage. Increasing the voltage increases the motor speed, while decreasing the voltage reduces the motor speed.
Geared DC motors are commonly used in many applications. The gear reduction in these motors allows for lower output speeds while maintaining high torque. This is essential for applications that require precise and controlled movements, such as robotics, conveyor belts, and automated machinery.
L298N
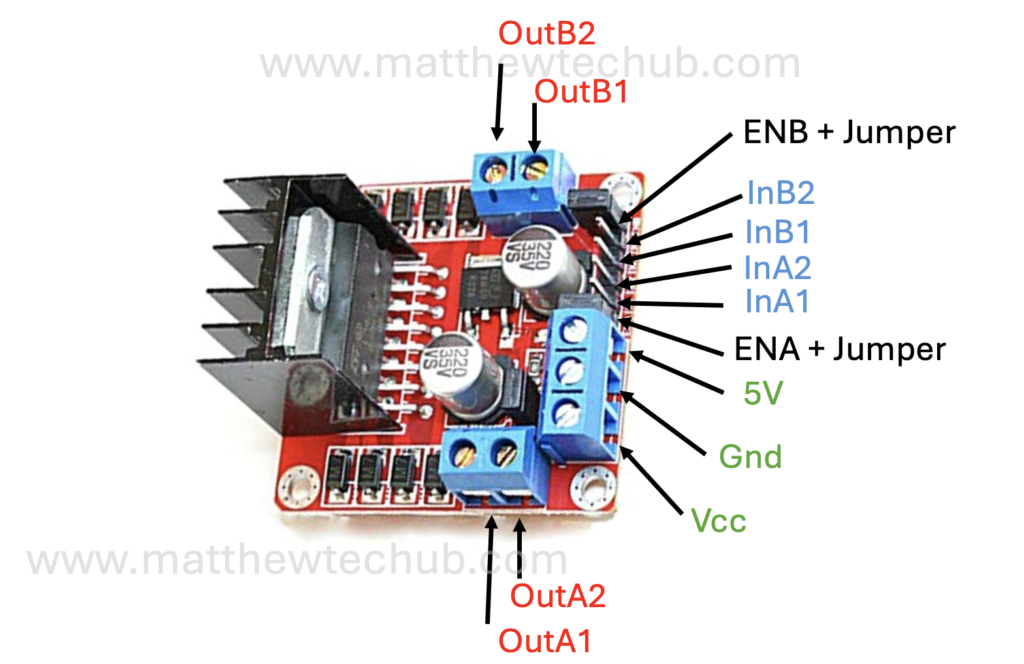
The L298N is a popular dual H-bridge motor driver integrated circuit (IC) that allows you to control the speed and direction of two DC motors or control one stepper motor.
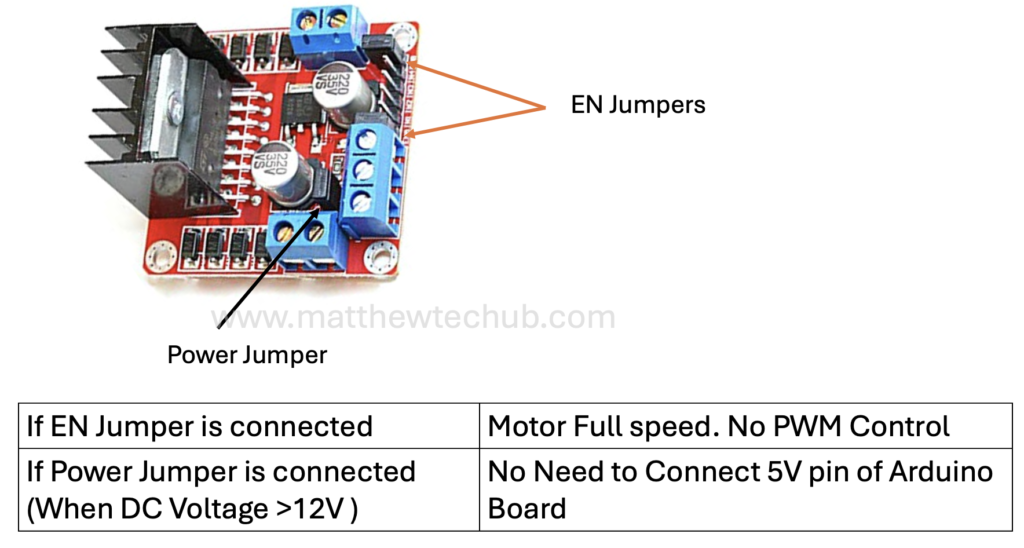
Jumpers in L298N Motor Driver Module
Understanding the jumpers on the L298N motor driver module is crucial for proper configuration and use. Whether you’re running motors at full speed or controlling their speed with PWM, setting the jumpers correctly is key to achieving desired functionality.
Basics of a Joystick
A joystick is an input device commonly used to control video games and robotic systems. It consists of a handle that pivots on two axes (X and Y) and often includes a button switch.
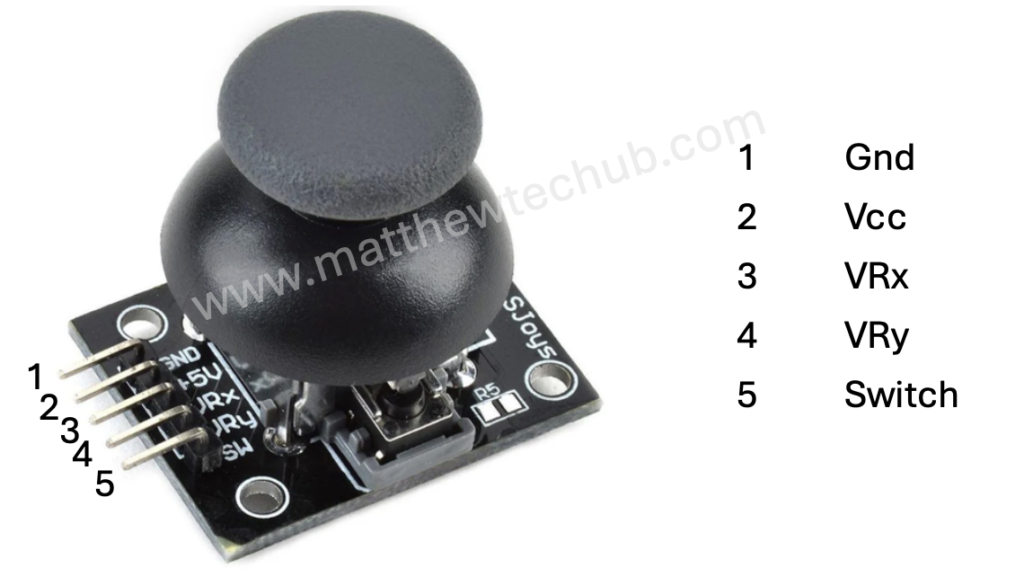
Components of a Joystick
- X-axis and Y-axis Potentiometers:
- These measure the position of the joystick handle along the horizontal (X) and vertical (Y) axes.
- Each potentiometer is essentially a variable resistor whose resistance changes as you move the joystick.
- The changing resistance alters the voltage at the analog output pins of the joystick, which can be read by an analog-to-digital converter (ADC) in a microcontroller.
- Button:
- Many joysticks include a button that can be pressed when the joystick is pushed down.
- This button typically provides a digital output: HIGH when not pressed and LOW when pressed.
Analog Outputs (X and Y axes):
- When the joystick is centered, both potentiometers typically output a voltage that is half of the supply voltage (e.g., 2.5V if powered by 5V).
- Moving the joystick handle changes these voltages. Moving it to one extreme of an axis will give a high voltage (near the supply voltage), and moving it to the other extreme will give a low voltage (near ground).
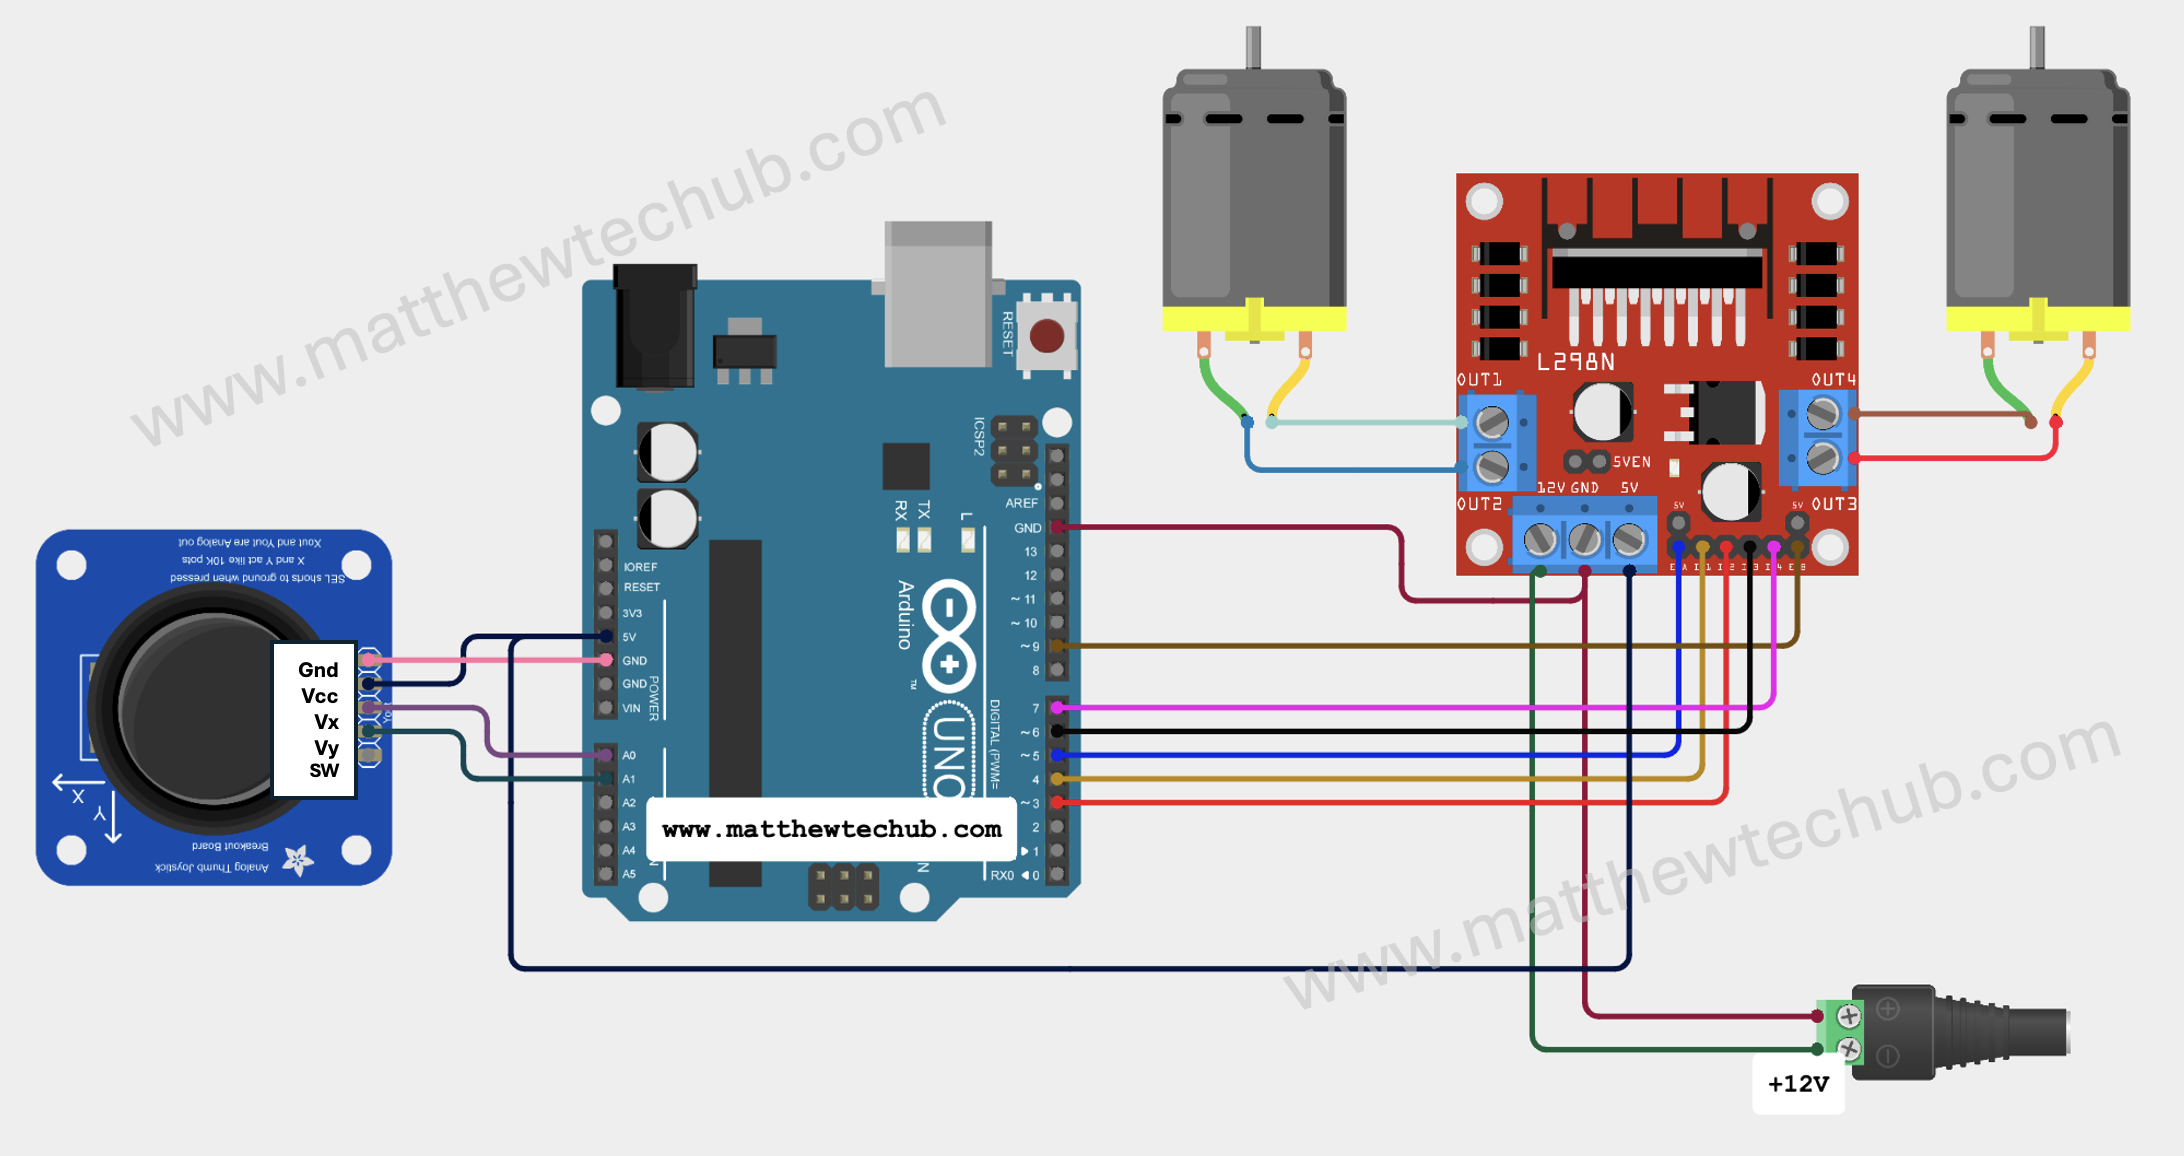
Circuit Wiring
- When the joystick is in the central position, the motors stop.
- When the joystick is moved upward, both motors rotate in the forward direction, and the speed of rotation is determined by the position of the joystick.
- When the joystick is moved downward, both motors rotate in the backward direction, and the speed of rotation is determined by the position of the joystick.
- When the joystick moves left direction, the first motor rotates in forward direction and the second motor rotates in backward direction.
- when the joystick moves to right position, the first motor rotates in the backward direction and the second motor rotates in the forward direction.
- Connect the circuit and upload the program, then place the setup in a toy car kit. Attach the motors to the front wheels of the car, while the back wheels remain free to rotate. Moving the joystick upward or downward will make the car move in the corresponding direction.
Program Code
// www.matthewtechub.com
// Electric Car
// Motor A connections
const int motorA1 = 3;  // IN1
const int motorA2 = 4;  // IN2
const int pwmA = 5;     // ENA

// Motor B connections
const int motorB1 = 6;  // IN3
const int motorB2 = 7;  // IN4
const int pwmB = 9;     // ENB

// Joystick connections
const int joyX = A0;    // X-axis
const int joyY = A1;    // Y-axis

// Joystick threshold to avoid deadzone issues
const int deadZone = 50;  // Adjust this value as needed
const int maxSpeed = 255; // Maximum speed for PWM

void setup() {
  // Set motor pins as outputs
  pinMode(motorA1, OUTPUT);
  pinMode(motorA2, OUTPUT);
  pinMode(pwmA, OUTPUT);
  pinMode(motorB1, OUTPUT);
  pinMode(motorB2, OUTPUT);
  pinMode(pwmB, OUTPUT);

  // Initialize serial communication for debugging
  Serial.begin(9600);
}

void loop() {
  // Read joystick values
  int xValue = analogRead(joyX);
  int yValue = analogRead(joyY);

  // Map joystick values from 0-1023 to -255 to 255
  int xSpeed = map(xValue, 0, 1023, -maxSpeed, maxSpeed);
  int ySpeed = map(yValue, 0, 1023, -maxSpeed, maxSpeed);

  // Calculate speeds for each motor
  int motorASpeed = 0;
  int motorBSpeed = 0;

  if (ySpeed > deadZone) {
    // Move forward
    motorASpeed = ySpeed;
    motorBSpeed = ySpeed;
    analogWrite(pwmA, motorASpeed);
    analogWrite(pwmB, motorBSpeed);
    digitalWrite(motorA1, HIGH);
    digitalWrite(motorA2, LOW);
    digitalWrite(motorB1, HIGH);
    digitalWrite(motorB2, LOW);
  } else if (ySpeed < -deadZone) {
    // Move backward
    motorASpeed = -ySpeed;
    motorBSpeed = -ySpeed;
    analogWrite(pwmA, motorASpeed);
    analogWrite(pwmB, motorBSpeed);
    digitalWrite(motorA1, LOW);
    digitalWrite(motorA2, HIGH);
    digitalWrite(motorB1, LOW);
    digitalWrite(motorB2, HIGH);
  } else if (xSpeed > deadZone) {
    // Turn right
    motorASpeed = maxSpeed;
    motorBSpeed = maxSpeed;
    analogWrite(pwmA, motorASpeed);
    analogWrite(pwmB, motorBSpeed);
    digitalWrite(motorA1, LOW);
    digitalWrite(motorA2, HIGH);
    digitalWrite(motorB1, HIGH);
    digitalWrite(motorB2, LOW);
  } else if (xSpeed < -deadZone) {
    // Turn left
    motorASpeed = maxSpeed;
    motorBSpeed = maxSpeed;
    analogWrite(pwmA, motorASpeed);
    analogWrite(pwmB, motorBSpeed);
    digitalWrite(motorA1, HIGH);
    digitalWrite(motorA2, LOW);
    digitalWrite(motorB1, LOW);
    digitalWrite(motorB2, HIGH);
  } else {
    // Stop motors
    analogWrite(pwmA, 0);
    analogWrite(pwmB, 0);
    digitalWrite(motorA1, LOW);
    digitalWrite(motorA2, LOW);
    digitalWrite(motorB1, LOW);
    digitalWrite(motorB2, LOW);
  }

  // Print joystick values for debugging
  Serial.print("X: ");
  Serial.print(xValue);
  Serial.print(" Y: ");
  Serial.println(yValue);

  delay(50); // Adjust delay as needed
}
This code allows for controlling two DC motors using a joystick. The motors can move forward, backward, and turn left or right based on the joystick’s position. The speed and direction of the motors are adjusted according to the analog readings from the joystick, and a dead zone is implemented to avoid minor joystick movements causing unintended motor actions.
Code Explanation
// Motor A connections
const int motorA1 = 3;  // IN1
const int motorA2 = 4;  // IN2
const int pwmA = 5;     // ENA

// Motor B connections
const int motorB1 = 6;  // IN3
const int motorB2 = 7;  // IN4
const int pwmB = 9;     // ENB

// Joystick connections
const int joyX = A0;    // X-axis
const int joyY = A1;    // Y-axis

// Joystick threshold to avoid deadzone issues
const int deadZone = 50;  // Adjust this value as needed
const int maxSpeed = 255; // Maximum speed for PWM
Motor A connections: `motorA1` and `motorA2` are the control pins for Motor A, and `pwmA` is the PWM (pulse-width modulation) pin used to control the speed.
Motor B connections: `motorB1` and `motorB2` are the control pins for Motor B, and `pwmB` is the PWM pin used to control the speed.
Joystick connections: `joyX` and `joyY` are the analog input pins connected to the X and Y axes of the joystick.
Joystick threshold (`deadZone`): This value helps to filter out small movements or noise around the joystick’s center position.
Maximum speed (`maxSpeed`): The highest value for PWM, which is 255. PWM values range from 0 (motor off) to 255 (motor at full speed).
Setup Function
void setup() {
  // Set motor pins as outputs
  pinMode(motorA1, OUTPUT);
  pinMode(motorA2, OUTPUT);
  pinMode(pwmA, OUTPUT);
  pinMode(motorB1, OUTPUT);
  pinMode(motorB2, OUTPUT);
  pinMode(pwmB, OUTPUT);

  // Initialize serial communication for debugging
  Serial.begin(9600);
}
pinMode: This function sets the specified pins as OUTPUT, meaning they will be used to send signals to the motors.
Serial.begin(9600): Initializes serial communication at a baud rate of 9600. This is used for debugging to monitor joystick values via the Serial Monitor.
Main Loop Function
The `loop` function runs repeatedly, reading joystick values and controlling the motors accordingly.
void loop() {
  // Read joystick values
  int xValue = analogRead(joyX);
int yValue = analogRead(joyY);analogRead: Reads the analog values from the joystick axes. These values range from 0 to 1023.
  // Map joystick values from 0-1023 to -255 to 255
  int xSpeed = map(xValue, 0, 1023, -maxSpeed, maxSpeed);
  int ySpeed = map(yValue, 0, 1023, -maxSpeed, maxSpeed);
map: This function converts the joystick values from their original range (0 to 1023) to a range suitable for motor control (-255 to 255).
  // Calculate speeds for each motor
  int motorASpeed = 0;
  int motorBSpeed = 0;
motorASpeed and motorBSpeed: Variables to store the calculated speed for each motor.
Movement Logic :
Moving Forward
  if (ySpeed > deadZone) {
    // Move forward
    motorASpeed = ySpeed;
    motorBSpeed = ySpeed;
    analogWrite(pwmA, motorASpeed);
    analogWrite(pwmB, motorBSpeed);
    digitalWrite(motorA1, HIGH);
    digitalWrite(motorA2, LOW);
    digitalWrite(motorB1, HIGH);
    digitalWrite(motorB2, LOW);
  }
- If the joystick is pushed forward (ySpeed > deadZone), both motors move forward.
- `analogWrite(pwmA, motorASpeed)` and `analogWrite(pwmB, motorBSpeed)` set the PWM speed for both motors.
- `digitalWrite(motorA1, HIGH); digitalWrite(motorA2, LOW);` and similar for Motor B set the motor direction to forward.
Moving Backward
  else if (ySpeed < -deadZone) {
    // Move backward
    motorASpeed = -ySpeed;
    motorBSpeed = -ySpeed;
    analogWrite(pwmA, motorASpeed);
    analogWrite(pwmB, motorBSpeed);
    digitalWrite(motorA1, LOW);
    digitalWrite(motorA2, HIGH);
    digitalWrite(motorB1, LOW);
    digitalWrite(motorB2, HIGH);
  }
- If the joystick is pulled backward (ySpeed < -deadZone), both motors move backward.
- Speed is set similarly, but the direction is reversed by setting the opposite control pins high and low.
Turning Right
  else if (xSpeed > deadZone) {
    // Turn right
    motorASpeed = maxSpeed;
    motorBSpeed = maxSpeed;
    analogWrite(pwmA, motorASpeed);
    analogWrite(pwmB, motorBSpeed);
    digitalWrite(motorA1, LOW);
    digitalWrite(motorA2, HIGH);
    digitalWrite(motorB1, HIGH);
    digitalWrite(motorB2, LOW);
  }
- If the joystick is pushed to the right (xSpeed > deadZone), the vehicle turns right.
- One motor runs forward while the other runs backward to achieve a turn.
Turning Left
  else if (xSpeed < -deadZone) {
    // Turn left
    motorASpeed = maxSpeed;
    motorBSpeed = maxSpeed;
    analogWrite(pwmA, motorASpeed);
    analogWrite(pwmB, motorBSpeed);
    digitalWrite(motorA1, HIGH);
    digitalWrite(motorA2, LOW);
    digitalWrite(motorB1, LOW);
    digitalWrite(motorB2, HIGH);
}- If the joystick is pushed to the left (xSpeed < -deadZone), the vehicle turns left.
- The motors are controlled similarly to turning right but in the opposite direction.
Stopping the Motors
  else {
    // Stop motors
    analogWrite(pwmA, 0);
    analogWrite(pwmB, 0);
    digitalWrite(motorA1, LOW);
    digitalWrite(motorA2, LOW);
    digitalWrite(motorB1, LOW);
    digitalWrite(motorB2, LOW);
}- If the joystick is in the dead zone (close to the center), the motors stop.
Debugging
  // Print joystick values for debugging
  Serial.print("X: ");
  Serial.print(xValue);
  Serial.print(" Y: ");
Serial.println(yValue);- Prints the joystick values to the Serial Monitor for debugging purposes.
Delay
  delay(50); // Adjust delay as needed
}- Adds a short delay (50 milliseconds) at the end of the loop to control the loop’s iteration speed and ensure smoother motor control.
