About The Project
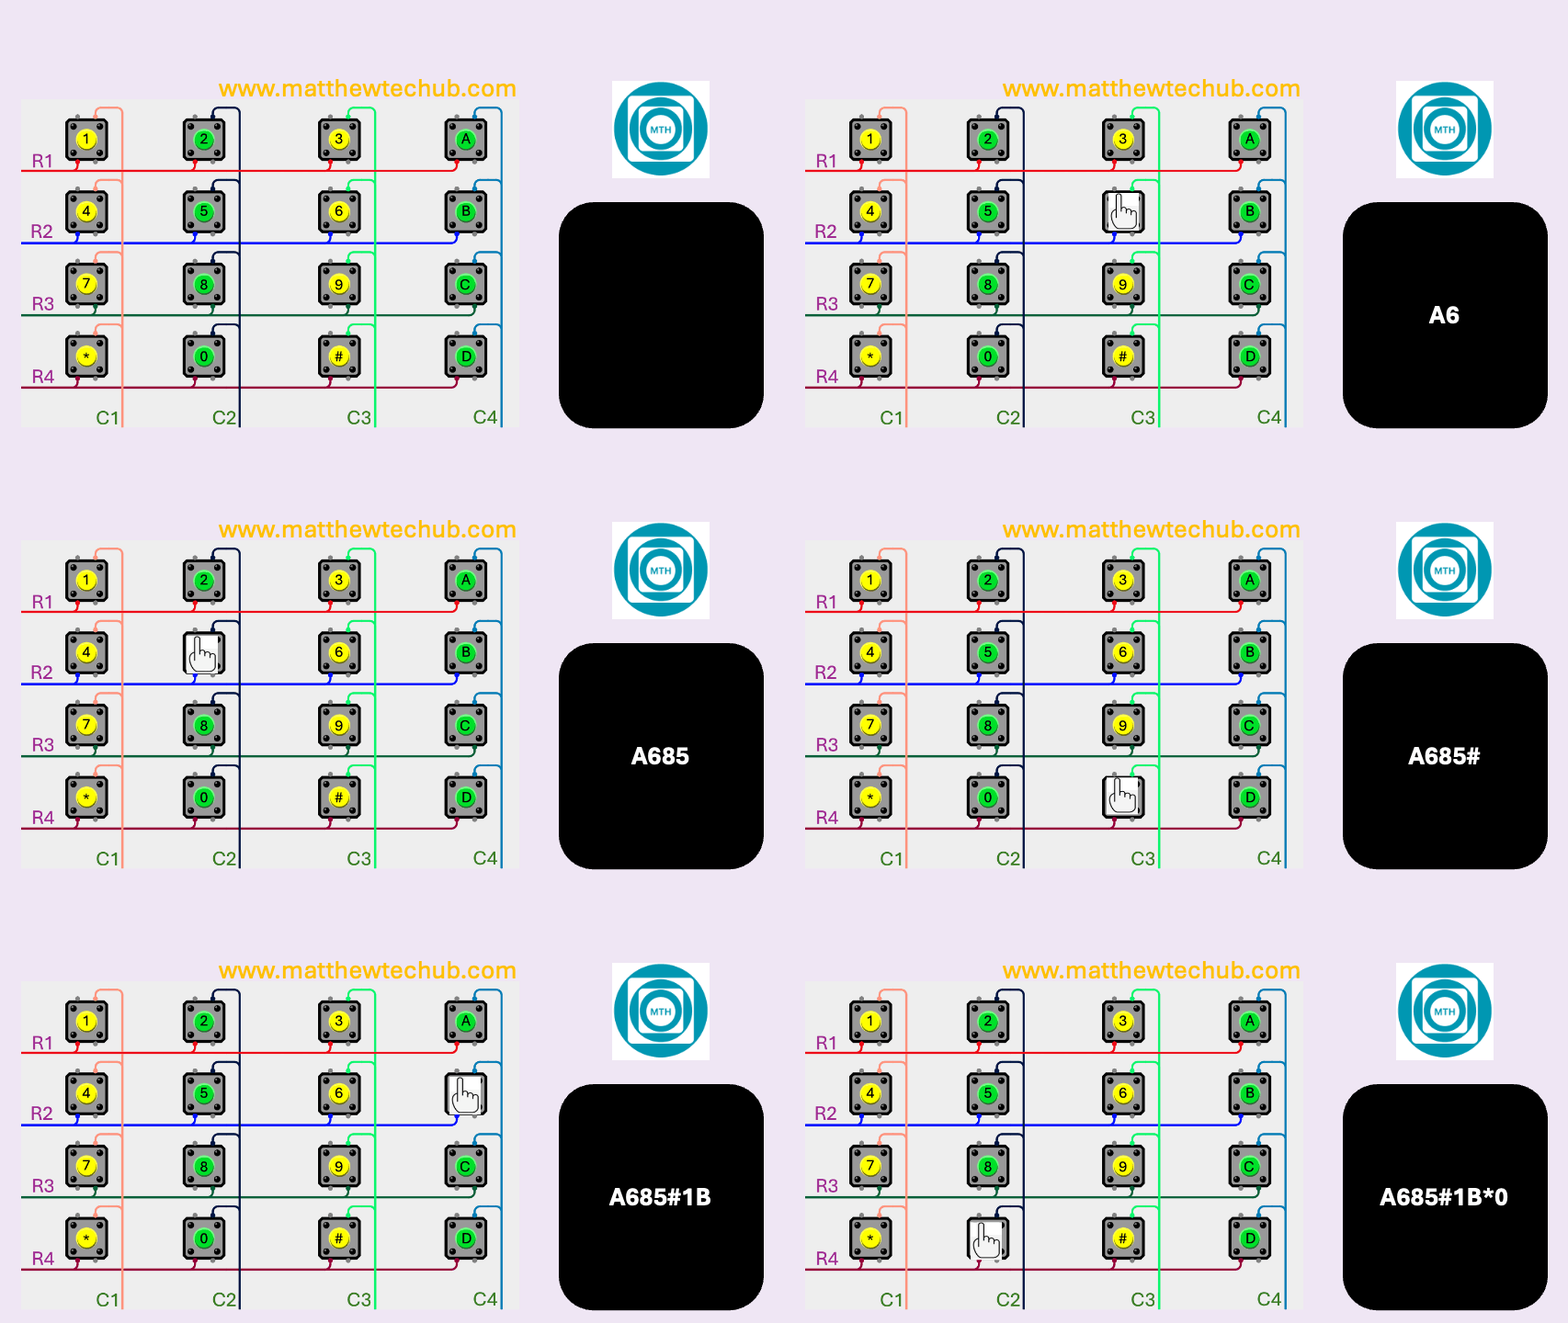
In this work, we will learn how to interface a 4×4 matrix keypad with an Arduino Uno board. When a key is pressed on the keypad, the corresponding number or letter will be displayed on the serial monitor
Keypad
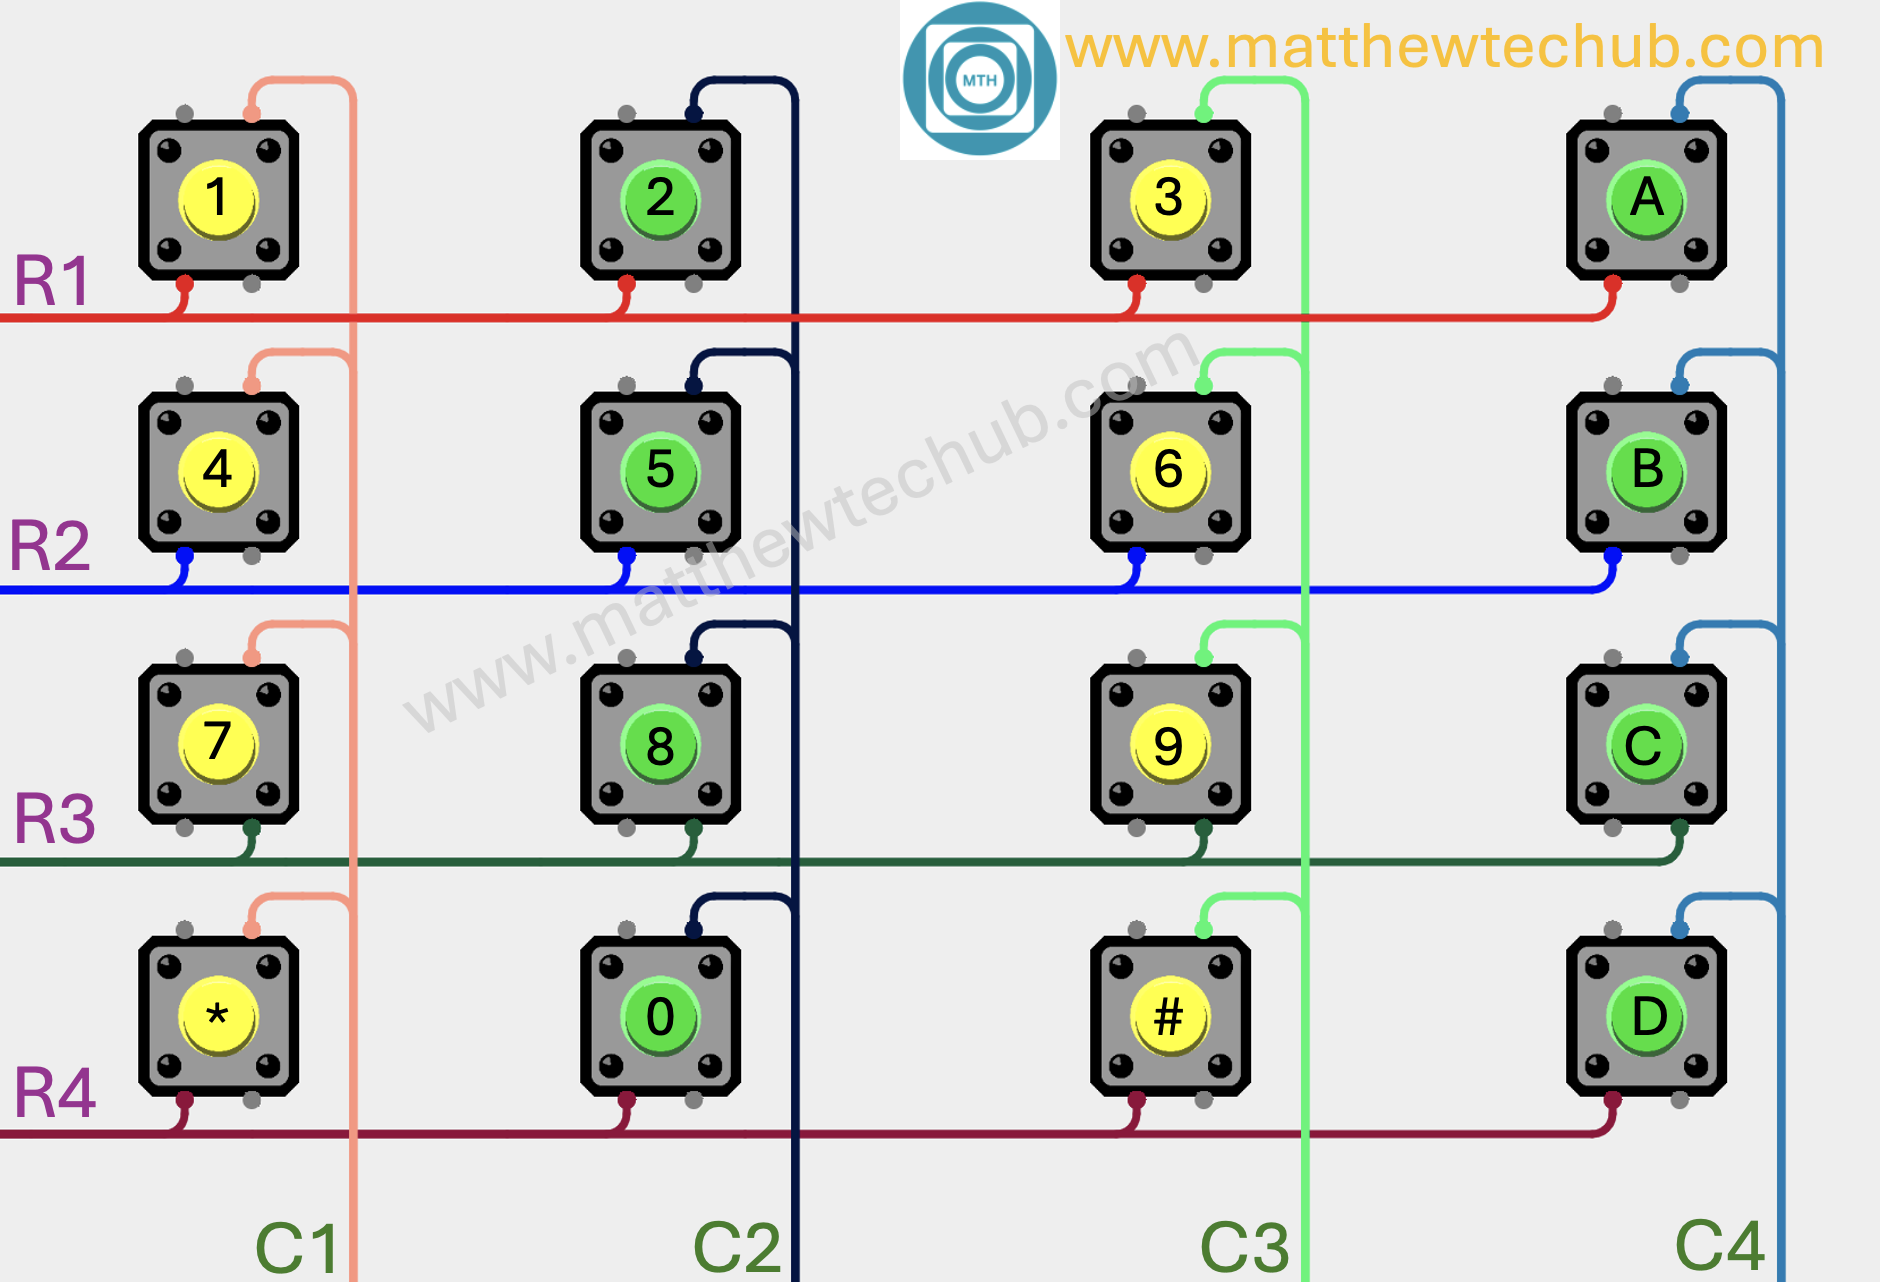
A basic keypad consists of button switches arranged in a matrix of rows and columns. When a key is pressed, it creates a connection between a specific row and column, which the microcontroller detects to determine which key was pressed.
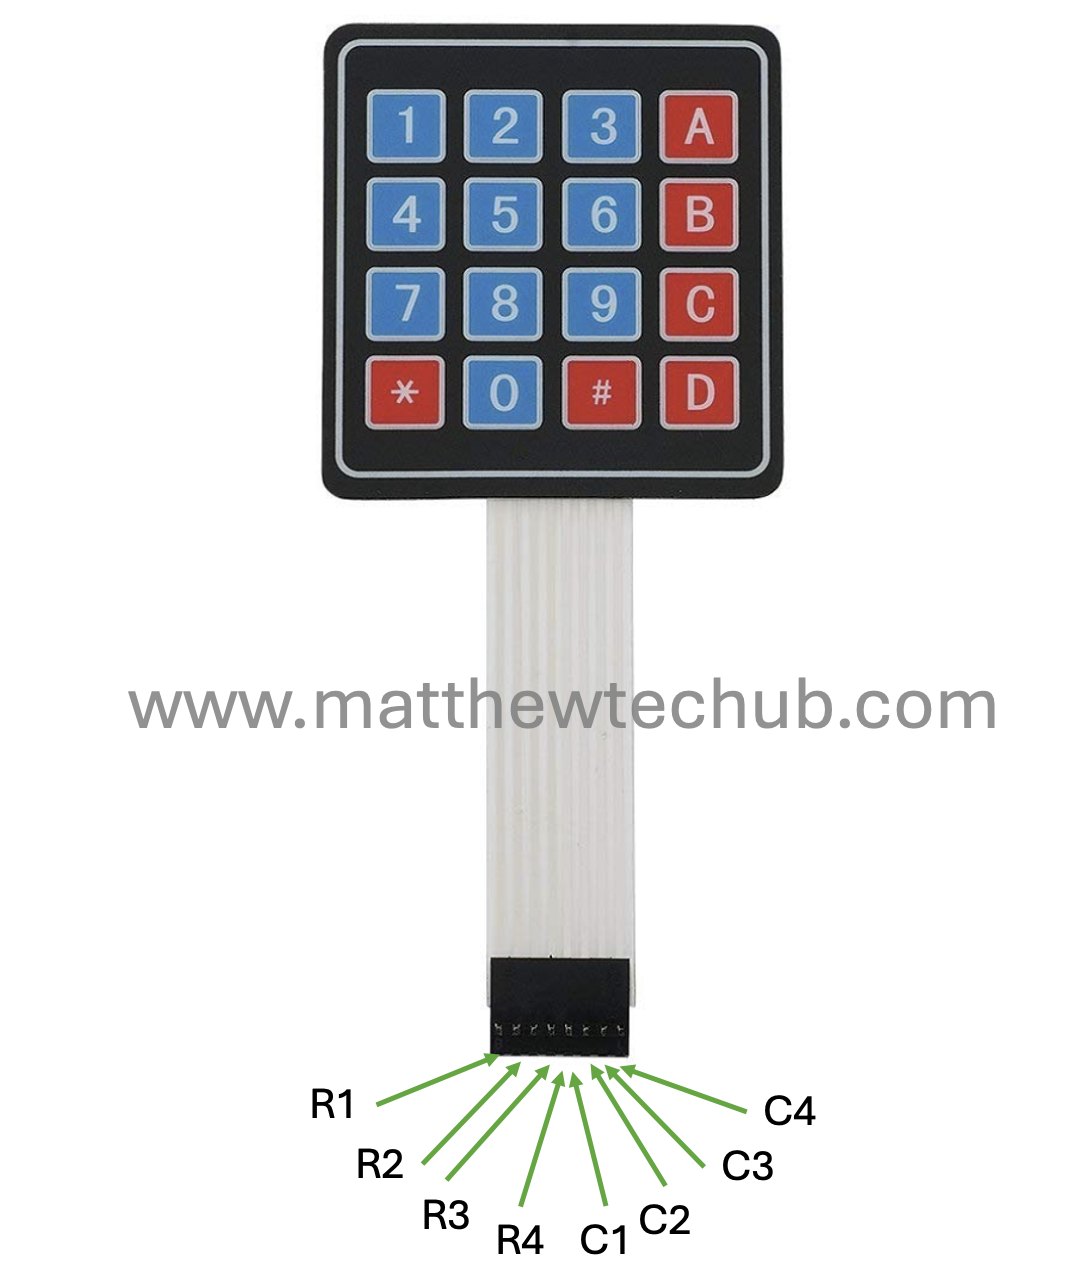
4X4 membrane keypad
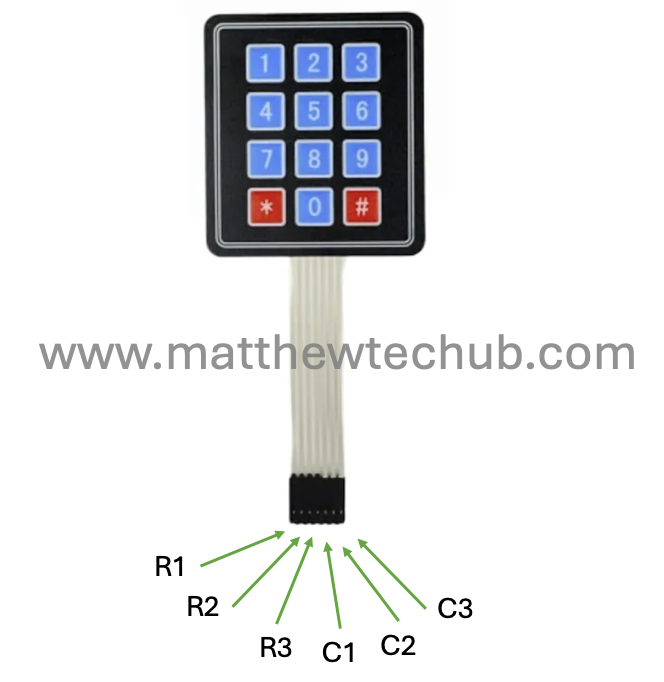
4X3 membrane keypad
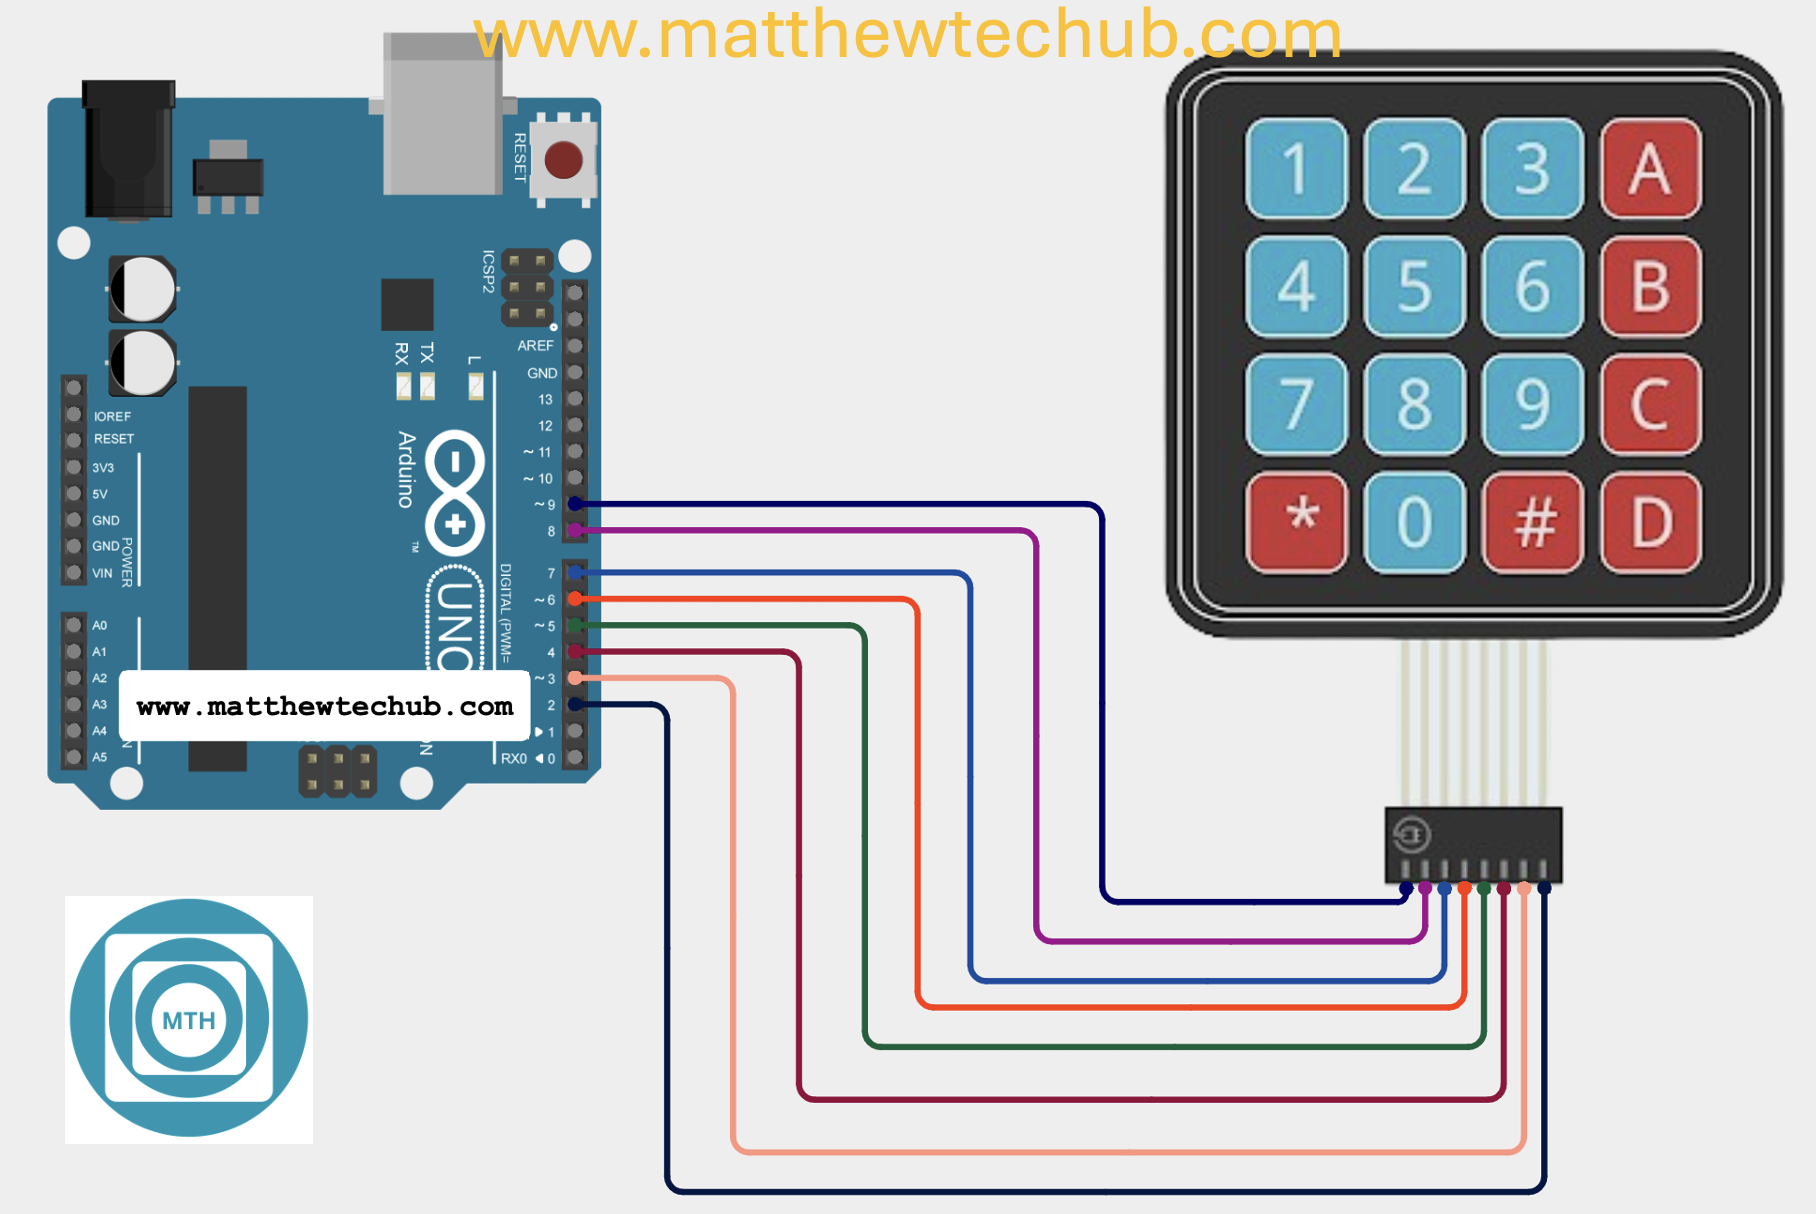
Circuit Wiring
Installation of Keypad Library
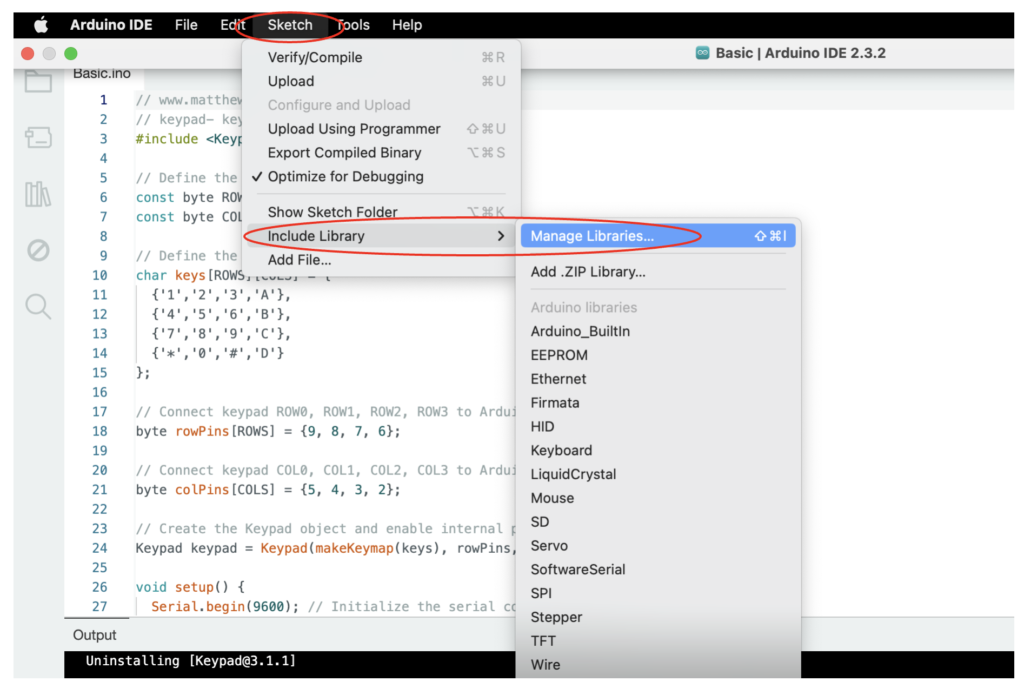
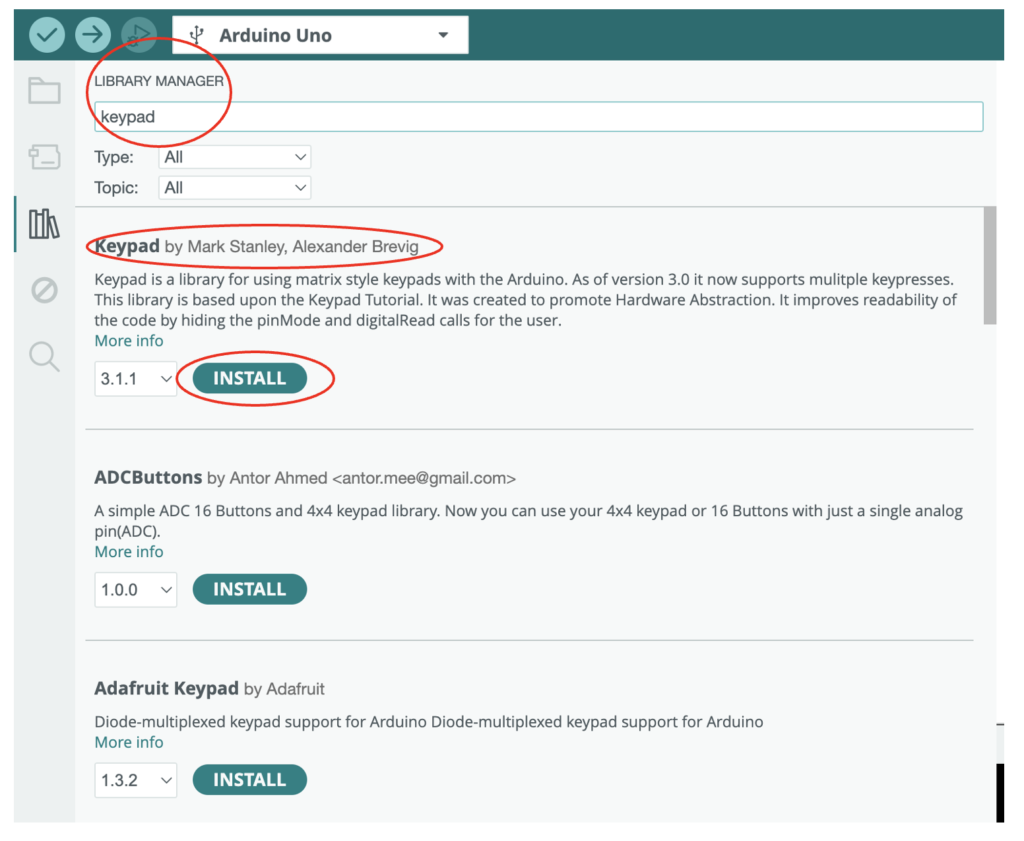
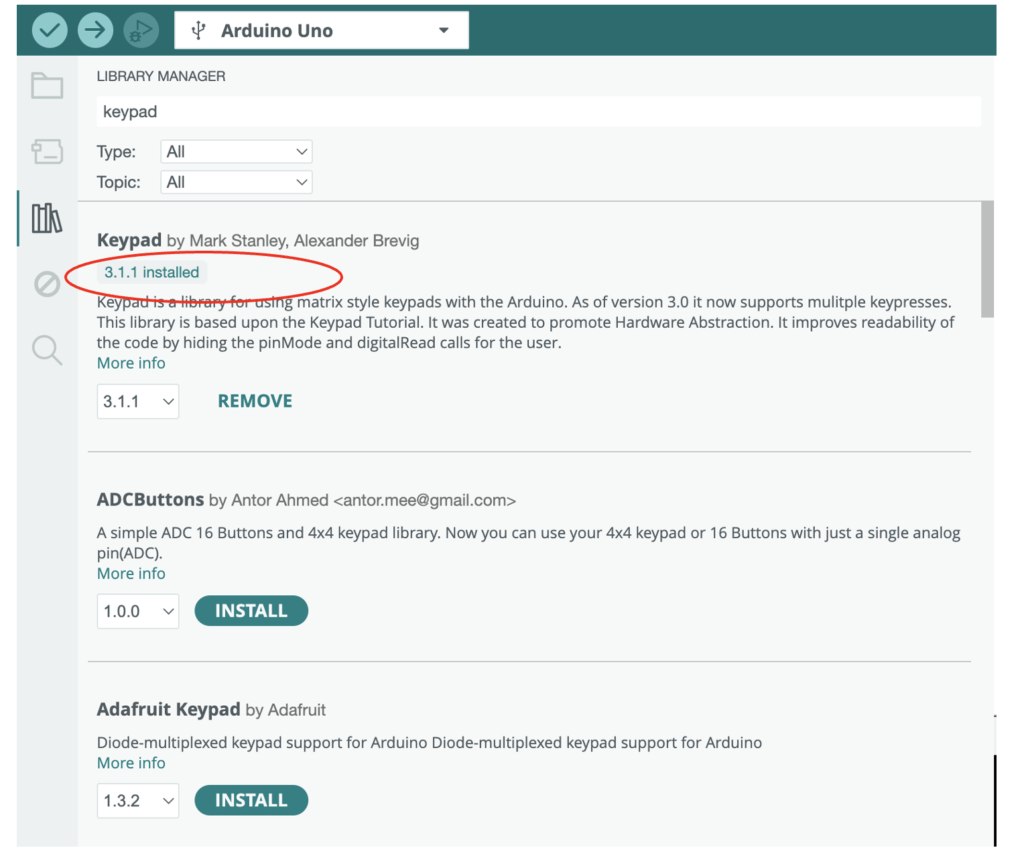
Before uploading the program to the Arduino board, we need to install the Keypad library and include the corresponding header file in the program. The screenshot below illustrates this process.
- Click on the Sketch menu at the top.
- Select Include Library from the dropdown menu.
- Click on Manage Libraries at the top of the list. This will open the Library Manager.
- In the Library Manager window, there is a search bar in the upper right corner.
- Type Keypad in the search bar and press Enter.
- Look for the library named “Keypad by Mark Stanley, Alexander Brevig”.
- Click on the “Install” button next to the library. The installation process will start.
Program Code
// www.matthewtechub.com
// keypad basic
#include <Keypad.h>

// Define the number of rows and columns in the keypad
const byte ROWS = 4;
const byte COLS = 4;

// Define the symbols on the keys of the keypad
char keys[ROWS][COLS] = {
  {'1','2','3','A'},
  {'4','5','6','B'},
  {'7','8','9','C'},
  {'*','0','#','D'}
};

// Connect keypad ROW0, ROW1, ROW2, ROW3 to these Arduino pins
byte rowPins[ROWS] = {9, 8, 7, 6};

// Connect keypad COL0, COL1, COL2, COL3 to these Arduino pins
byte colPins[COLS] = {5, 4, 3, 2};

// Create the Keypad object
Keypad keypad = Keypad(makeKeymap(keys), rowPins, colPins, ROWS, COLS);

void setup() {
  Serial.begin(9600); // Start serial communication
  Serial.println("Press a key on the keypad:");
}

void loop() {
  char key = keypad.getKey(); // Get the key pressed

  if (key) { // If a key is pressed
    Serial.print("Key pressed: ");
    Serial.println(key); // Display the key on the Serial Monitor
  }
}- The code initializes a 4×4 matrix keypad and waits for you to press a key.
- When a key is pressed, the code identifies which key it is and prints the corresponding character to the Serial Monitor.
- This basic program allows you to test the connection between the Arduino and the keypad, and it provides a way to see which key is being pressed.
Code Explanation
#include <Keypad.h>- This line includes the `Keypad` library, which is necessary for interfacing with matrix keypads. The library provides the functions and definitions needed to easily work with the keypad.
const byte ROWS = 4;
const byte COLS = 4;- `ROWS` and `COLS` define the number of rows and columns in your 4×4 keypad. Since the keypad has 4 rows and 4 columns, both are set to 4.
( The byte data type uses only 8 bits (1 byte) of memory, which is the smallest standard data type in Arduino. This is more memory-efficient than using larger data types like int, which occupies 16 bits (2 bytes) or long, which occupies 32 bits (4 bytes).)
char keys[ROWS][COLS] = {
  {'1','2','3','A'},
  {'4','5','6','B'},
  {'7','8','9','C'},
  {'*','0','#','D'}
};- This 2D array represents the layout of your keypad. Each element corresponds to a key on the keypad. For example, if you press the button in the first row and first column, it will return `’1’`, while pressing the button in the third row and second column will return `’8’`.
byte rowPins[ROWS] = {9, 8, 7, 6};
byte colPins[COLS] = {5, 4, 3, 2};
- `rowPins` and `colPins` arrays define the Arduino pins that are connected to the rows and columns of the keypad.
- For instance, row 0 is connected to pin 9, row 1 to pin 8, and so on. Similarly, column 0 is connected to pin 5, column 1 to pin 4, and so on.
Keypad keypad = Keypad(makeKeymap(keys), rowPins, colPins, ROWS, COLS);- This line creates an instance of the `Keypad` object, named `keypad`.
- The `makeKeymap(keys)` function converts the 2D array into a format that the `Keypad` library can use.
- The `keypad` object now has all the information it needs to detect which key is pressed.
void setup() {
  Serial.begin(9600);
  Serial.println("Press a key on the keypad:");
}
- `Serial.begin(9600);` initializes serial communication at a baud rate of 9600 bits per second. This allows the Arduino to send data to your computer.
- `Serial.println(“Press a key on the keypad:”);` prints a message to the Serial Monitor, instructing you to press a key.
void loop() {
  char key = keypad.getKey(); // Get the key pressed

  if (key) { // If a key is pressed
    Serial.print("Key pressed: ");
    Serial.println(key); // Display the key on the Serial Monitor
  }
- `keypad.getKey();` checks if any key on the keypad is pressed. If a key is pressed, it returns the character associated with that key (e.g., `’1’`, `’A’`, `’#’`, etc.).
- The `if (key)` condition checks if a key was pressed. If true, it proceeds to the next steps.
- `Serial.print(“Key pressed: “);` prints the message “Key pressed: ” to the Serial Monitor.
- `Serial.println(key);` then prints the actual key that was pressed.
Try Yourself
Modify the circuit and program to interface with a 4×3 matrix keypad.
