About the Project
In this project, we will learn how to create a musical keyboard using a Keypad. Each key will produce its own unique tone when pressed.
Keypad
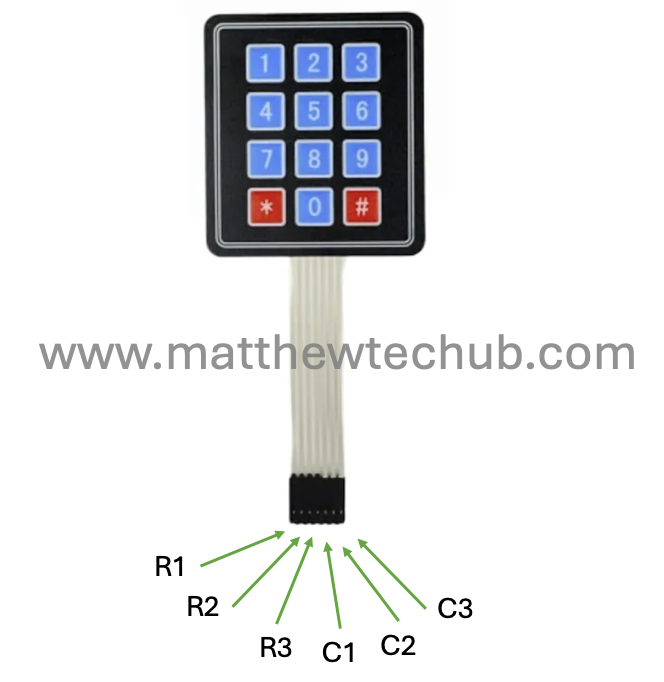
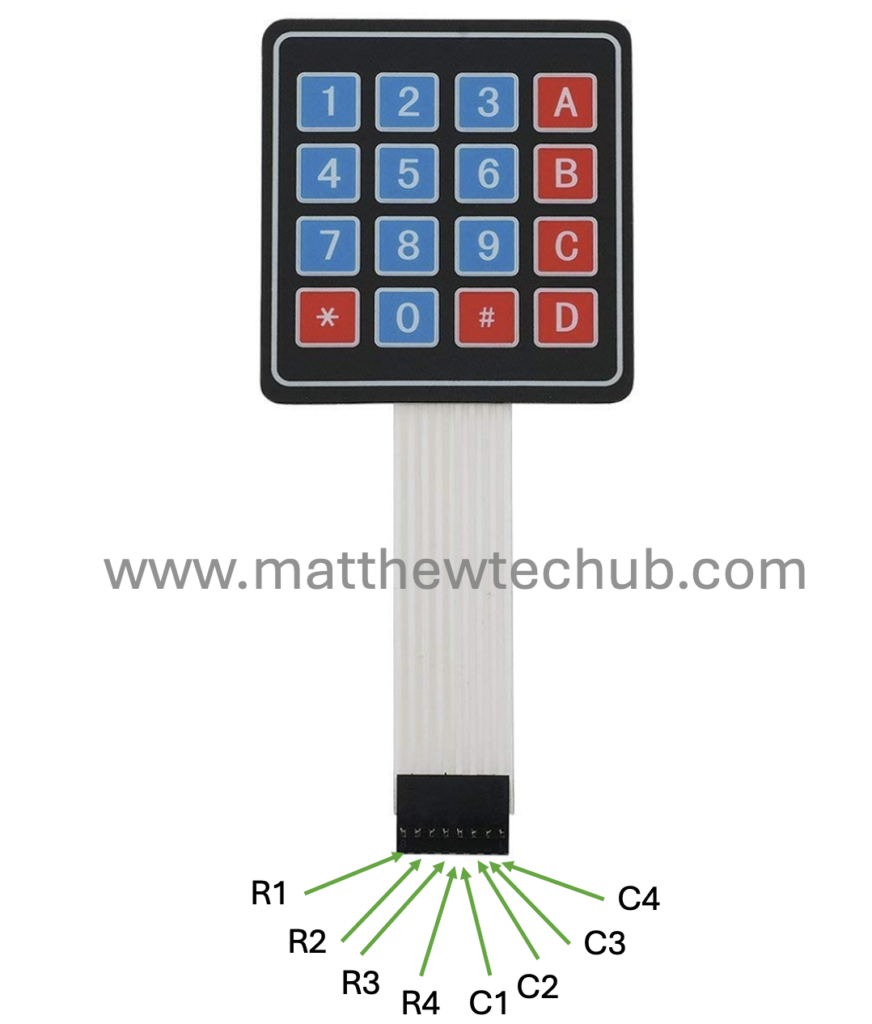
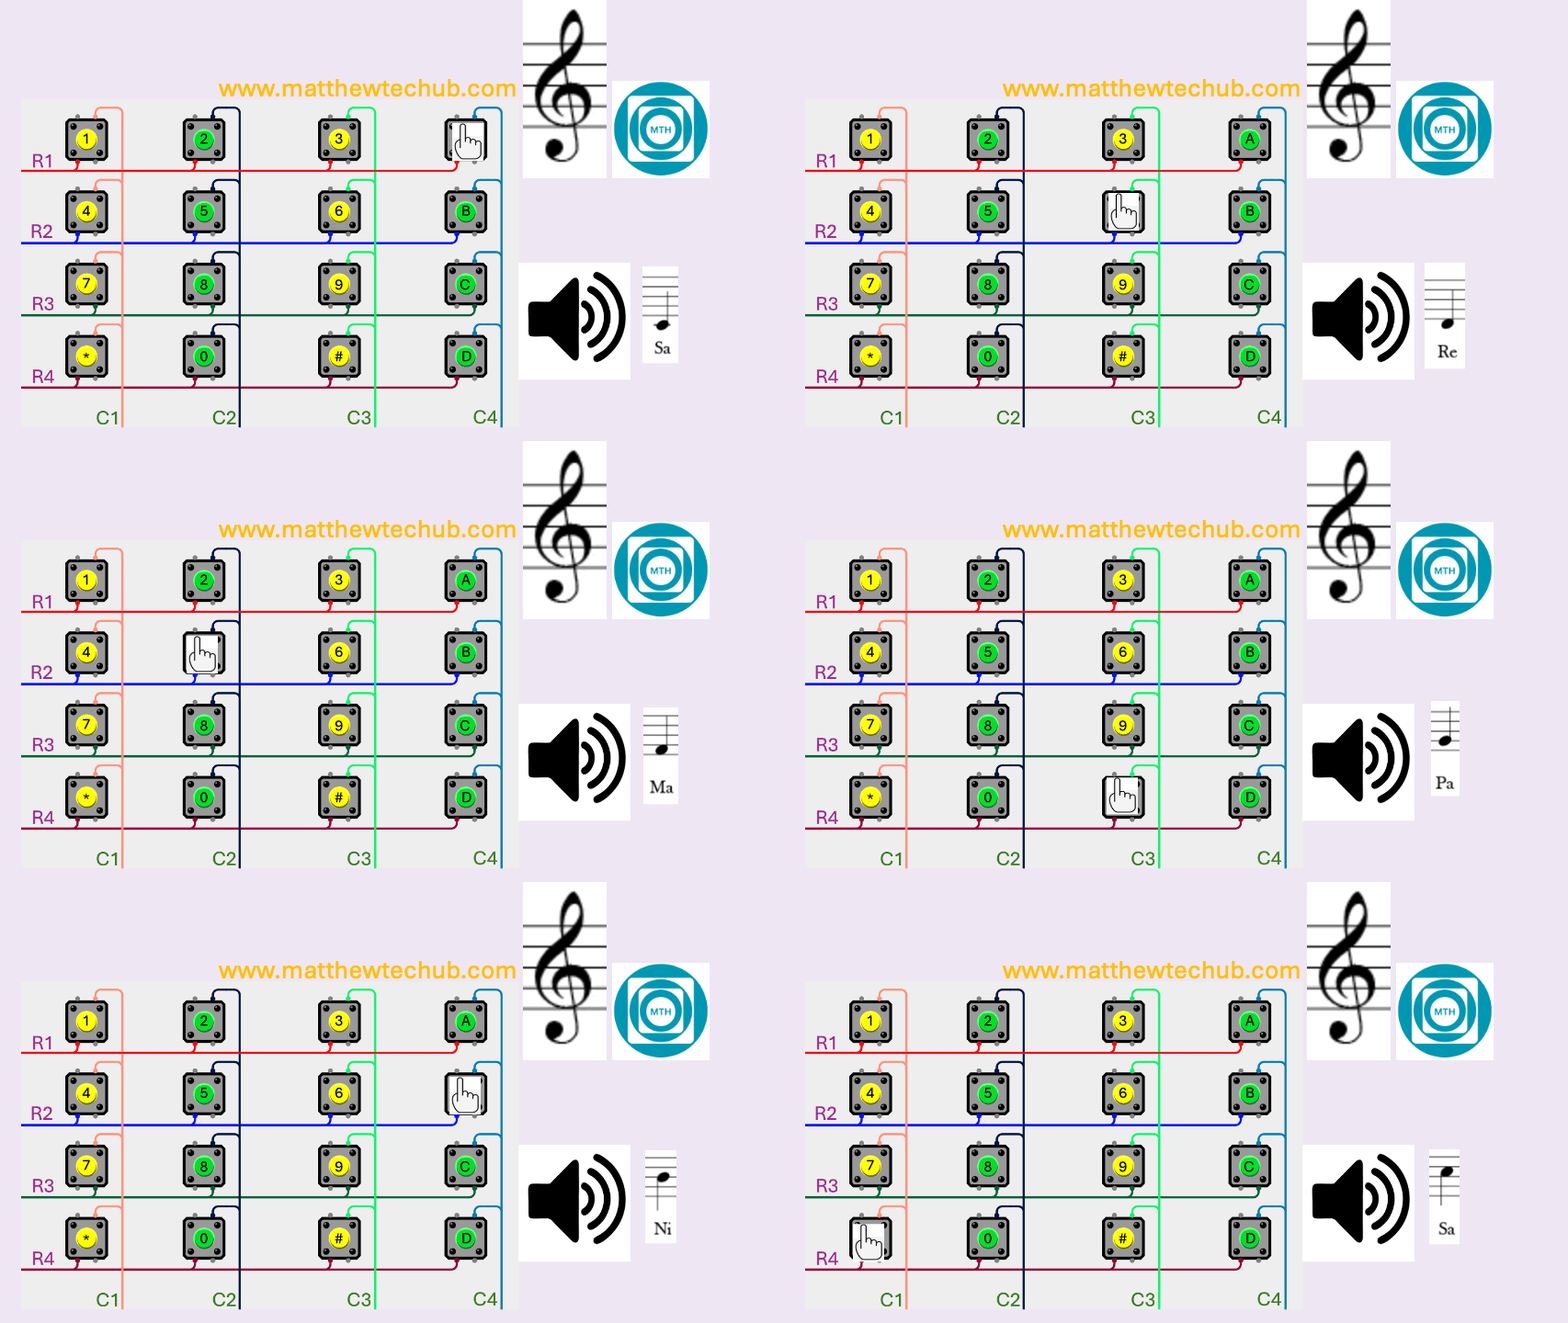
A basic keypad consists of button switches arranged in a matrix of rows and columns. When a key is pressed, it creates a connection between a specific row and column, which the microcontroller detects to determine which key was pressed.


Circuit Wiring
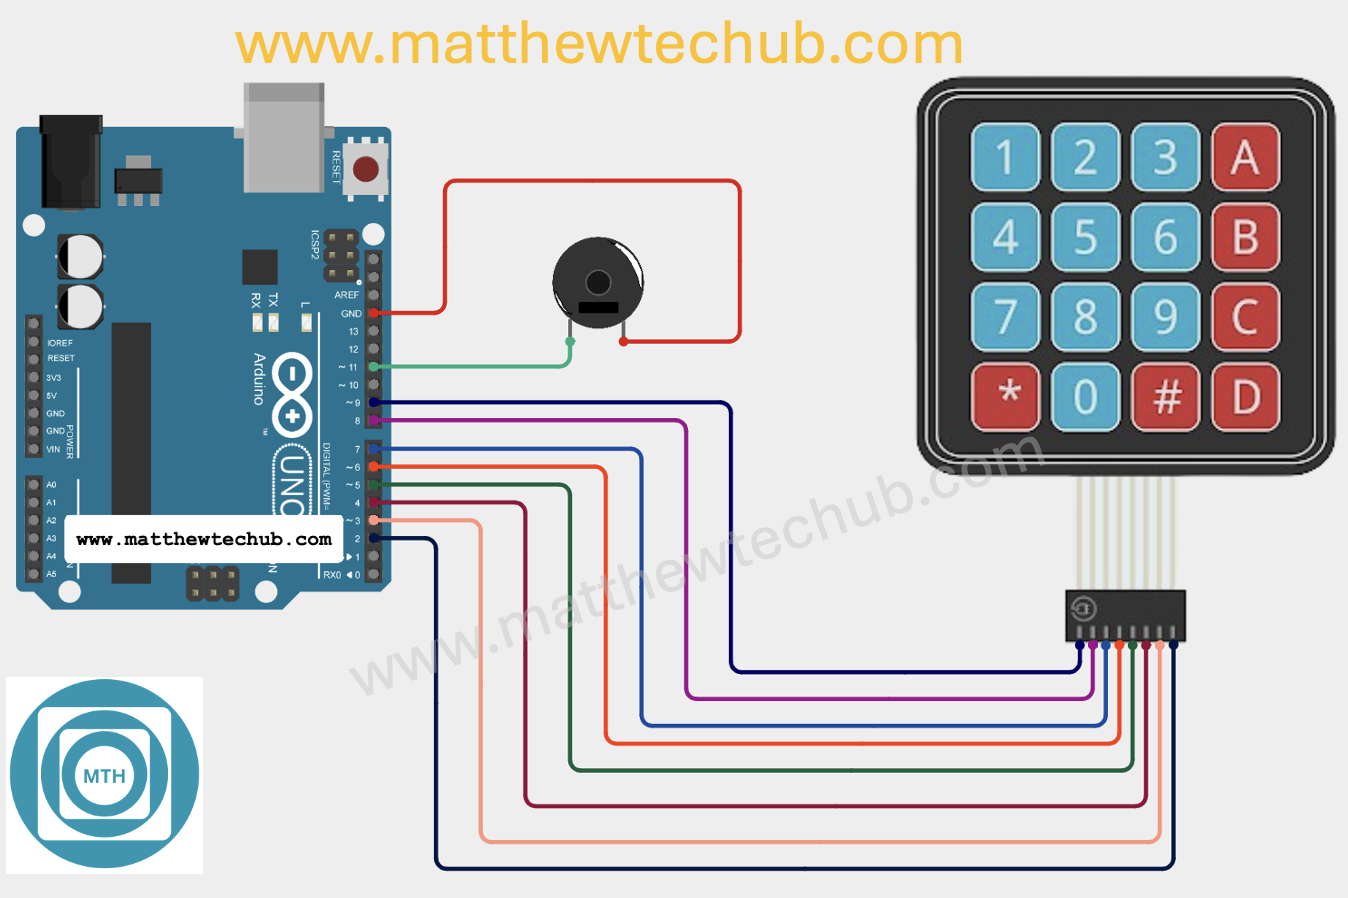
A musical keyboard using an Arduino, a 4×4 matrix keypad, and a buzzer. Each key on the keypad corresponds to a musical note or frequency, and when a key is pressed, the corresponding tone is played through the buzzer.
Installation of Keypad Library
Before uploading the program to the Arduino board, we need to install the Keypad library and include the corresponding header file in the program. The screenshot below illustrates this process.
- Click on the Sketch menu at the top.
- Select Include Library from the dropdown menu.
- Click on Manage Libraries… at the top of the list. This will open the Library Manager.
- In the Library Manager window, there is a search bar in the upper right corner.
- Type Keypad in the search bar and press Enter.
- Look for the library named “Keypad by Mark Stanley, Alexander Brevig”.
- Click on the “Install” button next to the library. The installation process will start.
- Once installed, you will see “INSTALLED” next to the Keypad library.
Program Code
// www.matthewtechub.com
// Musical Keyboard

#include <Keypad.h>

const byte ROWS = 4; // Four rows
const byte COLS = 4; // Four columns

char keys[ROWS][COLS] = {
  {'1','2','3','A'},
  {'4','5','6','B'},
  {'7','8','9','C'},
  {'*','0','#','D'}
};

byte rowPins[ROWS] = {9, 8, 7, 6}; // Connect to the row pins of the keypad
byte colPins[COLS] = {5, 4, 3, 2}; // Connect to the column pins of the keypad

Keypad keypad = Keypad(makeKeymap(keys), rowPins, colPins, ROWS, COLS);

const int buzzerPin = 11; // Pin connected to the buzzer

// Define tone frequencies for each key
const int keyTones[ROWS][COLS] = {
  {262, 294, 330, 349}, // Frequencies for keys '1', '2', '3', 'A'
  {392, 440, 466, 523}, // Frequencies for keys '4', '5', '6', 'B'
  {554, 587, 622, 659}, // Frequencies for keys '7', '8', '9', 'C'
  {698, 740, 784, 831}  // Frequencies for keys '*', '0', '#', 'D'
};

void setup() {
  pinMode(buzzerPin, OUTPUT);
}

void loop() {
  char key = keypad.getKey();

  if (key) {
    int row = -1, col = -1;

    // Find the row and column of the pressed key
    for (int r = 0; r < ROWS; r++) {
      for (int c = 0; c < COLS; c++) {
        if (keys[r][c] == key) {
          row = r;
          col = c;
          break;
        }
      }
      if (row != -1) break;
    }

    if (row != -1 && col != -1) {
      int frequency = keyTones[row][col];
      tone(buzzerPin, frequency, 200); // Play the tone for 200 milliseconds
      delay(200); // Wait for the tone to finish
      noTone(buzzerPin); // Stop the tone
    }
  }
}- This code sets up a musical keyboard where each key press on the keypad plays a different musical note through the buzzer.
- The code uses arrays to map each key to a specific frequency, checks for key presses, and generates sound accordingly.
Code Explanation
#include <Keypad.h>- This includes the Keypad library, which simplifies interfacing with a keypad.
const byte ROWS = 4; // Four rows
const byte COLS = 4; // Four columns- `ROWS` and `COLS` define the number of rows and columns in the keypad, which is 4×4.
char keys[ROWS][COLS] = {
  {'1','2','3','A'},
  {'4','5','6','B'},
  {'7','8','9','C'},
  {'*','0','#','D'}
};- The `keys` array defines the characters for each key on the keypad. This 2D array maps each row and column combination to a specific key character.
byte rowPins[ROWS] = {9, 8, 7, 6}; // Connect to the row pins of the keypad
byte colPins[COLS] = {5, 4, 3, 2}; // Connect to the column pins of the keypad- `rowPins` and `colPins` define which Arduino pins are connected to the rows and columns of the keypad.
Keypad keypad = Keypad(makeKeymap(keys), rowPins, colPins, ROWS, COLS);- This creates a `Keypad` object using the defined keymap (`keys`), row pins, and column pins. The `keypad` object will be used to read key presses.
const int buzzerPin = 11; // Pin connected to the buzzer- This defines the pin where the buzzer is connected. The buzzer will generate sound based on the key pressed.
const int keyTones[ROWS][COLS] = {
  {262, 294, 330, 349}, // Frequencies for keys '1', '2', '3', 'A'
  {392, 440, 466, 523}, // Frequencies for keys '4', '5', '6', 'B'
  {554, 587, 622, 659}, // Frequencies for keys '7', '8', '9', 'C'
  {698, 740, 784, 831}  // Frequencies for keys '*', '0', '#', 'D'
};- `keyTones` is a 2D array that maps each key to a specific frequency (in Hertz). For example, pressing ‘1’ will generate a tone of 262 Hz, while pressing ‘B’ will generate 523 Hz.
void setup() {
  pinMode(buzzerPin, OUTPUT);
}The `setup()` function configures the `buzzerPin` as an output, so the Arduino can send signals to the buzzer to produce sound.
void loop() {
char key = keypad.getKey();- The `loop()` function is the main part of the code that runs repeatedly. It checks if any key is pressed using `keypad.getKey()`. If a key is pressed, its value is stored in `key`.
  if (key) {
    int row = -1, col = -1;
- If a key is pressed (`key` is not `NULL`), the code initializes `row` and `col` to `-1`. These will be used to store the row and column of the pressed key.
    for (int r = 0; r < ROWS; r++) {
      for (int c = 0; c < COLS; c++) {
        if (keys[r][c] == key) {
          row = r;
          col = c;
          break;
        }
      }
      if (row != -1) break;
}- The code then loops through the `keys` array to find the row and column of the pressed key. If the key is found, `row` and `col` are set to the corresponding indices, and the loop is exited.
    if (row != -1 && col != -1) {
      int frequency = keyTones[row][col];
      tone(buzzerPin, frequency, 200); // Play the tone for 200 milliseconds
      delay(200); // Wait for the tone to finish
      noTone(buzzerPin); // Stop the tone
}- If the `row` and `col` values are valid (meaning the key was found), the code retrieves the corresponding frequency from the `keyTones` array.
- The `tone()` function plays a sound at that frequency on the buzzer for 200 milliseconds.
- After a delay of 200 milliseconds, the `noTone()` function stops the buzzer.

