About The Project
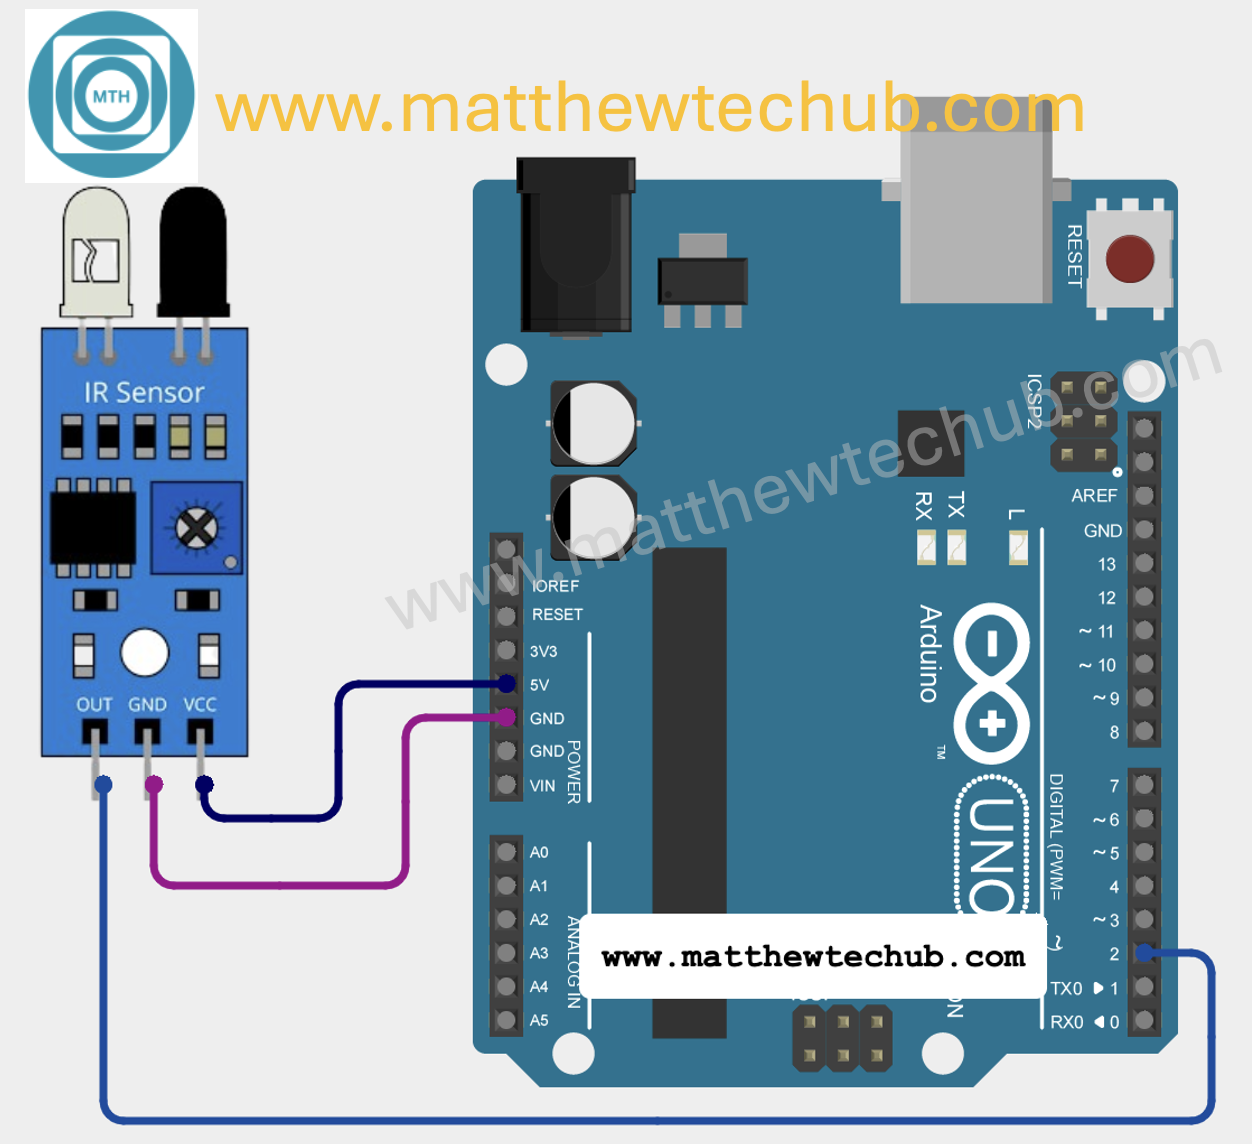
In this project, we will learn how to interface an IR sensor module with an Arduino Uno board. We will explore how to detect an obstacle in front of the IR sensor module and display an indication on the Serial Monitor and through an LED.
IR Sensor Module
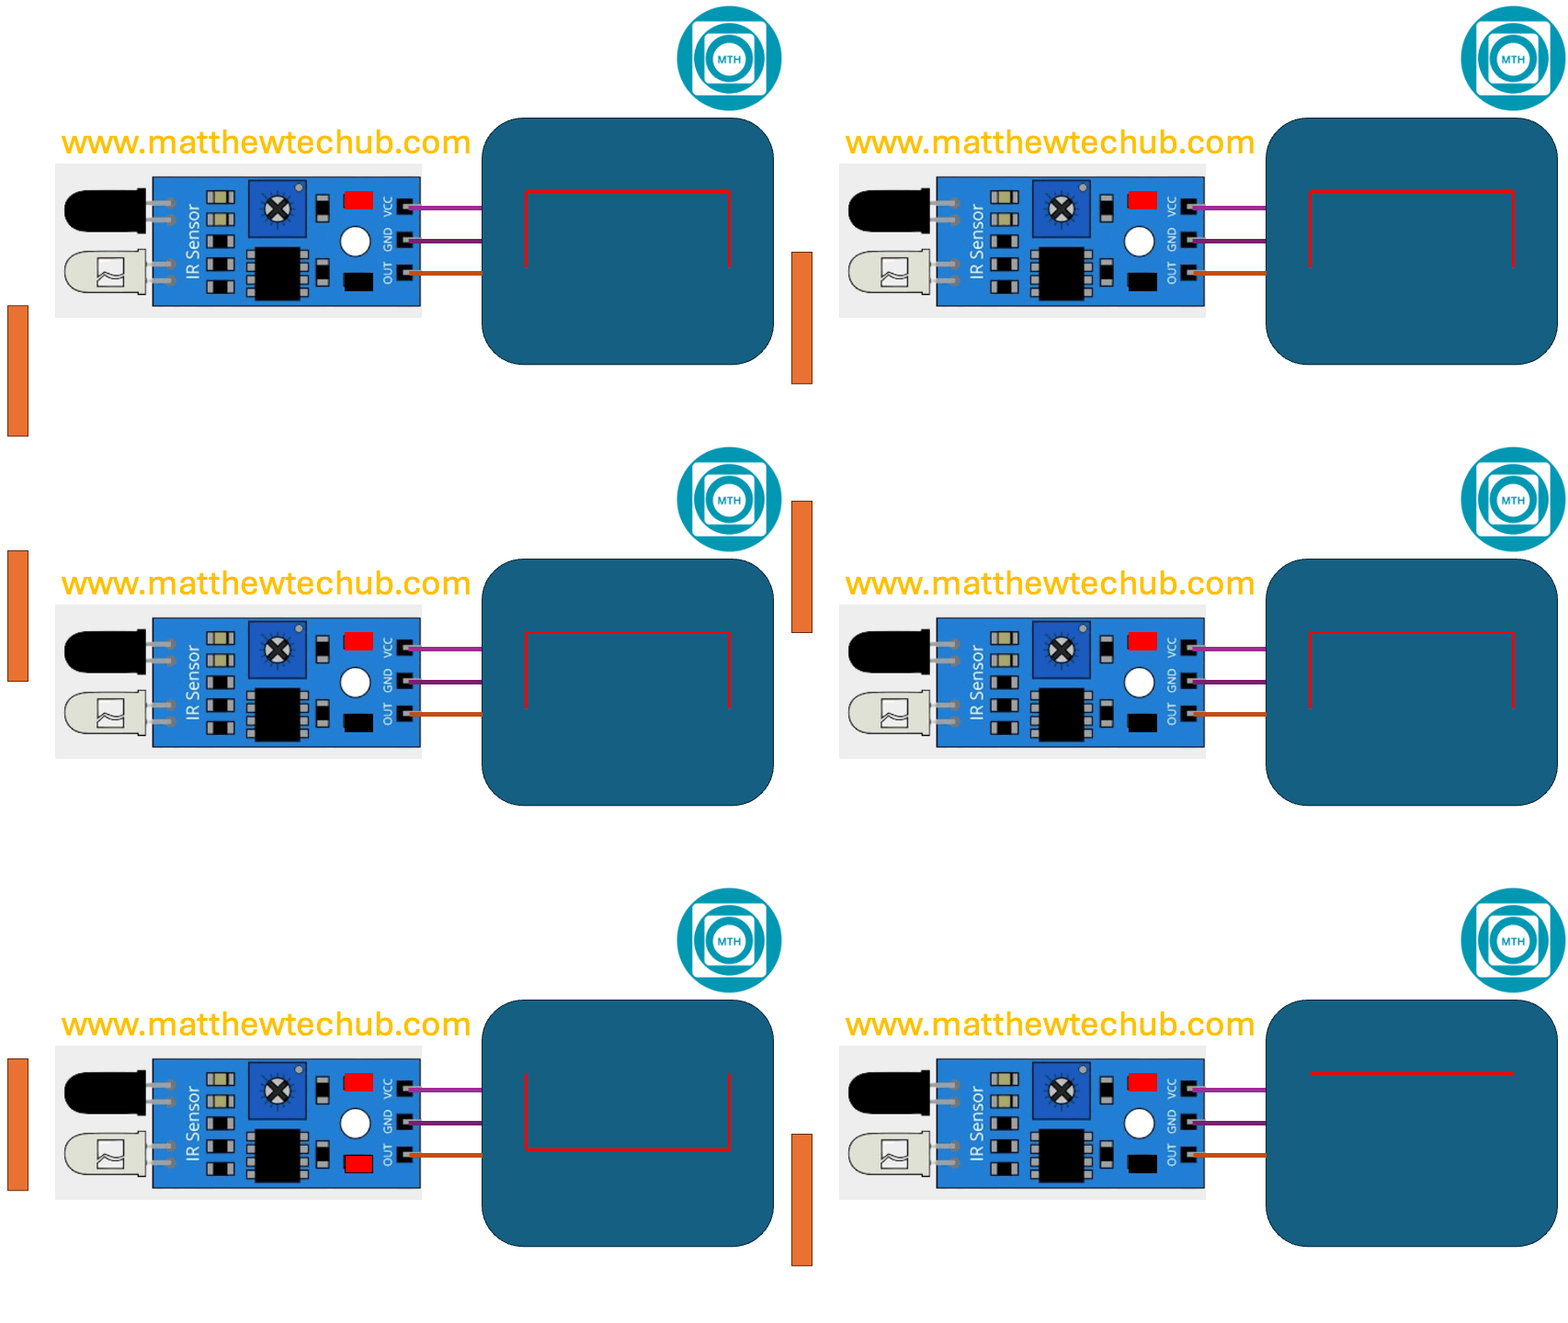
An IR (Infrared) sensor module is a device that detects infrared light to identify objects, measure distances, or detect movement. It typically consists of an IR LED (emitter) and an IR photodiode (receiver) arranged in a way that the IR light emitted by the LED can be reflected back to the receiver when an object is in front of it.
When an object comes within the sensor’s range, the IR light emitted by the LED reflects off the object and is detected by the photodiode. This causes the sensor to change its output, which can then be read by a microcontroller.
Circuit Wiring
Program Code
This Arduino code is designed to interface with an IR sensor module to detect the presence of an object. The detection result is then printed to the Serial Monitor.
// www.matthewtechub.com
// IR Sensor Object Detection
const int sensorPin = 2;
// Variable to store the sensor's state
int sensorState = 0;

void setup() {
  // Initialize the digital pin as input
  pinMode(sensorPin, INPUT);

  // Initialize serial communication
  Serial.begin(9600);
}

void loop() {
  // Read the value from the IR sensor
  sensorState = digitalRead(sensorPin);

  // Check if the sensor detects an object
  if (sensorState == LOW) {
    Serial.println("Object detected!");
  } else {
    Serial.println("No object detected.");
  }

  // Delay to avoid flooding the Serial Monitor
  delay(500);
}Code Explanation
const int sensorPin = 2;
// Variable to store the sensor's state
int sensorState = 0;- const int sensorPin = 2;`: This line defines a constant integer `sensorPin` and assigns it the value `2`. This means the IR sensor’s output pin is connected to digital pin 2 on the Arduino.
- `int sensorState = 0;`**: This line declares an integer variable `sensorState` to store the current state of the sensor. Initially, it is set to `0`.
void setup() {
  // Initialize the digital pin as input
  pinMode(sensorPin, INPUT);

  // Initialize serial communication
  Serial.begin(9600);
}- void setup()`: The `setup` function runs once when the Arduino is powered on or reset.
- `pinMode(sensorPin, INPUT);`: This function sets the mode of `sensorPin` (which is connected to pin 2) as an input. This configuration allows the Arduino to read the state of the IR sensor.
- `Serial.begin(9600);`: This initializes the serial communication with a baud rate of `9600` bits per second, enabling communication between the Arduino and the Serial Monitor on your computer.
void loop() {
  // Read the value from the IR sensor
  sensorState = digitalRead(sensorPin);

  // Check if the sensor detects an object
  if (sensorState == LOW) {
    Serial.println("Object detected!");
  } else {
    Serial.println("No object detected.");
  }

  // Delay to avoid flooding the Serial Monitor
  delay(500);
}
- ‘void loop()`: The `loop` function runs continuously after the `setup` function. It contains the main logic of the program.
- -`sensorState = digitalRead(sensorPin);`: This line reads the current state of the sensor connected to pin 2. The `digitalRead()` function returns `HIGH` or `LOW` depending on whether the sensor is detecting an object (`LOW`) or not (`HIGH`).
- `if (sensorState == LOW) {…}`: This conditional checks if the sensor’s state is `LOW`, which indicates that an object is detected by the IR sensor.
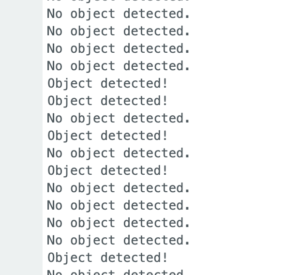
- `Serial.println(“Object detected!”);`: If the sensor detects an object (`LOW`), this line sends the message “Object detected!” to the Serial Monitor.
- `Serial.println(“No object detected.”);`: If no object is detected (`HIGH`), this line sends the message “No object detected.” to the Serial Monitor.
- `delay(500);`: This introduces a 500-millisecond delay to prevent flooding the Serial Monitor with messages. Without this delay, the messages would be printed very quickly, making it hard to read.
This program continuously monitors the output of an IR sensor connected to digital pin 2 of the Arduino. If an object is detected by the sensor, the message “Object detected!” is printed to the Serial Monitor. If no object is detected, it prints “No object detected.” The 500-millisecond delay ensures that the Serial Monitor is not overwhelmed with messages.
Screenshot

Program Code
This Arduino code is designed to interface with an IR sensor and control an LED based on the sensor’s detection of an object. The LED will turn on and remain on even after the object is detected, and the sensor’s status is printed to the Serial Monitor.
// www.matthewtechub.com
// IR - LED -2
// led  on led even after detection
int irPin=2;
int ledPin=13;
int status;
void setup()
{
  pinMode(irPin, INPUT);
  pinMode (ledPin, OUTPUT);
  Serial.begin(9600);
}
void loop()
{
status =digitalRead(irPin);
Serial.println(status);
if (status==0)
digitalWrite(ledPin, HIGH);
delay(500);
}Code Explanation
int irPin = 2;
int ledPin = 13;
int status;- ‘int irPin = 2;`: This line defines an integer variable `irPin` and assigns it the value `2`. This specifies that the IR sensor’s output is connected to digital pin 2 on the Arduino.
- `int ledPin = 13;`: This line defines an integer variable `ledPin` and assigns it the value `13`. This indicates that an LED is connected to digital pin 13 on the Arduino.
- `int status;`: This line declares an integer variable `status` that will store the current state of the IR sensor.
void setup()
{
  pinMode(irPin, INPUT);
  pinMode(ledPin, OUTPUT);
  Serial.begin(9600);
}
- `void setup()`: The `setup` function runs once when the Arduino is powered on or reset.
- `pinMode(irPin, INPUT);`: This line sets the `irPin` (connected to pin 2) as an input. This allows the Arduino to read the state of the IR sensor.
- `pinMode(ledPin, OUTPUT);`: This line sets the `ledPin` (connected to pin 13) as an output. This allows the Arduino to control the LED.
- `Serial.begin(9600);`: This initializes the serial communication with a baud rate of `9600` bits per second, enabling communication between the Arduino and the Serial Monitor.
void loop()
{
  status = digitalRead(irPin);
  Serial.println(status);
  if (status == 0)
    digitalWrite(ledPin, HIGH);
  delay(500);
}
- `void loop()`: The `loop` function runs continuously after the `setup` function. It contains the main logic of the program.
- `status = digitalRead(irPin);`: This line reads the current state of the sensor connected to pin 2 using `digitalRead()`. The function returns `HIGH` or `LOW` based on whether the sensor detects an object (`LOW`) or not (`HIGH`). The result is stored in the `status` variable.
- `Serial.println(status);`: This line prints the current value of `status` to the Serial Monitor. This allows you to see whether the sensor is detecting an object (`0`) or not (`1`).
- `if (status == 0)`: This conditional checks if the sensor’s state is `LOW` (0), which means the IR sensor has detected an object.
- `digitalWrite(ledPin, HIGH);`: If the sensor detects an object (`status == 0`), this line turns the LED on by setting the `ledPin` (pin 13) to `HIGH`.
- `delay(500);`: This introduces a 500-millisecond delay to slow down the loop execution. Without this delay, the loop would run too quickly, making it hard to observe the LED behavior or read the Serial Monitor output.
This program continuously reads the state of the IR sensor connected to pin 2. When the sensor detects an object (status becomes `0`), it turns on the LED connected to pin 13. The LED stays on even after the object is detected.
Screenshot

Program Code
This Arduino code is designed to control an LED based on the presence or absence of an object detected by an IR sensor. The LED will turn on when an object is detected and turn off when no object is detected. The status of the sensor is also printed to the Serial Monitor.
// www.matthewtechub.com
// IR - LED -1
// led on when detect object
//led off when no object detected
int irPin=2;
int ledPin=13;
int status;
void setup()
{
  pinMode(irPin, INPUT);
  pinMode (ledPin, OUTPUT);
  Serial.begin(9600);
}
void loop()
{
status =digitalRead(irPin);
Serial.println(status);
if (status==0)
digitalWrite(ledPin, HIGH);
else
digitalWrite(ledPin, LOW);
delay(500);
}
Code Explanation
int irPin = 2;
int ledPin = 13;
int status;
- `int irPin = 2;`: This line defines an integer variable `irPin` and assigns it the value `2`. This indicates that the IR sensor’s output pin is connected to digital pin 2 on the Arduino.
- `int ledPin = 13;`: This line defines an integer variable `ledPin` and assigns it the value `13`. This means the LED is connected to digital pin 13 on the Arduino.
- `int status;`: This line declares an integer variable `status` that will be used to store the current state of the IR sensor.
void setup()
{
  pinMode(irPin, INPUT);
  pinMode(ledPin, OUTPUT);
  Serial.begin(9600);
}
- `void setup()`: The `setup` function runs once when the Arduino is powered on or reset.
- `pinMode(irPin, INPUT);`: This function sets the mode of `irPin` (connected to pin 2) as an input. This allows the Arduino to read the state of the IR sensor.
- `pinMode(ledPin, OUTPUT);`: This function sets the mode of `ledPin` (connected to pin 13) as an output. This allows the Arduino to control the LED.
- `Serial.begin(9600);`: This initializes serial communication with a baud rate of `9600` bits per second, enabling the Arduino to send data to the Serial Monitor on your computer.
void loop()
{
  status = digitalRead(irPin);
  Serial.println(status);
  if (status == 0)
    digitalWrite(ledPin, HIGH);
  else
    digitalWrite(ledPin, LOW);
  delay(500);
}
- `void loop()`: The `loop` function runs continuously after the `setup` function. It contains the main logic of the program.
- `status = digitalRead(irPin);`: This line reads the current state of the sensor connected to pin 2 using `digitalRead()`. The function returns `HIGH` or `LOW` depending on whether the sensor detects an object (`LOW`) or not (`HIGH`). The result is stored in the `status` variable.
- `Serial.println(status);`: This line prints the current value of `status` to the Serial Monitor, allowing you to see the sensor’s state: `0` if an object is detected, or `1` if no object is detected.
- if (status == 0)`: This conditional checks if the sensor’s state is `LOW` (0), which indicates that the IR sensor has detected an object.
- `digitalWrite(ledPin, HIGH);`: If the sensor detects an object (`status == 0`), this line turns the LED on by setting the `ledPin` (pin 13) to `HIGH`.
- `else digitalWrite(ledPin, LOW);`: If the sensor does not detect an object (`status != 0`), this line turns the LED off by setting the `ledPin` to `LOW`.
- `delay(500);`: This introduces a 500-millisecond delay to slow down the loop execution. Without this delay, the loop would run too quickly, making it difficult to observe the LED behavior or read the Serial Monitor output.
Screenshot


