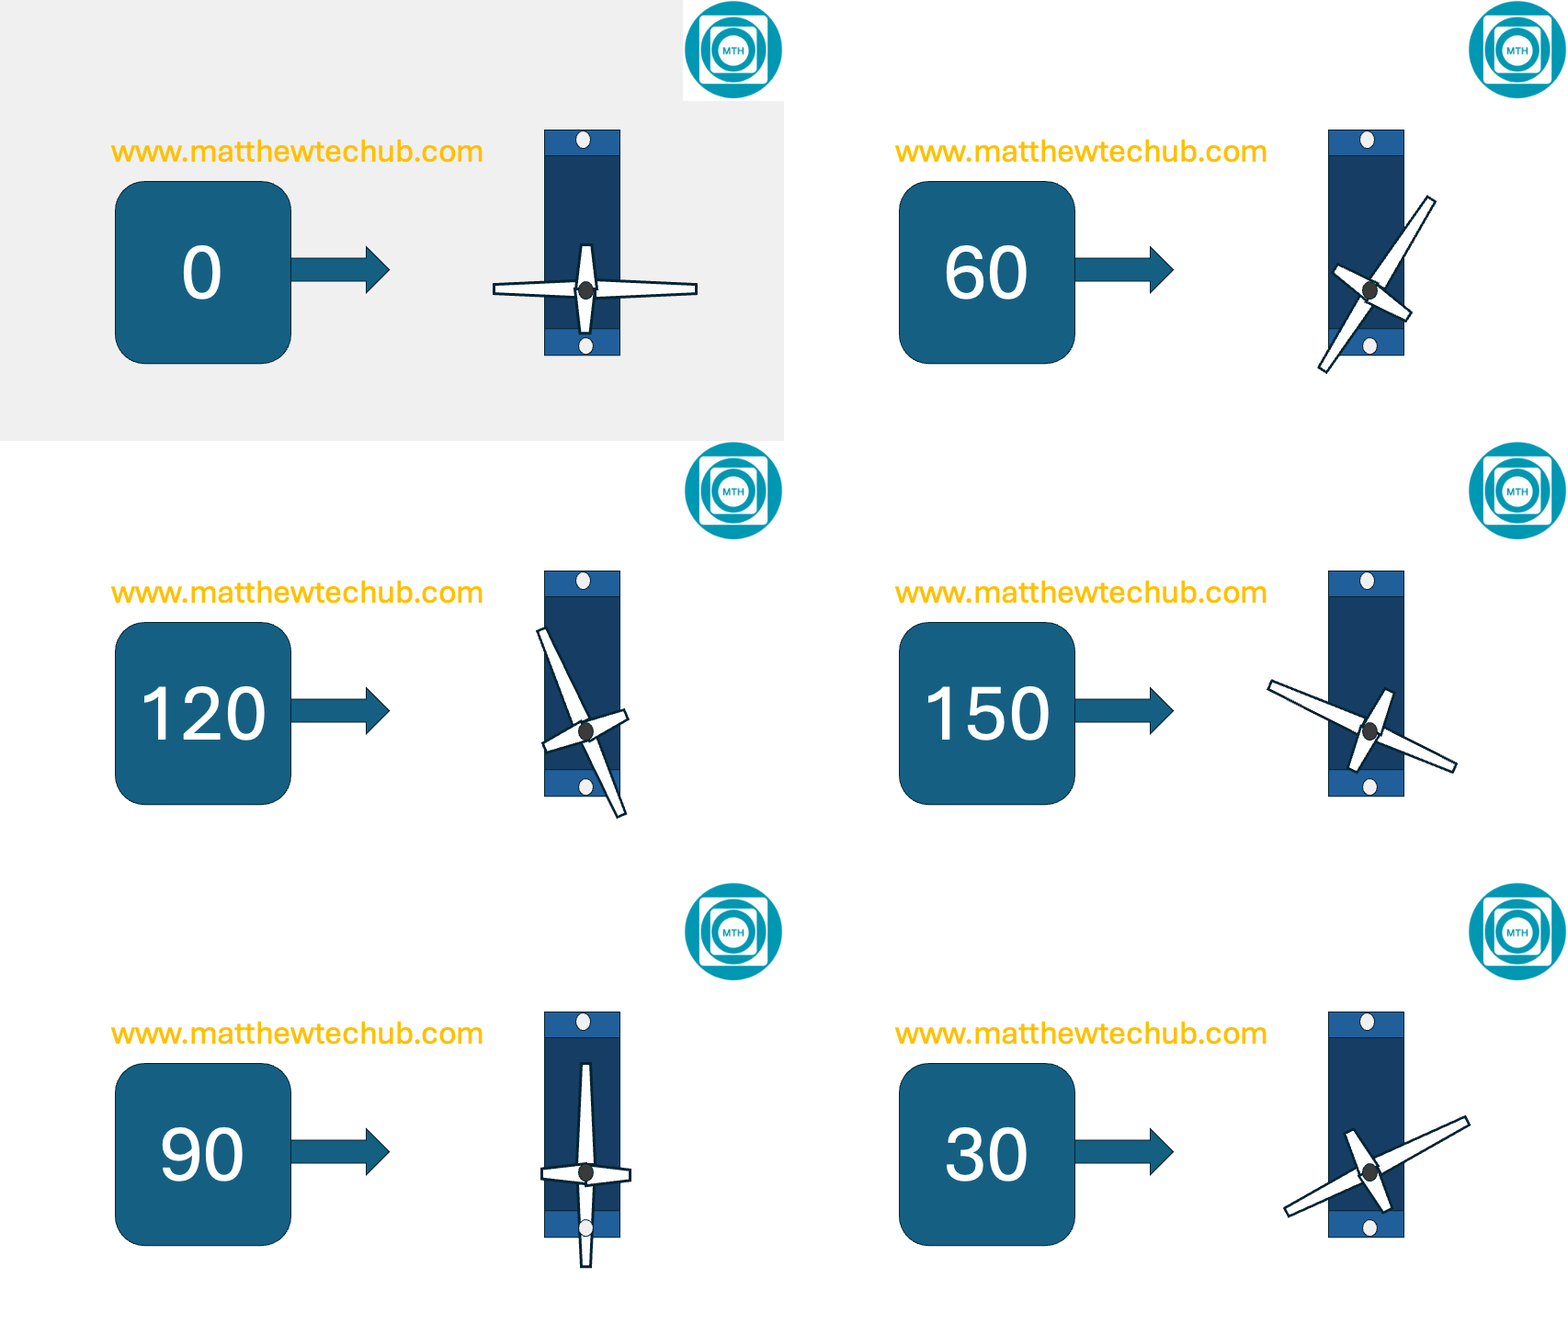
A servo motor is a type of motor where precise control of angular position is required.
Components in the Servo Motor:
- Motor: Provides the movement.
- Gearbox: Reduces the speed and increases torque.
- Control Circuit: Receives signals and adjusts the motor’s position.
- Potentiometer: Measures the position of the servo.
Operation:
- A servo motor receives a PWM (Pulse Width Modulation) signal on its control wire.
- The width of the pulse determines the position of the servo horn (output shaft).
- The internal control circuit adjusts the motor to maintain the desired position.
Types of Servo Motors:
- Standard Servos: Provide 180 degrees of rotation.
- Continuous Rotation Servos: Do not have a fixed range of rotation.
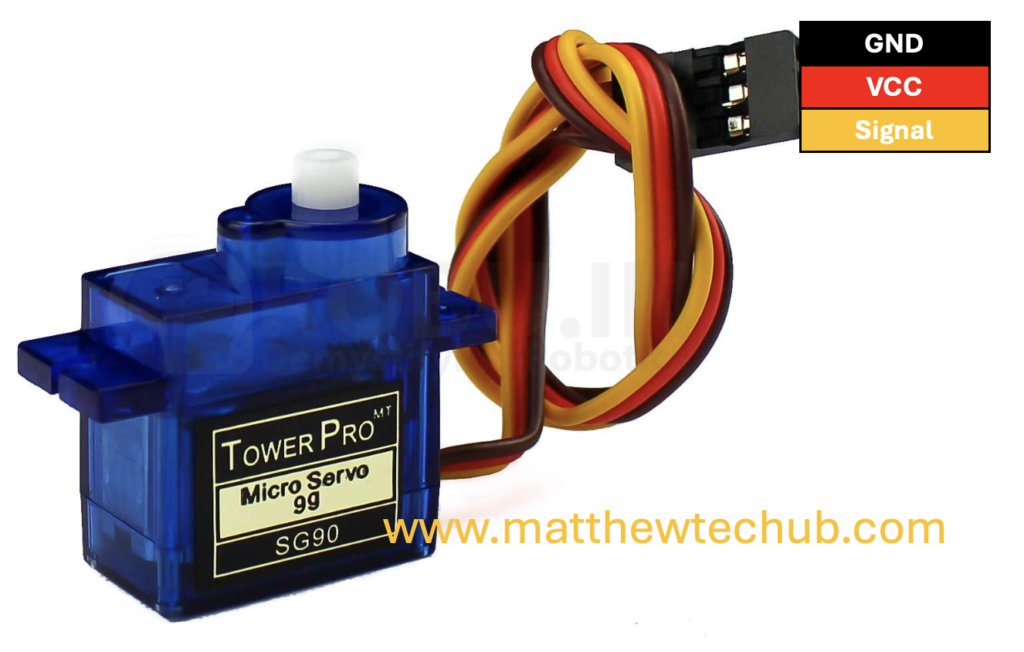
Pin Configuration
How the Servo Motor Determines the Angle
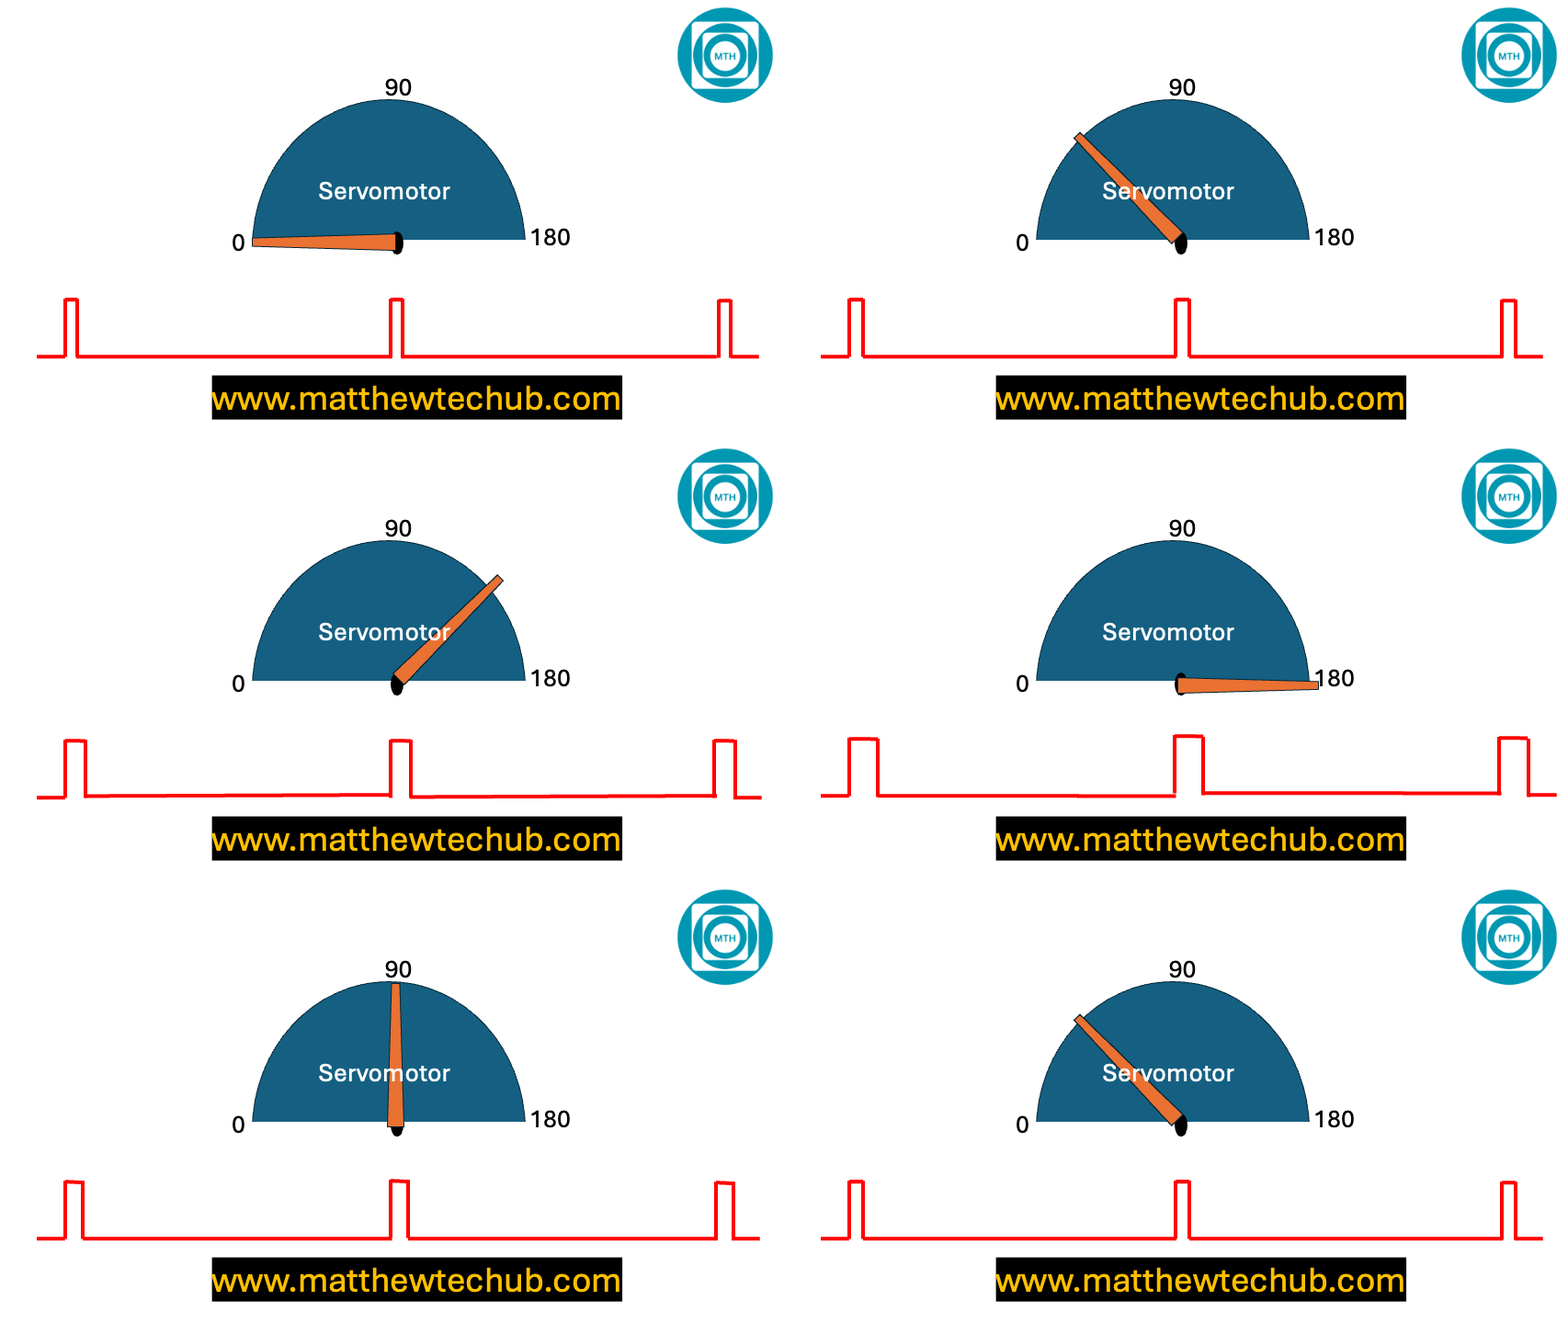
- Input Signal (PWM): The control circuit receives a PWM (Pulse Width Modulation) signal, which dictates the desired position of the servo.
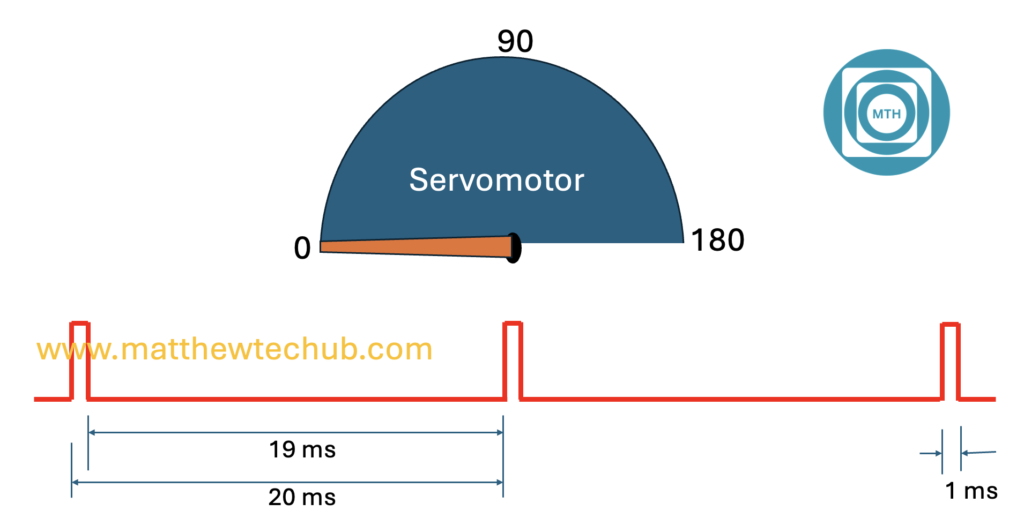
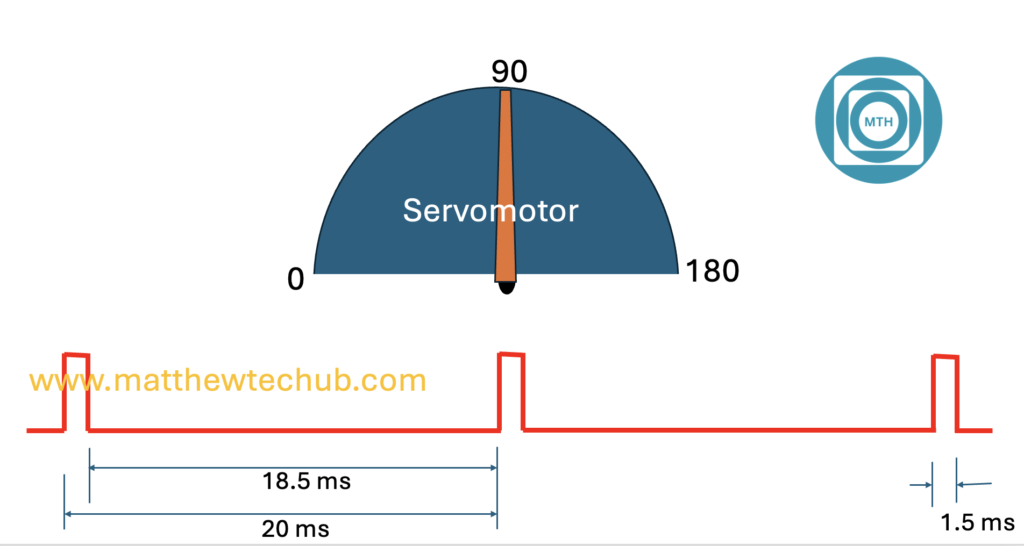
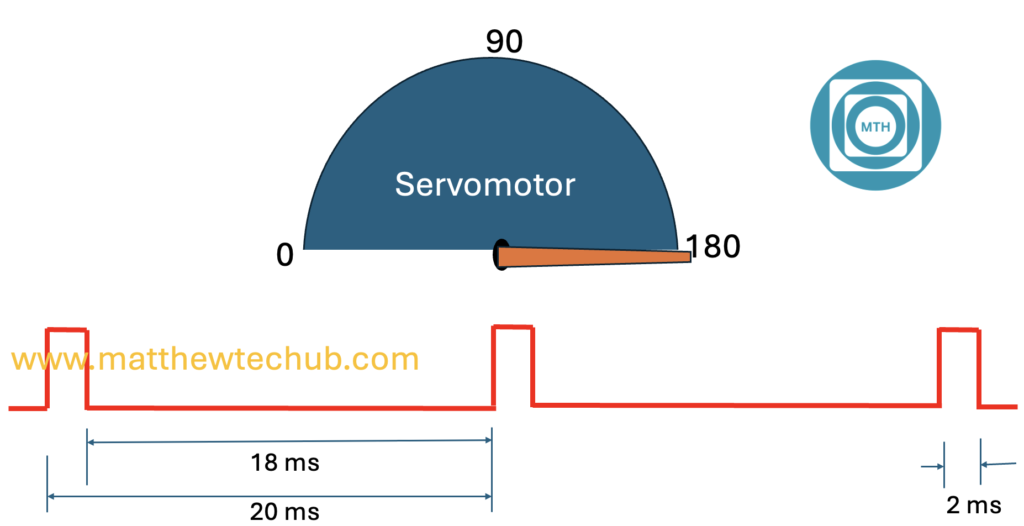
- Pulse Width: The length of the pulse determines the angle:
- 1 ms pulse width: Typically corresponds to 0 degrees.
- 1.5 ms pulse width: Corresponds to 90 degrees (midpoint).
- 2 ms pulse width: Corresponds to 180 degrees.
- The pulse width is sent every 20 ms in a 50 Hz (meaning the pulse is repeated every 20 ms) signal.
- Pulse Width: The length of the pulse determines the angle:
However, Arduino programming with a servo motor is straightforward, the servo motor’s position is determined by a value ranging from 0 to 180 degrees
Who converts this value to a PWM signal with a duty cycle of 5% to 10% at a frequency of 50 Hz?
The Servo.h library, handles the conversion of the angle value to a PWM signal with the appropriate duty cycle and frequency, controlling the servo motor’s position.
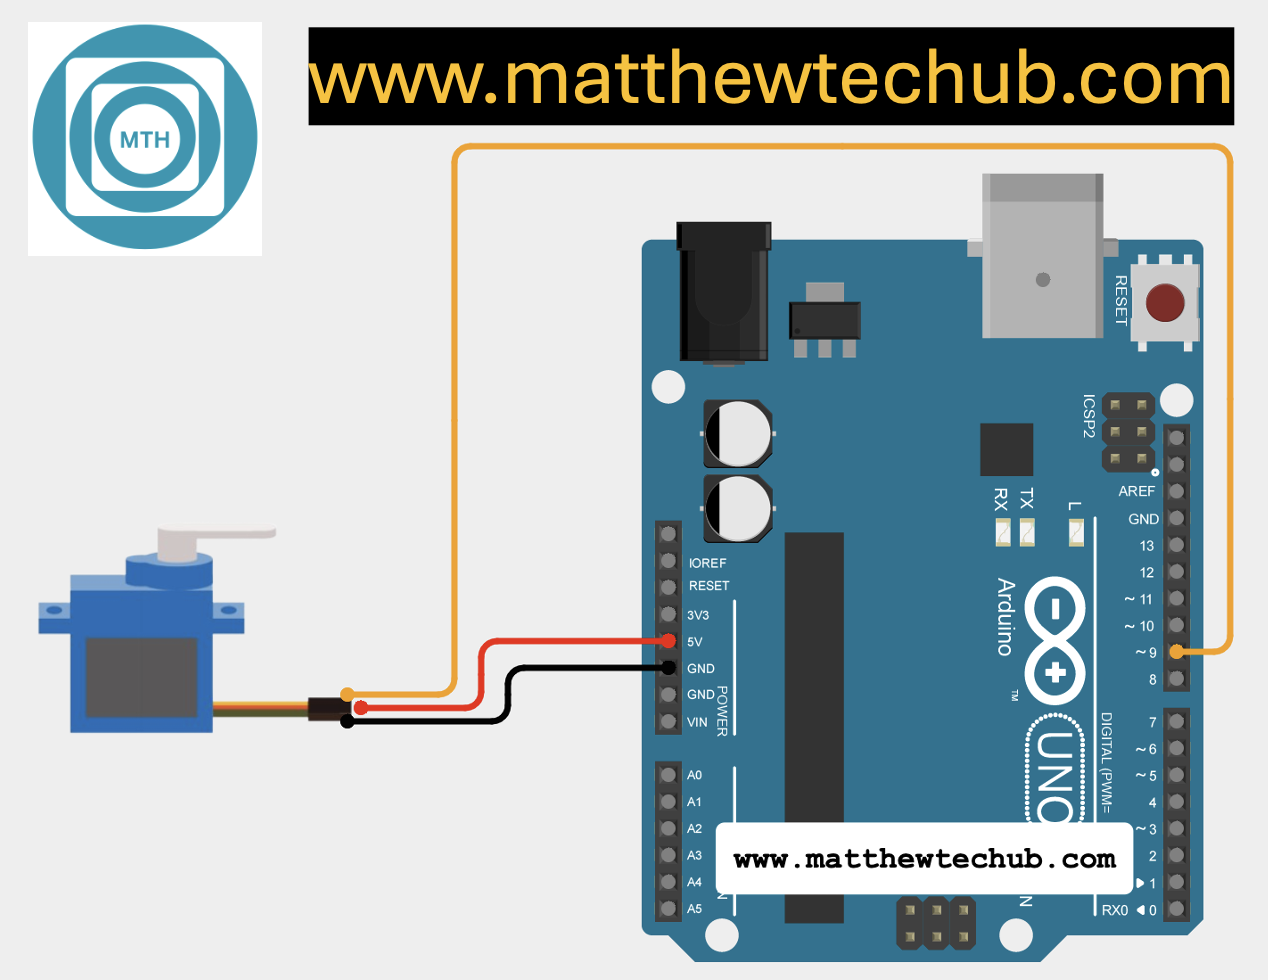
Circuit Wiring
Servo Library
For basic servo motor control with an Arduino, you should use the standard Servo library, which is typically pre-installed with the Arduino IDE. However, if it’s not installed or if you’re looking for additional features, you can install it manually via the Arduino Library Manager.
Installing the Servo Library:
- Open the Arduino IDE.
- Go to the menu bar and click on Sketch > Include Library > Manage Libraries.
- In the Library Manager window, type “Servo” in the search bar.
- Locate the “Servo” library by Arduino in the search results.
- Click “Install” if it is not already installed.
Recommended Servo Library:
- Name: Servo
- Author: Arduino
Program Code
// www.matthewtechub.com
// servo motor
#include <Servo.h>

Servo myServo;

void setup() {
  myServo.attach(9); // Attach servo to pin 9
}

void loop() {
  myServo.write(0);    // 0 degrees
  delay(1000);
  myServo.write(90);   // 90 degrees
  delay(1000);
  myServo.write(180);  // 180 degrees
  delay(1000);
}The code makes the servo motor move to three distinct positions: 0 degrees (fully counterclockwise), 90 degrees (center), and 180 degrees (fully clockwise). Each position is held for 1 second.
Code Explanation
#include <Servo.h>- This line includes the `Servo.h` library, which provides functions and tools to control servo motors with Arduino. The library handles the generation of the necessary PWM signals required to control the position of the servo motor.
Servo myServo;- This line creates a `Servo` object named `myServo`. The `Servo` object represents the servo motor you’re controlling. It gives you access to the functions provided by the `Servo.h` library, such as `attach()` and `write()`.
void setup() {
  myServo.attach(9); // Attach servo to pin 9
}
- `void setup()`: This function runs once when the Arduino is powered on or reset. It’s used to initialize settings.
- `myServo.attach(9)`: This function attaches the servo motor to digital pin 9 on the Arduino. The Arduino will now send PWM signals to this pin to control the servo motor’s position.
void loop() {
  myServo.write(0);    // 0 degrees
  delay(1000);
  myServo.write(90);   // 90 degrees
  delay(1000);
  myServo.write(180);  // 180 degrees
  delay(1000);
}
- `void loop()`: This function runs continuously after the `setup()` function has finished. It contains the main code that the Arduino will execute repeatedly.
- write(0)`: This line sets the servo motor to the 0-degree position, which is typically the fully counterclockwise position.
- `delay(1000)`: This line pauses the program for 1000 milliseconds (1 second) to give the servo time to reach the 0-degree position before moving to the next command.
- `myServo.write(90)`: This line sets the servo motor to the 90-degree position, which is typically the center position.
- `delay(1000)`: This line pauses the program for 1 second to give the servo time to reach the 90-degree position before moving to the next command.
- `myServo.write(180)`: This line sets the servo motor to the 180-degree position, which is typically the fully clockwise position.
- `delay(1000)`: This line pauses the program for 1 second to give the servo time to reach the 180-degree position before looping back to the start of the `loop()` function.
Program Code
The code makes the servo motor sweep smoothly back and forth between 0 and 180 degrees. It also sends the current angle to the Serial Monitor, allowing you to track the servo’s movement in real-time.
// www.matthewtechub.com
// servo motor basic
#include <Servo.h>

Servo myServo;  // Create a Servo object

void setup() {
  myServo.attach(9);  // Attach the servo to pin 9
  Serial.begin(9600); // Initialize Serial communication at 9600 baud rate
}

void loop() {
  // Sweep the servo from 0 to 180 degrees
  for (int angle = 0; angle <= 180; angle++) {
    myServo.write(angle);  // Set the servo position
    Serial.print("Angle: "); // Print label
    Serial.println(angle);   // Print the current angle
    delay(15);               // Wait for the servo to reach the position
  }

  // Sweep the servo from 180 to 0 degrees
  for (int angle = 180; angle >= 0; angle--) {
    myServo.write(angle);  // Set the servo position
    Serial.print("Angle: "); // Print label
    Serial.println(angle);   // Print the current angle
    delay(15);               // Wait for the servo to reach the position
  }
}
Code Explanation
#include <Servo.h>- This line includes the `Servo.h` library, which provides built-in functions for controlling servo motors with Arduino. It abstracts away the complexities of generating the correct PWM signals needed to control a servo.
Servo myServo; // Create a Servo object- This line creates a `Servo` object named `myServo`. The `Servo` object represents a servo motor connected to the Arduino and allows you to control its position.
void setup() {
  myServo.attach(9);  // Attach the servo to pin 9
  Serial.begin(9600); // Initialize Serial communication at 9600 baud rate
}
- `void setup()`: This function runs once when the Arduino starts or is reset. It’s used to initialize settings.
- `myServo.attach(9)`: This function attaches the servo motor to digital pin 9 on the Arduino. The Arduino will now send PWM signals to this pin to control the servo.
- `Serial.begin(9600)`: Initializes serial communication at a baud rate of 9600. This enables the Arduino to send data to the Serial Monitor, allowing you to see real-time data from your program.
void loop() {
  // Sweep the servo from 0 to 180 degrees
  for (int angle = 0; angle <= 180; angle++) {
    myServo.write(angle);  // Set the servo position
    Serial.print("Angle: "); // Print label
    Serial.println(angle);   // Print the current angle
    delay(15);               // Wait for the servo to reach the position
  }
- `void loop()`: This function runs continuously after the `setup()` function completes. It contains the main code that will repeatedly execute.
- `for (int angle = 0; angle <= 180; angle++)`: This loop starts the variable `angle` at 0 and increments it by 1 in each iteration until it reaches 180. It sweeps the servo from 0 degrees (fully counterclockwise) to 180 degrees (fully clockwise).
- `myServo.write(angle)`: This function sets the servo to the position specified by `angle`. For example, when `angle` is 90, the servo moves to the 90-degree position.
- `Serial.print(“Angle: “)`: This prints the label “Angle: ” to the Serial Monitor without a newline.
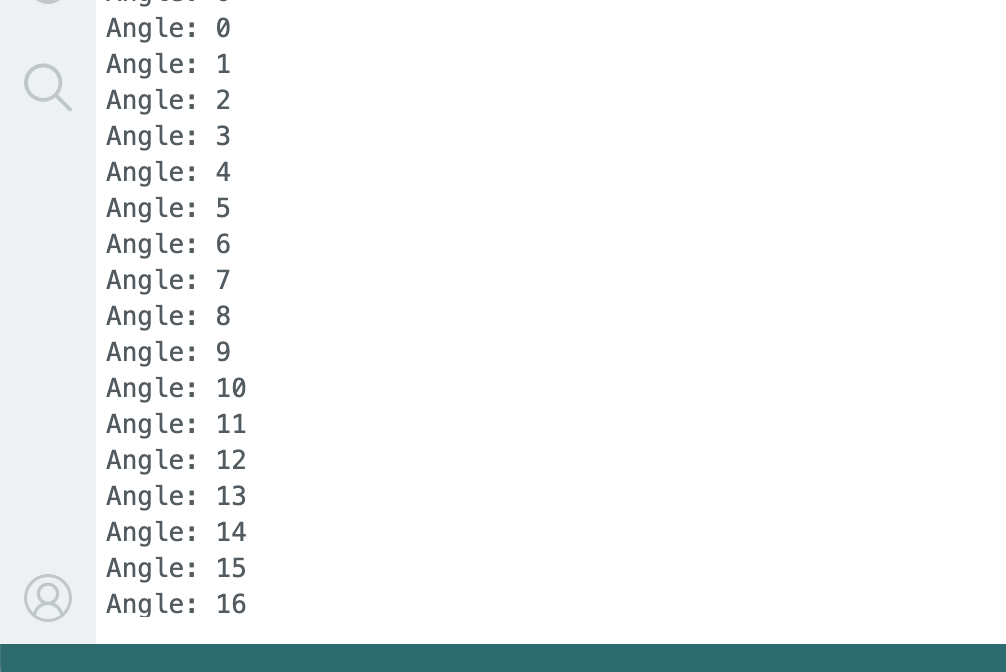
- `Serial.println(angle)`: This prints the current value of `angle` to the Serial Monitor, followed by a newline, so each value appears on a new line.
- `delay(15)`: This pauses the program for 15 milliseconds, allowing the servo time to reach the desired position before moving to the next angle.
for (int angle = 180; angle >= 0; angle--) {
    myServo.write(angle);  // Set the servo position
    Serial.print("Angle: "); // Print label
    Serial.println(angle);   // Print the current angle
    delay(15);               // Wait for the servo to reach the position
  }
- This loop is similar to the previous one, but it starts at 180 degrees and decrements the `angle` variable by 1 in each iteration until it reaches 0. This sweeps the servo from 180 degrees back to 0 degrees.
- The `myServo.write(angle)`, `Serial.print()`, `Serial.println()`, and `delay(15)` functions work the same as described above.
Screenshot
