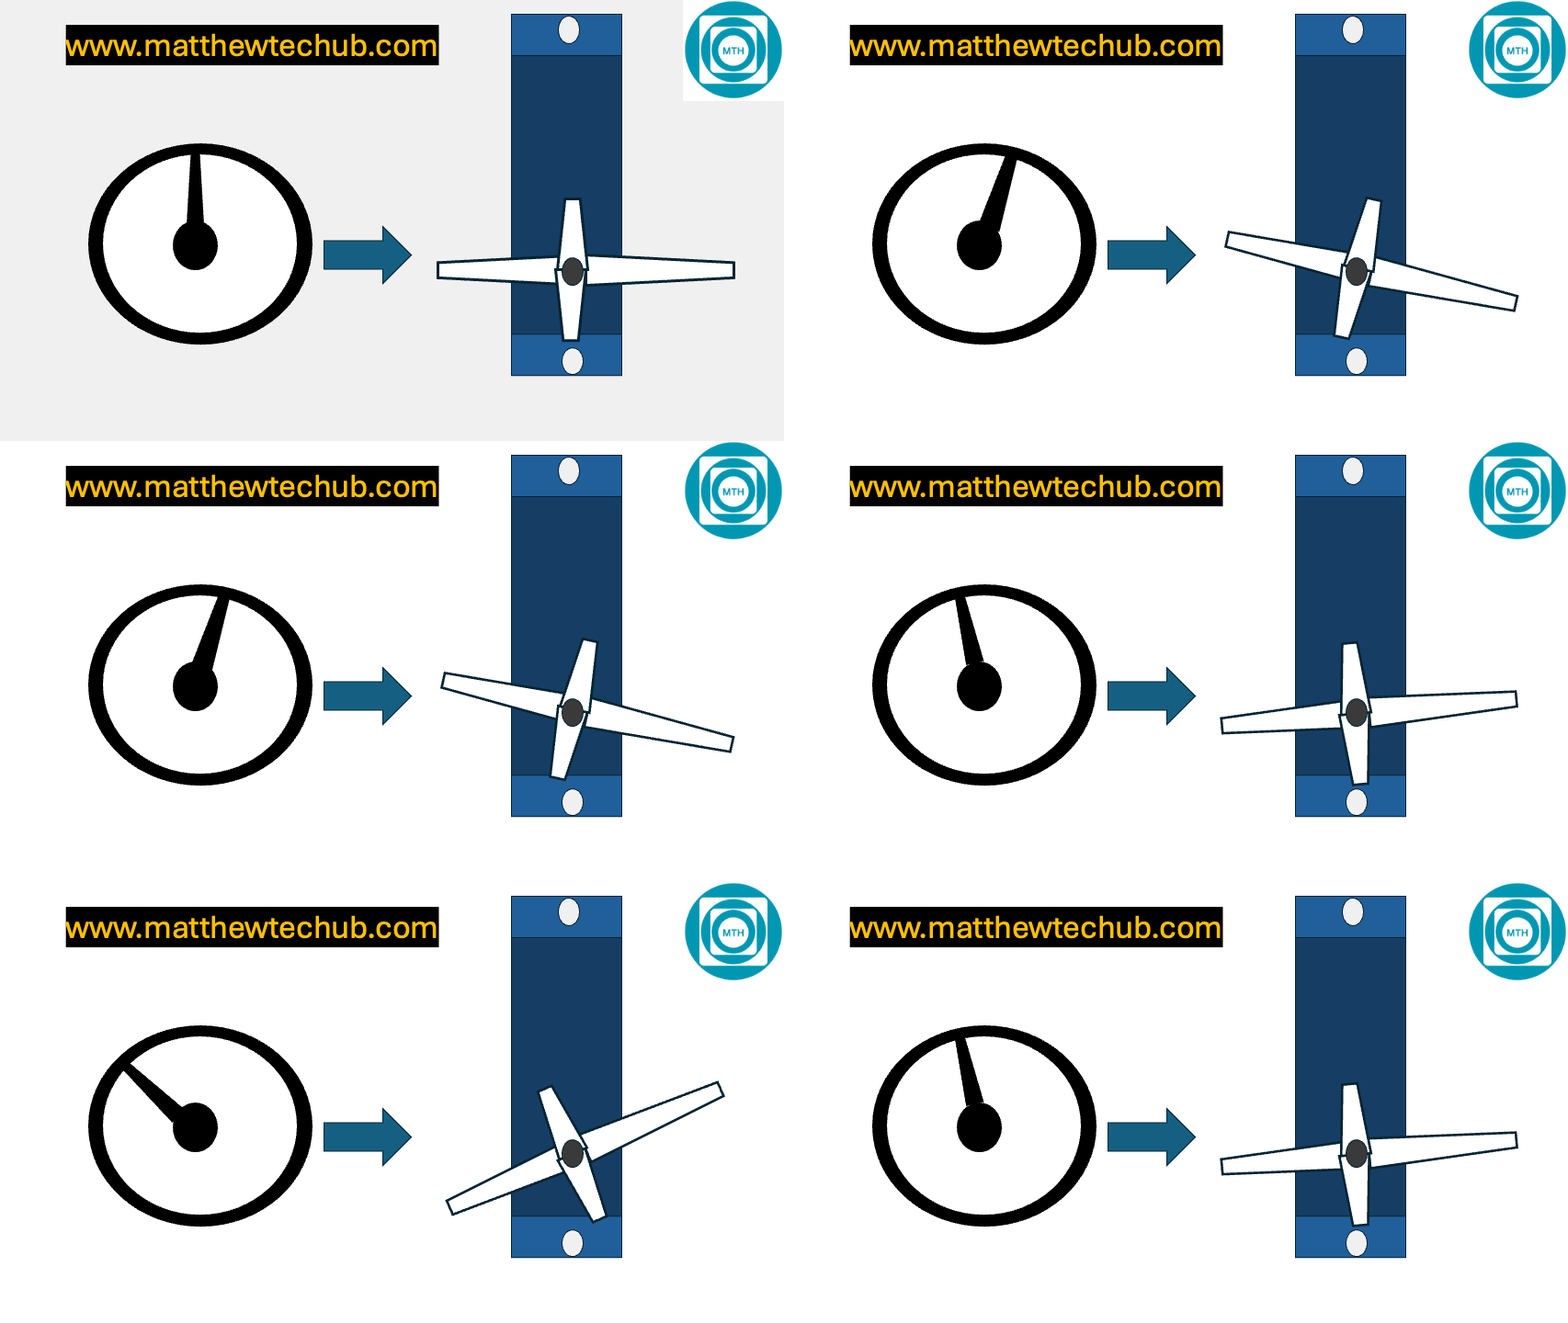
About The Project
In this project, we are learning how to control the shaft of a stepper motor using a potentiometer. This concept can be applied to the steering system in electric cars, where the angular movement of the potentiometer determines the position of the steering.
Servo Motor
A servo motor is a type of motor where precise control of angular position is required.
- A servo motor receives a PWM (Pulse Width Modulation) signal on its control wire.
- The width of the pulse determines the position of the servo horn (output shaft).
- Input Signal (PWM): The control circuit receives a PWM (Pulse Width Modulation) signal, which dictates the desired position of the servo.
- Pulse Width: The length of the pulse determines the angle:
- 1 ms pulse width: Typically corresponds to 0 degrees.
- 1.5 ms pulse width: Corresponds to 90 degrees (midpoint).
- 2 ms pulse width: Corresponds to 180 degrees.
- The pulse width is sent every 20 ms in a 50 Hz (meaning the pulse is repeated every 20 ms) signal.
- Pulse Width: The length of the pulse determines the angle:
- However, Arduino programming with a servo motor is straightforward, the servo motor’s position is determined by a value ranging from 0 to 180 degrees.
- The Servo.h library, handles the conversion of the angle value to a PWM signal with the appropriate duty cycle and frequency, controlling the servo motor’s position.
Servo Motor Pin Configuration

Servo Motor Library
For basic servo motor control with an Arduino, you should use the standard Servo library, which is typically pre-installed with the Arduino IDE. However, if it’s not installed or if you’re looking for additional features, you can install it manually via the Arduino Library Manager.
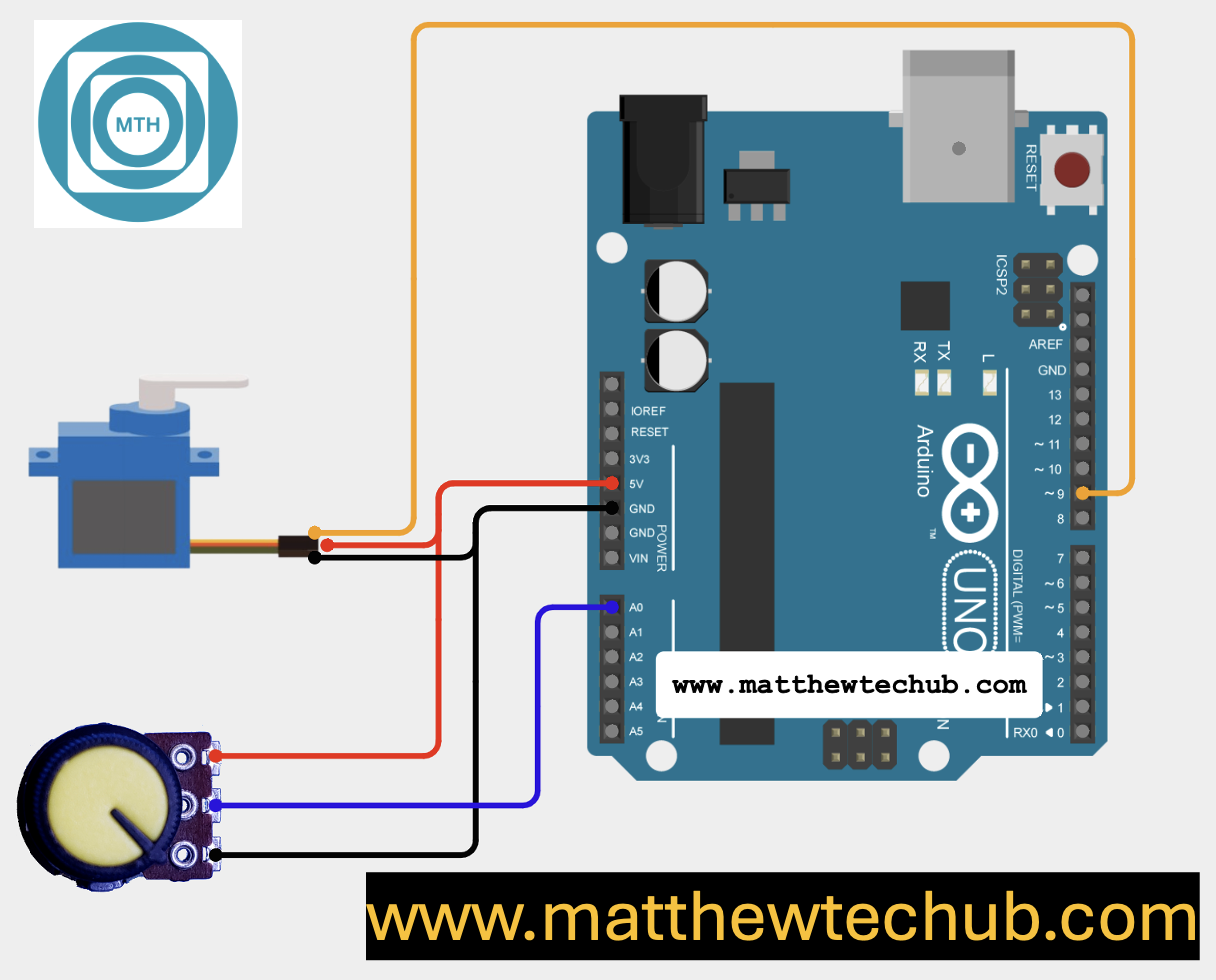
Circuit Wiring
Real-World Application
Potentiometer as the Steering Wheel:
- The potentiometer acts as a simplified model of a car’s steering wheel. Rotating the potentiometer simulates turning the steering wheel.
Servo Motor as the Steering Mechanism:
- The servo motor represents the part of the car that changes the direction of the wheels based on the steering input. In an electric car, this might correspond to the electronic steering actuator that moves the wheels left or right.
Angle Control:
- Just as in a real car, where the steering wheel’s position determines the car’s direction, the potentiometer’s position here directly determines the servo motor’s angle, simulating how the steering mechanism would work in an electric vehicle.
Program Code
In this project, the code is used to simulate how a steering system in an electric car might work by controlling a servo motor with a potentiometer. The potentiometer represents the steering wheel, and the servo motor represents the steering mechanism (the part that actually changes the direction of the wheels).
// www.matthewtechub.com
// servo motor-POT Interface
#include <Servo.h>

Servo myServo;  // Create a Servo object to control the servo motor
int potPin = A0;  // Define the analog pin where the potentiometer is connected
int potValue;     // Variable to store the value read from the potentiometer
int angle;        // Variable to store the angle for the servo motor

void setup() {
  myServo.attach(9);  // Attach the servo to digital pin 9
  Serial.begin(9600); // Initialize serial communication for debugging
}

void loop() {
  potValue = analogRead(potPin);           // Read the analog value from the potentiometer (0 to 1023)
  angle = map(potValue, 0, 1023, 0, 180);  // Map the potentiometer value to an angle (0 to 180 degrees)

  myServo.write(angle);  // Set the servo position to the mapped angle
  Serial.print("Potentiometer Value: ");  // Print the potentiometer value for debugging
  Serial.print(potValue);
  Serial.print("  -  Servo Angle: ");  // Print the servo angle for debugging
  Serial.println(angle);

  delay(50);  // Short delay to stabilize the reading and servo position
}
Code Explanation
#include <Servo.h>- This line includes the `Servo` library, which provides the necessary functions to control the servo motor.
   Servo myServo;  // Create a Servo object to control the servo motor
   int potPin = A0;  // Define the analog pin where the potentiometer is connected
   int potValue;     // Variable to store the value read from the potentiometer
   int angle;        // Variable to store the angle for the servo motor
- `myServo`: A Servo object is created to control the servo motor.
- `potPin`: The potentiometer is connected to the analog pin `A0`.
- `potValue`: This variable will store the value read from the potentiometer.
- `angle`: This variable will store the angle to which the servo motor will be set.
   void setup() {
     myServo.attach(9);  // Attach the servo to digital pin 9
     Serial.begin(9600); // Initialize serial communication for debugging
   }
- `myServo.attach(9);`: The servo motor is attached to pin 9 of the Arduino.
- `Serial.begin(9600);`: Initializes serial communication at a baud rate of 9600 for debugging purposes.
   void loop() {
     potValue = analogRead(potPin);           // Read the analog value from the potentiometer (0 to 1023)
     angle = map(potValue, 0, 1023, 0, 180);  // Map the potentiometer value to an angle (0 to 180 degrees)

     myServo.write(angle);  // Set the servo position to the mapped angle
     Serial.print("Potentiometer Value: ");  // Print the potentiometer value for debugging
     Serial.print(potValue);
     Serial.print("  -  Servo Angle: ");  // Print the servo angle for debugging
     Serial.println(angle);

     delay(50);  // Short delay to stabilize the reading and servo position
   }
- ‘ potValue = analogRead(potPin);’ : The Arduino reads the analog value from the potentiometer. This value ranges from 0 to 1023, depending on the position of the potentiometer.
- ‘angle = map(potValue, 0, 1023, 0, 180); ‘: The `map()` function is used to convert the potentiometer’s value (0-1023) into a corresponding servo motor angle (0-180 degrees). This is crucial because the servo motor can only rotate between 0 and 180 degrees.
- ‘myServo.write(angle);’ : The servo motor is commanded to rotate to the angle specified by the `angle` variable. This angle represents the direction of the car’s wheels, just as turning the steering wheel changes the direction of an actual car’s wheels.
     Serial.print("Potentiometer Value: ");
     Serial.print(potValue);
     Serial.print("  -  Servo Angle: ");
Serial.println(angle);- The potentiometer value and the corresponding servo angle are printed to the Serial Monitor for debugging purposes. This helps in visualizing how the rotation of the potentiometer (steering wheel) affects the servo motor (steering mechanism).
- ‘delay(50);’ : A short delay is added to stabilize the servo’s movement and ensure smooth operation.

