About The Project
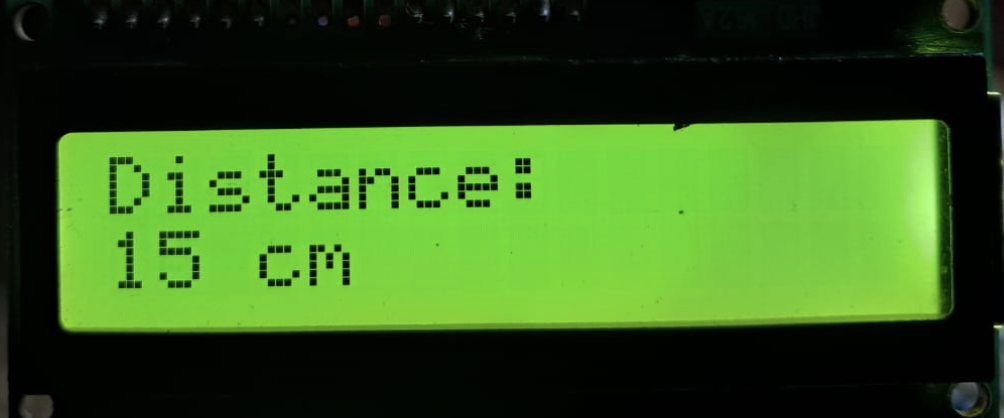
The project involves creating a distance measurement system using an ultrasonic sensor and Arduino, with real-time distance data displayed on an LCD. This system accurately calculates and displays the distance between the sensor and an object, making it useful for various applications such as obstacle detection or level monitoring.
Ultrasonic Sensor (HC-SR04)
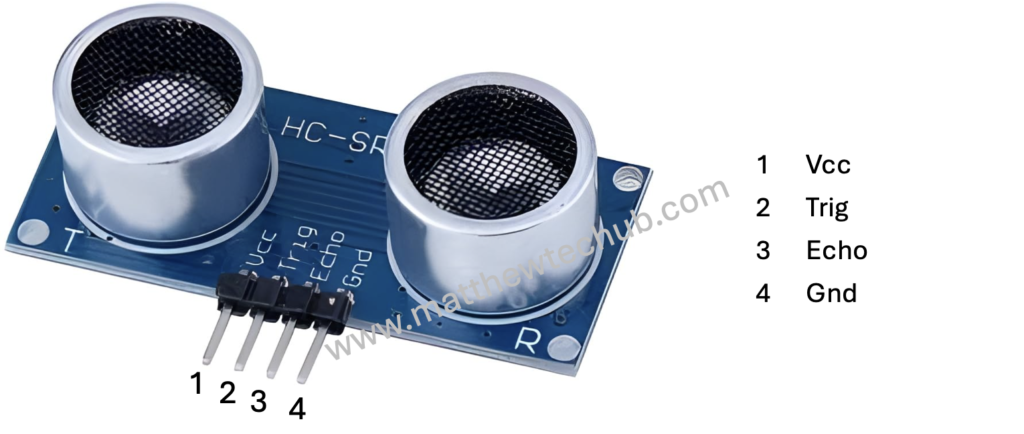
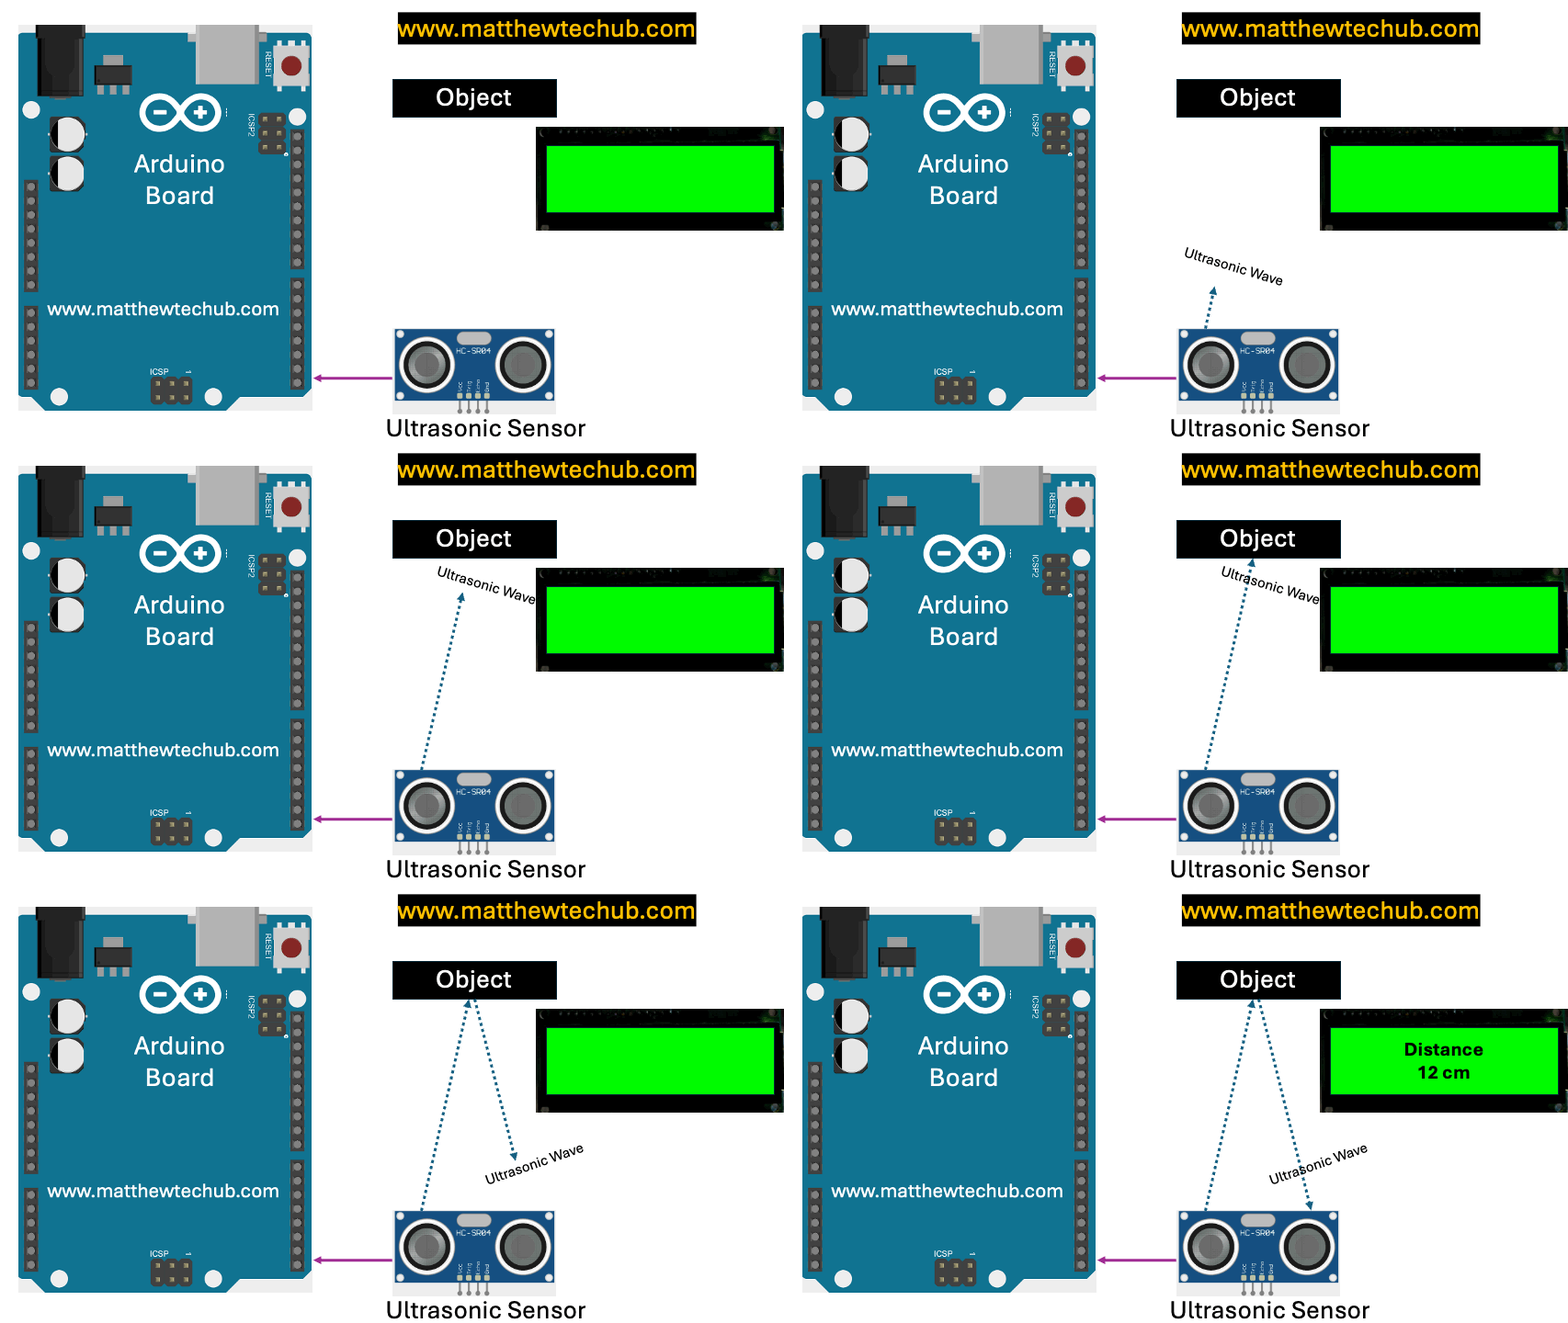
The working principle of an ultrasonic distance sensor is based on the echo of high-frequency sound (Ultrasonic Sound)waves.
- Sound Wave Emission: The sensor emits short pulses of ultrasonic sound waves (typically above the range of human hearing, around 40 kHz).
- Travel to Object: These sound waves travel through the air and bounce off any obstacle or object in their path.
- Echo Reception: The sensor then listens for the echoes of the sound waves reflected back from the object.
Time Calculation : By measuring the time interval between sending the sound pulse and receiving its echo, the Arduino Uno calculates the distance to the object using the formula: Distance = Speed of Sound ×Time interval between sending the sound pulse and receiving its echo/2.
Speed of Sound: The speed of sound wave in air is approximately 343 meters per second .
LCD Display
An LCD (Liquid Crystal Display) is an electronic display module that uses liquid crystals to produce visual output.
How LCDs Work
- Liquid Crystals: The display uses liquid crystals that align to block or allow light to pass through when an electric field is applied.
- Backlight: Most LCDs are backlit to improve visibility in various lighting conditions.
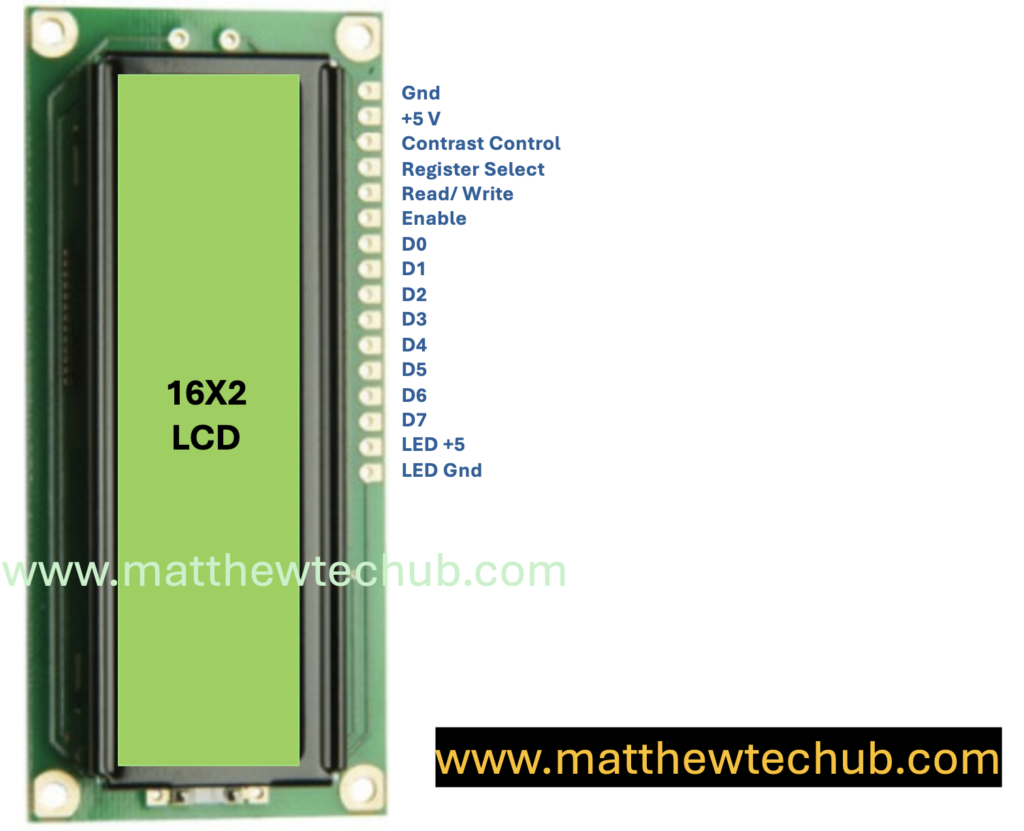
Pin Description for Standard Character LCD Module (e.g., 16×2 or 20×4)
- VSS (Pin 1) – Ground
- Purpose: This pin is connected to the ground of the circuit.
- VDD (Pin 2) – Power Supply
- Purpose: This pin is connected to the positive power supply, usually 5V.
- VO (Pin 3) – Contrast Adjustment
- Purpose: This pin is used to adjust the contrast of the display. It’s usually connected to a potentiometer to vary the contrast by adjusting the voltage between 0V and 5V.
- RS (Pin 4) – Register Select
- Purpose: This pin selects the register to which data is sent.
- 0: Instruction Register (commands)
- 1: Data Register (text or data to display)
- Purpose: This pin selects the register to which data is sent.
- RW (Pin 5) – Read/Write
- Purpose: This pin selects the mode of operation.
- 0: Write mode (data/command from Arduino to LCD)
- 1: Read mode (data from LCD to Arduino, not often used)
- Purpose: This pin selects the mode of operation.
- E (Pin 6) – Enable
- Purpose: This pin enables the data read/write operation. When it’s toggled from low to high, data is written to or read from the LCD.
7-10. D0-D3 (Pins 7-10) – Data Pins (Optional)
- Purpose: These are the lower 4 bits of the data bus. They are used in 8-bit mode. In 4-bit mode, these pins can be left unconnected.
11-14. D4-D7 (Pins 11-14) – Data Pins
- Purpose: These are the higher 4 bits of the data bus. In 4-bit mode, these are the primary data pins used to send data/commands to the LCD.
- LED+ (Pin 15) – Backlight Anode (optional)
- Purpose: This pin is connected to the positive terminal of the backlight LED. Typically connected to 5V with a current-limiting resistor.
- LED- (Pin 16) – Backlight Cathode (optional)
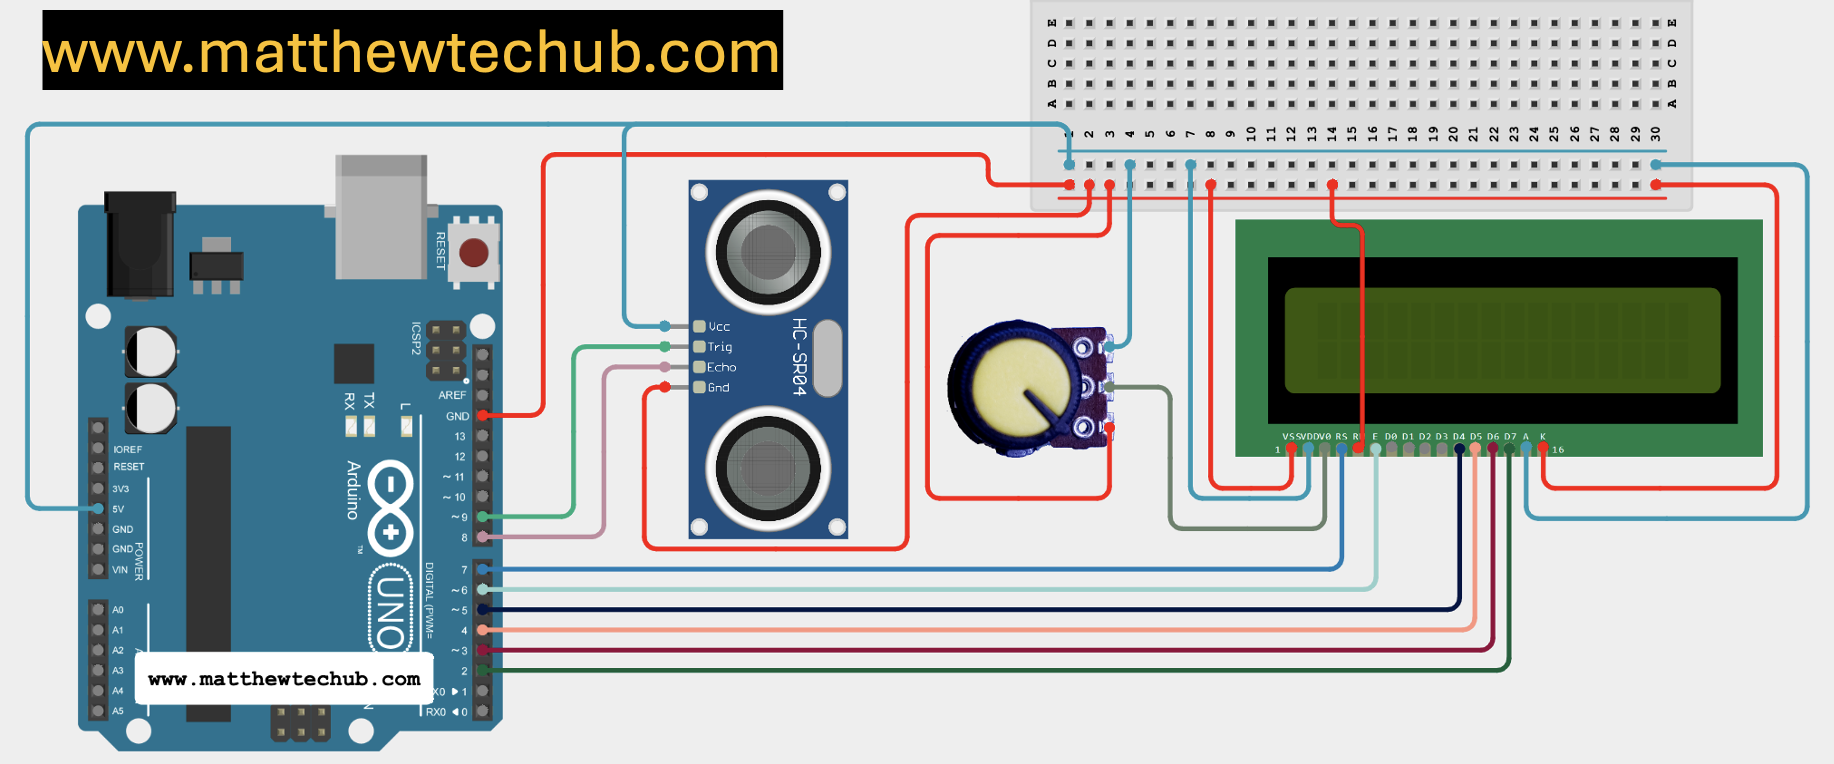
Circuit Wiring
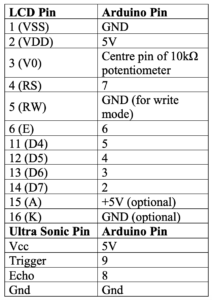
Program Code
// www.matthewtechub.com
// lcd -distance
// LCD pin = Arduino pin
// RS = 7, EN = 6, D4 = 5, D5 = 4, D6 = 3, D7 = 2
// Ultrasonic Sensor pins: Trig = 9, Echo = 8

#include <LiquidCrystal.h>

// Initialize the library with the numbers of the interface pins
LiquidCrystal lcd(7, 6, 5, 4, 3, 2);

const int trigPin = 9; // Trig pin of the ultrasonic sensor
const int echoPin = 8; // Echo pin of the ultrasonic sensor
long duration;
int distance;

void setup() {
  lcd.begin(16, 2);  // Set up the LCD's number of columns and rows
  lcd.setCursor(0, 0);  // Move cursor to (0, 0)
  lcd.print("Distance:");  // Print "Distance:" at (0, 0)

  pinMode(trigPin, OUTPUT);  // Set the Trig pin as an output
  pinMode(echoPin, INPUT);   // Set the Echo pin as an input
}

void loop() {
  // Clear the trigPin by setting it LOW for 2 microseconds
  digitalWrite(trigPin, LOW);
  delayMicroseconds(2);

  // Trigger the sensor by setting the trigPin HIGH for 10 microseconds
  digitalWrite(trigPin, HIGH);
  delayMicroseconds(10);
  digitalWrite(trigPin, LOW);

  // Read the echoPin, returns the sound wave travel time in microseconds
  duration = pulseIn(echoPin, HIGH);

  // Calculate the distance in centimeters
  distance = duration * 0.034 / 2;

  // Display the distance on the LCD
  lcd.setCursor(0, 1);  // Move cursor to (0, 1)
  lcd.print("                ");  // Clear the previous value
  lcd.setCursor(0, 1);  // Move cursor to (0, 1)
  lcd.print(distance);  // Print the distance
  lcd.print(" cm");  // Print "cm"

  delay(500);  // Delay for stability
}
This Arduino code is designed to interface an ultrasonic sensor with an LCD display to measure and display the distance to an object in front of the sensor.
Code Explanation
#include <LiquidCrystal.h>- This line includes the `LiquidCrystal` library, which is essential for controlling the LCD display.
LiquidCrystal lcd(7, 6, 5, 4, 3, 2);- This line initializes the LCD by specifying the Arduino pins connected to the LCD:
- RS (Register Select) to Arduino pin 7
- EN (Enable) to Arduino pin 6
- D4 to Arduino pin 5
- D5 to Arduino pin 4
- D6 to Arduino pin 3
- D7 to Arduino pin 2
const int trigPin = 9; // Trig pin of the ultrasonic sensor
const int echoPin = 8; // Echo pin of the ultrasonic sensor
- These lines assign the Trig and Echo pins of the ultrasonic sensor to Arduino pins 9 and 8 respectively.
long duration;
int distance;
- `duration` will store the time taken by the ultrasonic pulse to travel to the object and back.
- `distance` will store the calculated distance based on the time duration.
void setup() {
  lcd.begin(16, 2);  // Set up the LCD's number of columns and rows
  lcd.setCursor(0, 0);  // Move cursor to (0, 0)
  lcd.print("Distance:");  // Print "Distance:" at (0, 0)

  pinMode(trigPin, OUTPUT);  // Set the Trig pin as an output
  pinMode(echoPin, INPUT);   // Set the Echo pin as an input
}
- `lcd.begin(16, 2);`: Initializes the LCD with 16 columns and 2 rows.
- `lcd.setCursor(0, 0);`: Sets the cursor to the first row, first column.
- `lcd.print(“Distance:”);`: Prints the label “Distance:” on the LCD.
- `pinMode(trigPin, OUTPUT);` and `pinMode(echoPin, INPUT);`: Configures the Trig pin as an output (to send the pulse) and the Echo pin as an input (to receive the reflected pulse).
digitalWrite(trigPin, LOW);
delayMicroseconds(2);
- `digitalWrite(trigPin, LOW);`: Sets the `trigPin` (connected to the trigger pin of the ultrasonic sensor) to LOW, ensuring it’s in a clear state before sending a pulse.
- `delayMicroseconds(2);`: Waits for 2 microseconds. This delay ensures that the `trigPin` is fully cleared before it is triggered.
digitalWrite(trigPin, HIGH);
delayMicroseconds(10);
digitalWrite(trigPin, LOW);
- `digitalWrite(trigPin, HIGH);`: Sets the `trigPin` HIGH for 10 microseconds. This HIGH signal causes the ultrasonic sensor to send out an ultrasonic pulse.
- `delayMicroseconds(10);`: Holds the `trigPin` HIGH for 10 microseconds, which is enough time to trigger the ultrasonic pulse.
- `digitalWrite(trigPin, LOW);`: Sets the `trigPin` back to LOW after the pulse has been sent.
duration = pulseIn(echoPin, HIGH);- `duration = pulseIn(echoPin, HIGH);`: Measures the time taken for the ultrasonic pulse to travel to the object and return to the sensor. The `pulseIn` function returns this time in microseconds. The function waits for the `echoPin` (connected to the echo pin of the ultrasonic sensor) to go HIGH, times how long it stays HIGH, and returns this duration.
distance = duration * 0.034 / 2;- `distance = duration * 0.034 / 2;`: Converts the duration into distance. The speed of sound is approximately 0.034 cm/μs, so the formula `duration * 0.034` calculates the distance travelled by the pulse in centimetres. Since the pulse travels to the object and back, the distance is divided by 2.
lcd.setCursor(0, 1);
lcd.print("                ");
lcd.setCursor(0, 1);
lcd.print(distance);
lcd.print(" cm");
- `lcd.setCursor(0, 1);`: Moves the cursor to the second row and first column of the LCD.
- `lcd.print(” “);`: Clears any previous distance value displayed by printing a row of spaces.
- `lcd.setCursor(0, 1);`: Resets the cursor to the second row and first column again.
- `lcd.print(distance);`: Prints the current distance value calculated.
- `lcd.print(” cm”);`: Appends “cm” after the distance value to indicate the unit of measurement.
delay(500);- `delay(500);`: Introduces a 500-millisecond delay between each measurement cycle to provide stability and prevent rapid flickering of the displayed value on the LCD.
LCD Display Output
