About the Project
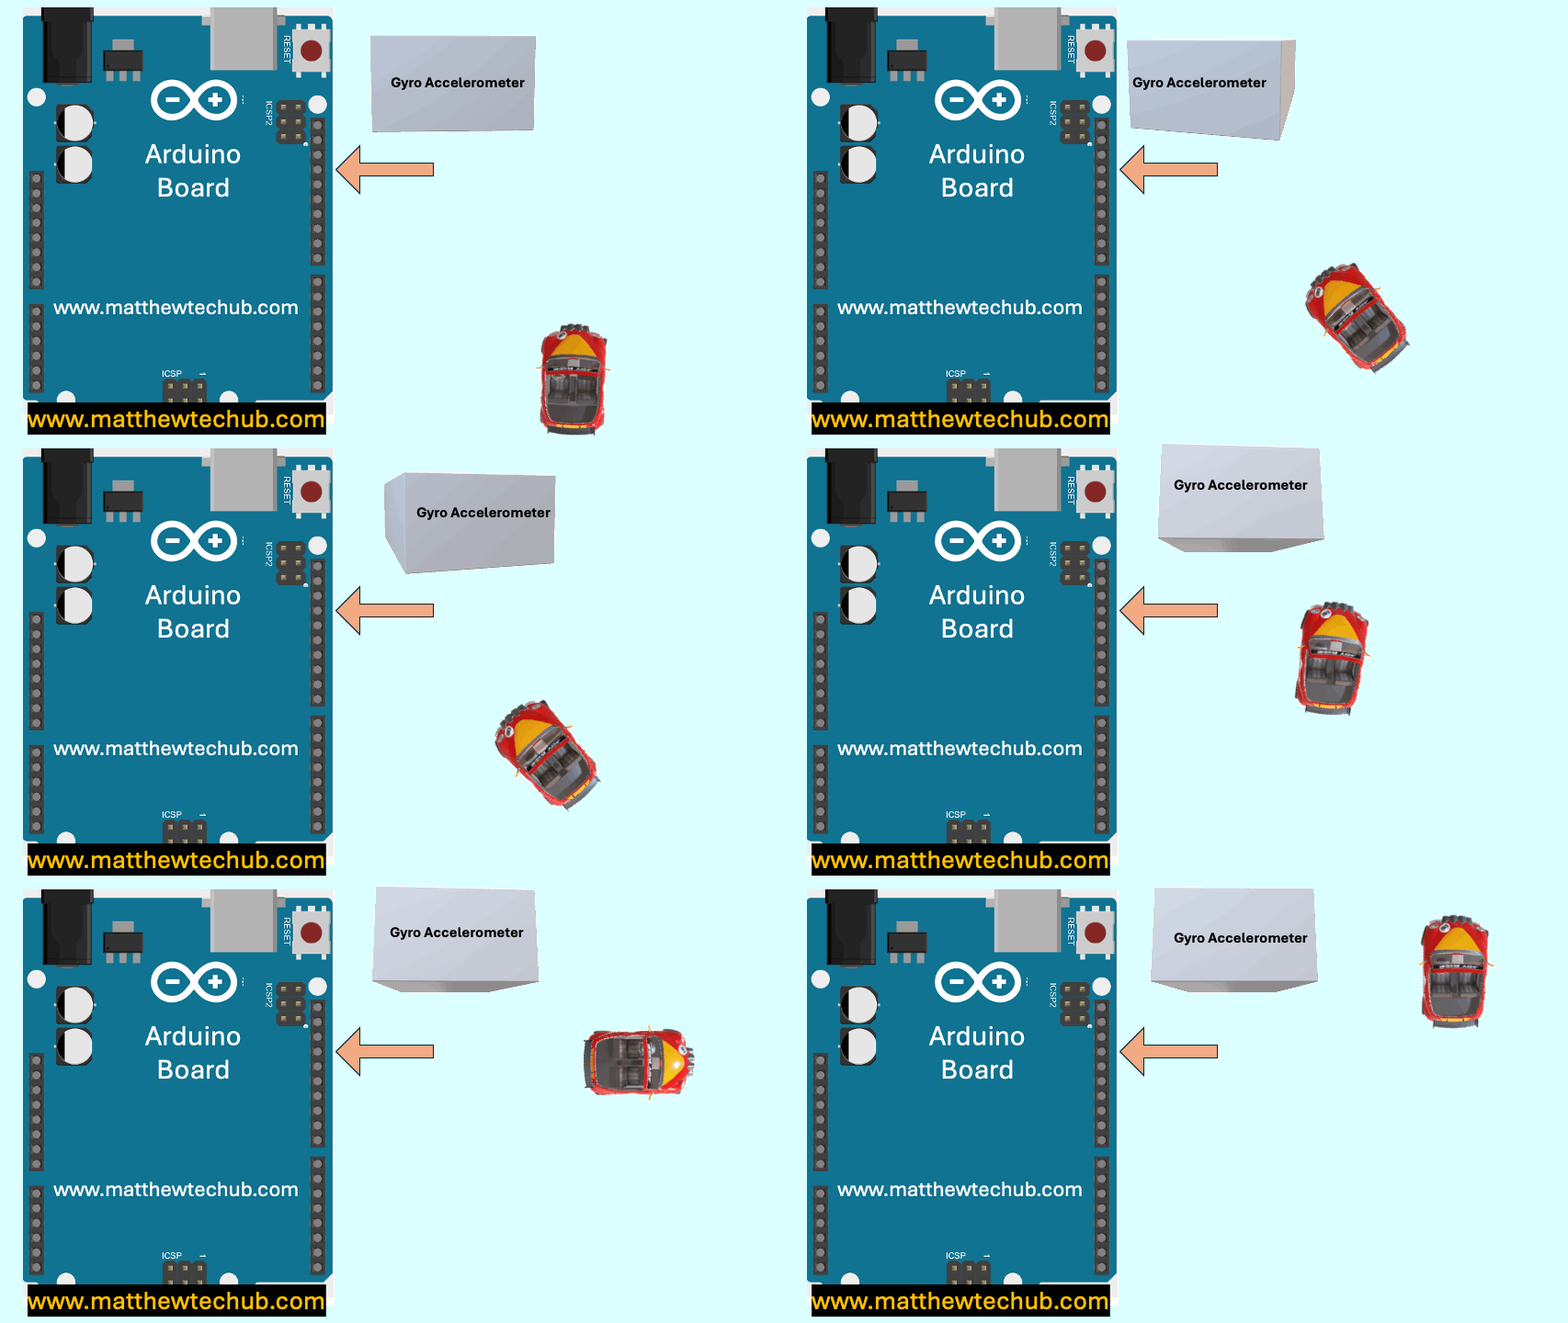
This project uses an MPU6050 sensor to control the speed and direction of a toy car by detecting tilt angles along the X and Y axes. By tilting the controller, the user can move the car forward, backward, or turn it left and right. The car’s two DC motors respond to these tilt inputs, providing intuitive and responsive control.
Gyro Accelerometer
The Gyro Accelerometer is a sensor that integrates both an accelerometer and a gyroscope. It measures linear acceleration and rotational velocity along three axes (X, Y, Z). This sensor is widely used in motion-sensing applications, such as drones, robotics, and gaming devices, for tracking movement and orientation.
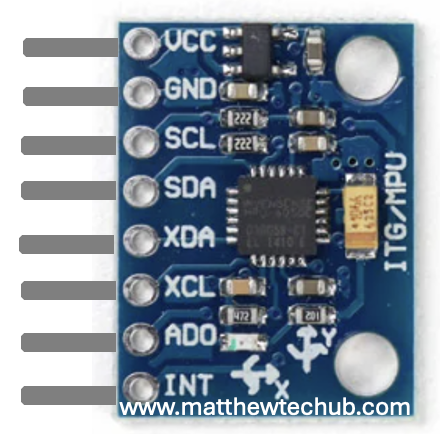
MPU 6050 Module Pin Diagram
The MPU-6050 is a motion tracking sensor combining a 3-axis gyroscope and a 3-axis accelerometer.
MPU6050 Working
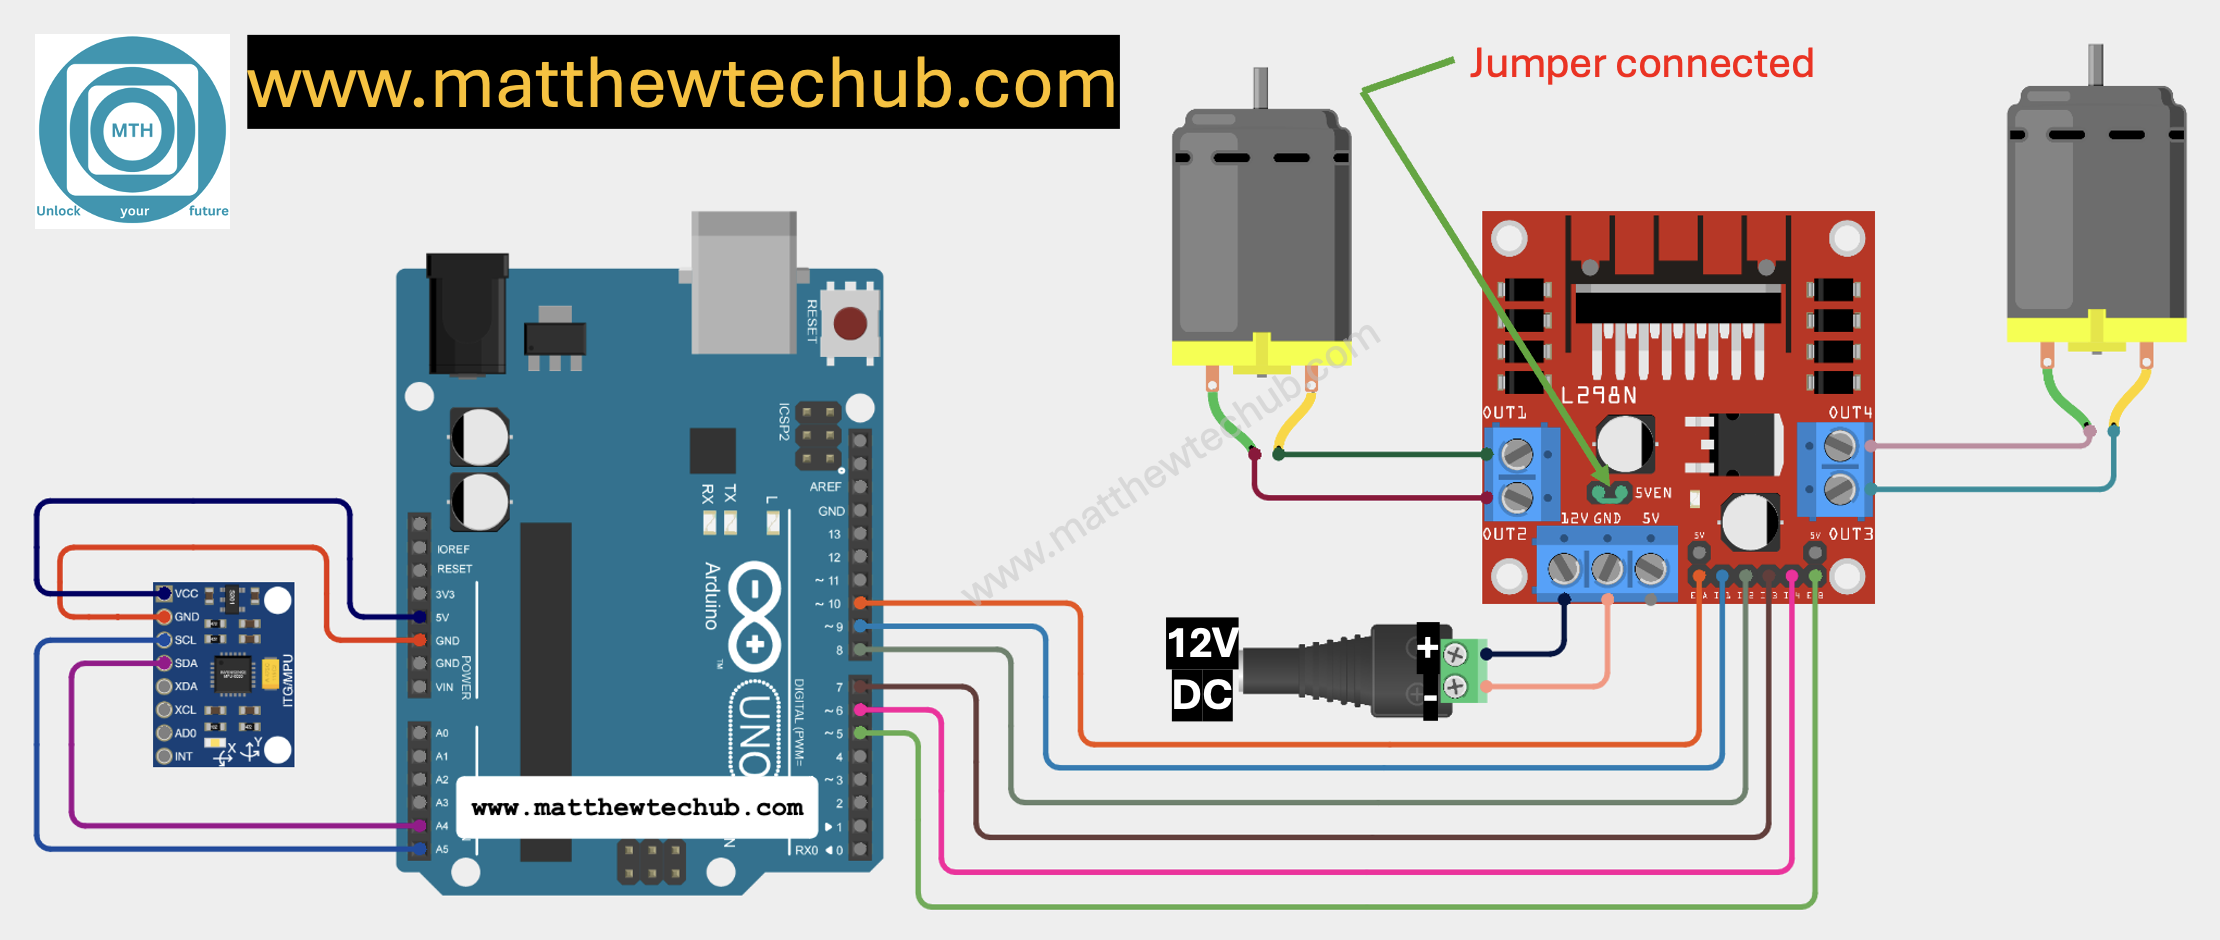
This project utilizes an MPU6050 sensor connected to an Arduino Uno to measure and analyse tilt angles. The MPU6050 combines a gyroscope and accelerometer to capture rotational speed and linear acceleration along the X, Y, and Z axes. By detecting rotational rates and changes in velocity, the sensor provides detailed data on both the device’s orientation and movement.
DC Motor
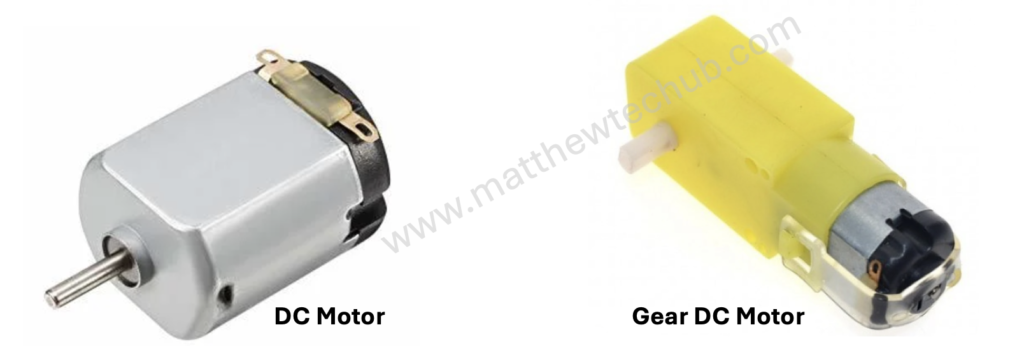
A DC motor is a device that turns electrical energy into mechanical motion. When you run electricity through the motor, it creates a magnetic field that makes a part of the motor spin. This spinning motion is what powers things like fans, toys, and even electric cars.
The direction of motion in a DC motor is determined by the direction of the electrical current flowing through the motor’s windings. Changing the polarity of the voltage applied to the motor (i.e., swapping the positive and negative connections) will reverse the direction of the current flowing through the motor’s windings.
The speed of a DC motor is directly proportional to the applied voltage. Increasing the voltage increases the motor speed, while decreasing the voltage reduces the motor speed.
Geared DC motors are commonly used in many applications. The gear reduction in these motors allows for lower output speeds while maintaining high torque. This is essential for applications that require precise and controlled movements, such as robotics, conveyor belts, and automated machinery.
L298N
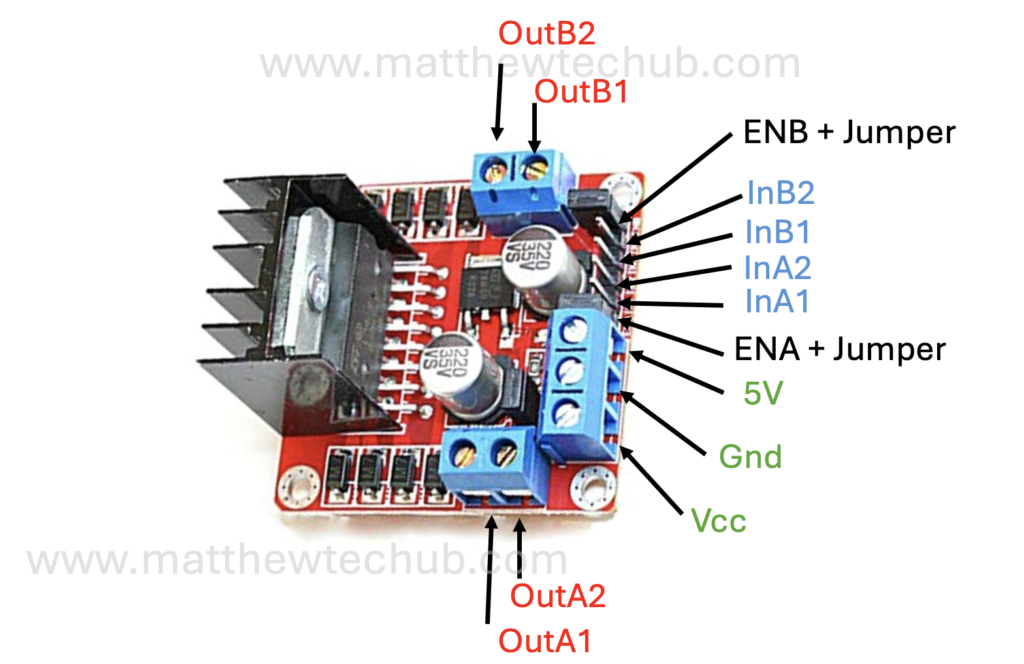
The L298N is a popular dual H-bridge motor driver integrated circuit (IC) that allows you to control the speed and direction of two DC motors or control one stepper motor.
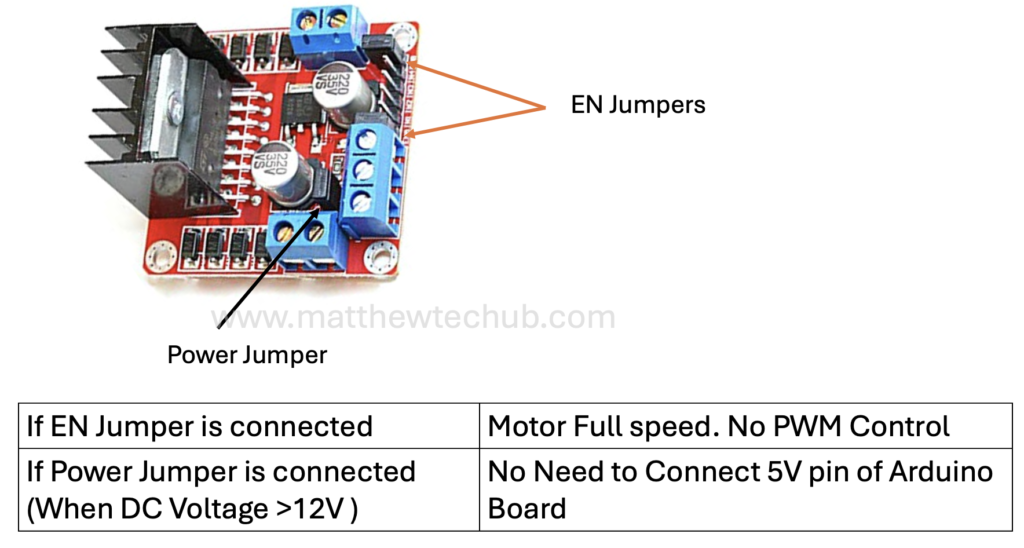
Jumpers in L298N Motor Driver Module
Understanding the jumpers on the L298N motor driver module is crucial for proper configuration and use. Whether you’re running motors at full speed or controlling their speed with PWM, setting the jumpers correctly is key to achieving desired functionality.
Circuit Wiring
Library Installation
To use the Wire, Adafruit_MPU6050, and Adafruit_Sensor libraries in your Arduino project, you need to install them in the Arduino IDE. Here’s a step-by-step guide on how to install these libraries:
- Install the Wire Library
The Wire library is a core library included with the Arduino IDE, so you don’t need to install it separately. It provides support for I2C communication, which is used to interface with the MPU6050 sensor.
- Install the Adafruit_MPU6050 Library
This library is specific to the MPU6050 sensor and is provided by Adafruit. Follow these steps to install it:
- Open the Arduino IDE.
- Go to the Library Manager:
- Click on Sketch in the top menu.
- Select Include Library > Manage Libraries….
- Search for the Library:
- In the Library Manager, type Adafruit MPU6050 into the search box.
- Install the Library:
- Find the Adafruit MPU6050 library in the search results.
- Click on it to select it.
- Click the Install button to add it to your Arduino IDE.
- Install the Adafruit_Sensor Library
The Adafruit_Sensor library is a dependency for the Adafruit_MPU6050 library and provides a common interface for various Adafruit sensors.
- Open the Arduino IDE.
- Go to the Library Manager:
- Click on Sketch in the top menu.
- Select Include Library > Manage Libraries….
- Search for the Library:
- In the Library Manager, type Adafruit Sensor into the search box.
- Install the Library:
- Find the Adafruit Sensor library in the search results.
- Click on it to select it.
- Click the Install button to add it to your Arduino IDE.
Program Code
// www.matthewtechub.com
// Control Toy Car Speed and Direction with MPU6050 Tilt
#include <Wire.h>
#include <Adafruit_MPU6050.h>
#include <Adafruit_Sensor.h>

Adafruit_MPU6050 mpu;

// Define motor control pins for Left Motor (Motor 1)
const int motor1PWM = 10;  // PWM pin for speed control (Left motor)
const int motor1Dir1 = 9;  // Direction pin 1 (Left motor)
const int motor1Dir2 = 8;  // Direction pin 2 (Left motor)

// Define motor control pins for Right Motor (Motor 2)
const int motor2PWM = 5;   // PWM pin for speed control (Right motor)
const int motor2Dir1 = 6;  // Direction pin 1 (Right motor)
const int motor2Dir2 = 7;  // Direction pin 2 (Right motor)

void setup() {
  Serial.begin(9600);
  while (!Serial)
    delay(10); // Wait for Serial Monitor to open

  // Initialize motor control pins
  pinMode(motor1PWM, OUTPUT);
  pinMode(motor1Dir1, OUTPUT);
  pinMode(motor1Dir2, OUTPUT);

  pinMode(motor2PWM, OUTPUT);
  pinMode(motor2Dir1, OUTPUT);
  pinMode(motor2Dir2, OUTPUT);

  // Try to initialize the MPU6050
  if (!mpu.begin()) {
    Serial.println("Failed to find MPU6050 chip");
    while (1) {
      delay(10);
    }
  }
  Serial.println("MPU6050 Found!");

  // Set the accelerometer range
  mpu.setAccelerometerRange(MPU6050_RANGE_2_G);

  // Set the gyro range
  mpu.setGyroRange(MPU6050_RANGE_250_DEG);

  // Set the filter bandwidth
  mpu.setFilterBandwidth(MPU6050_BAND_21_HZ);

  delay(100);
}

void loop() {
  sensors_event_t a, g, temp;
  mpu.getEvent(&a, &g, &temp);

  // Calculate tilt angles in degrees for X and Y axes
  float angleX = atan2(a.acceleration.y, a.acceleration.z) * 180.0 / PI;
  float angleY = atan2(-a.acceleration.x, a.acceleration.z) * 180.0 / PI;

  // Print tilt angles
  Serial.print("Tilt Angle X: ");
  Serial.print(angleX);
  Serial.print("° | Tilt Angle Y: ");
  Serial.print(angleY);
  Serial.println("°");

  // Control car direction and speed
  if (angleY > 5) {
    // Forward movement
    moveForward(angleY);
  }
  else if (angleY < -5) {
    // Backward movement
    moveBackward(angleY);
  }
  else {
    // Stop motors when tilt is between -5° and +5°
    stopMotors();
  }

  // Turning control based on X-axis tilt
  if (angleX > 5) {
    // Right turn
    turnRight(angleX);
  }
  else if (angleX < -5) {
    // Left turn
    turnLeft(angleX);
  }

  delay(100);
}

// Function to move forward
void moveForward(float angleY) {
  digitalWrite(motor1Dir1, HIGH);
  digitalWrite(motor1Dir2, LOW);
  digitalWrite(motor2Dir1, HIGH);
  digitalWrite(motor2Dir2, LOW);

  int speed = map(angleY, 5, 90, 0, 255); // Map tilt angle to PWM range
  analogWrite(motor1PWM, speed);
  analogWrite(motor2PWM, speed);
  Serial.println("Moving forward with speed: " + String(speed));
}

// Function to move backward
void moveBackward(float angleY) {
  digitalWrite(motor1Dir1, LOW);
  digitalWrite(motor1Dir2, HIGH);
  digitalWrite(motor2Dir1, LOW);
  digitalWrite(motor2Dir2, HIGH);

  int speed = map(angleY, -5, -90, 0, 255); // Map tilt angle to PWM range
  analogWrite(motor1PWM, speed);
  analogWrite(motor2PWM, speed);
  Serial.println("Moving backward with speed: " + String(speed));
}

// Function to stop the motors
void stopMotors() {
  analogWrite(motor1PWM, 0);
  analogWrite(motor2PWM, 0);
  Serial.println("Motors stopped.");
}

// Function to turn right
void turnRight(float angleX) {
  // Slow down left motor to turn right
  int speed = map(angleX, 5, 90, 255, 0); // Reduce left motor speed based on tilt angle
  analogWrite(motor1PWM, speed);
  Serial.println("Turning right with adjusted speed.");
}

// Function to turn left
void turnLeft(float angleX) {
  // Slow down right motor to turn left
  int speed = map(angleX, -5, -90, 255, 0); // Reduce right motor speed based on tilt angle
  analogWrite(motor2PWM, speed);
  Serial.println("Turning left with adjusted speed.");
}
This code controls a toy car’s speed and direction using the MPU6050 sensor to detect tilt angles on the X (left-right) and Y (forward-backward) axes. Two DC motors are used for the front wheels of the car, and a free wheel is at the back. Based on the tilt, the car moves forward, backward, or turns left and right.
Code Explanation
Initialization:
- `Wire.h` and `Adafruit_MPU6050.h` libraries are included to communicate with the MPU6050 sensor over the I2C protocol.
- The motor control pins are defined for two DC motors:
- Motor 1 (left motor) uses pins 10, 9, and 8.
- Motor 2 (right motor) uses pins 5, 6, and 7.
- In `setup()`, the motor pins are set as output pins. The MPU6050 is initialized, and its settings (accelerometer range, gyro range, and filter bandwidth) are configured.
Reading Sensor Data:
- In the `loop()`, the `mpu.getEvent()` function retrieves the latest sensor data (accelerometer, gyroscope, and temperature) from the MPU6050.
- The tilt angles along the X and Y axes are calculated using the `atan2()` function:
- X-axis tilt (angleX) controls the car’s turning.
- Y-axis tilt (angleY) controls the forward/backward motion and speed.
Controlling the Toy Car’s Motion:
- The car moves forward when the Y-axis tilt is greater than 5°. The speed is mapped from the angle range (5° to 90°) to a PWM value between 0 and 255. The two motors are driven in the forward direction by setting `INA1` and `INB1` high, while the other direction pins are set low.
- The car moves backward when the Y-axis tilt is less than -5°. The speed is again mapped to the PWM range, and the motors are driven in reverse by setting `INA2` and `INB2` high while keeping `INA1` and `INB1` low.
- The car stops when the tilt angle on the Y-axis is between -5° and 5°, indicating a near-horizontal position.
Turning the Toy Car:
- If the **X-axis tilt** is greater than 5°, the car turns **right** by reducing the speed of the left motor. This is done by mapping the X-axis tilt to the speed of the left motor and adjusting it accordingly.
- Similarly, if the X-axis tilt is less than -5°, the car turns **left** by reducing the speed of the right motor.
Helper Functions:
- `moveForward(float angleY)`: Controls both motors to move the car forward, with speed based on the Y-axis tilt.
- `moveBackward(float angleY)`: Controls both motors to move the car backward, with speed mapped similarly.
- `stopMotors()`: Stops both motors by writing a PWM value of 0, halting the car.
- `turnRight(float angleX)`: Slows down the left motor to turn the car right based on the tilt angle on the X-axis.
- `turnLeft(float angleX)`: Slows down the right motor to turn the car left based on the tilt angle on the X-axis.
The toy car’s movement is entirely controlled by the MPU6050 sensor, which detects the tilt of the controller. Tilting forward or backward adjusts the car’s speed, while tilting left or right adjusts the direction by slowing down one of the motors. This combination allows smooth control of both speed and direction.
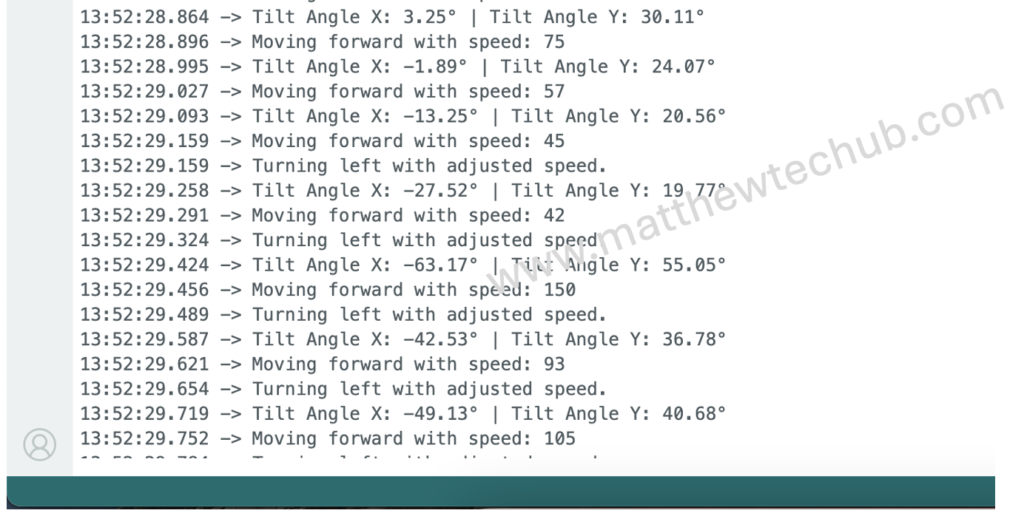
Screenshot
