About the Project
This project involves using an MPU6050 sensor to detect slopes along the X and Y axes. The real-time tilt information helps assess the orientation and slope of an object, providing practical applications in motion and balance detection systems.
Gyro Accelerometer
The Gyro Accelerometer is a sensor that integrates both an accelerometer and a gyroscope. It measures linear acceleration and rotational velocity along three axes (X, Y, Z). This sensor is widely used in motion-sensing applications, such as drones, robotics, and gaming devices, for tracking movement and orientation.
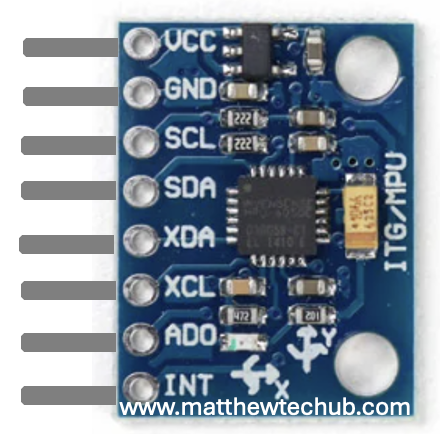
MPU 6050 Module Pin Diagram
MPU6050 Working
This project utilizes an MPU6050 sensor connected to an Arduino Uno to measure and analyse tilt angles. The MPU6050 combines a gyroscope and accelerometer to capture rotational speed and linear acceleration along the X, Y, and Z axes. By detecting rotational rates and changes in velocity, the sensor provides detailed data on both the device’s orientation and movement.
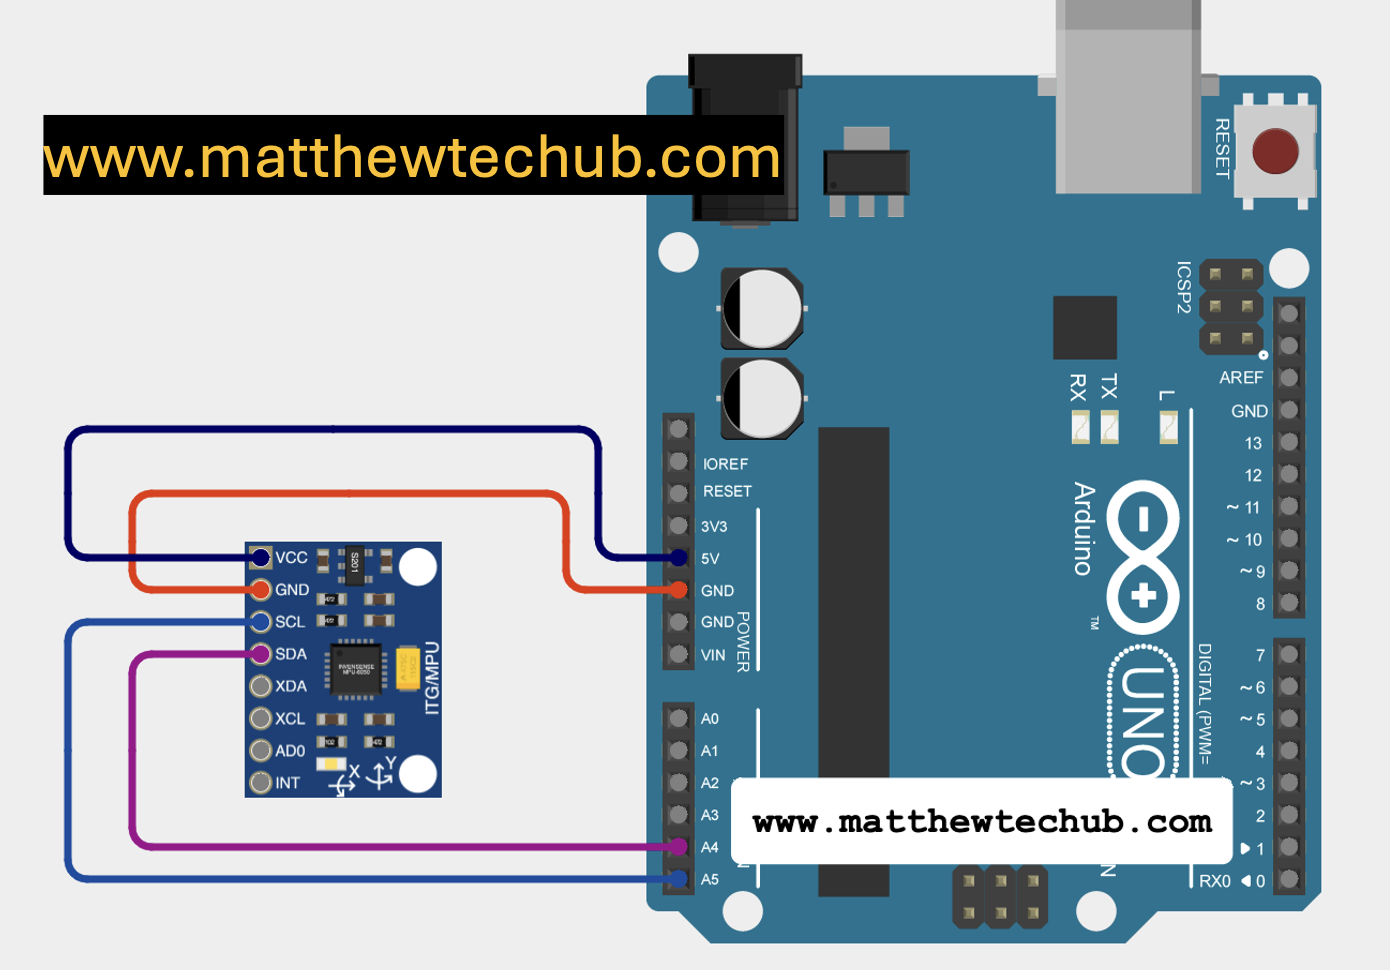
Circuit Wiring
Library Installation
To use the Wire, Adafruit_MPU6050, and Adafruit_Sensor libraries in your Arduino project, you need to install them in the Arduino IDE. Here’s a step-by-step guide on how to install these libraries:
- Install the Wire Library
The Wire library is a core library included with the Arduino IDE, so you don’t need to install it separately. It provides support for I2C communication, which is used to interface with the MPU6050 sensor.
- Install the Adafruit_MPU6050 Library
This library is specific to the MPU6050 sensor and is provided by Adafruit. Follow these steps to install it:
- Open the Arduino IDE.
- Go to the Library Manager:
- Click on Sketch in the top menu.
- Select Include Library > Manage Libraries….
- Search for the Library:
- In the Library Manager, type Adafruit MPU6050 into the search box.
- Install the Library:
- Find the Adafruit MPU6050 library in the search results.
- Click on it to select it.
- Click the Install button to add it to your Arduino IDE.
- Install the Adafruit_Sensor Library
The Adafruit_Sensor library is a dependency for the Adafruit_MPU6050 library and provides a common interface for various Adafruit sensors.
- Open the Arduino IDE.
- Go to the Library Manager:
- Click on Sketch in the top menu.
- Select Include Library > Manage Libraries….
- Search for the Library:
- In the Library Manager, type Adafruit Sensor into the search box.
- Install the Library:
- Find the Adafruit Sensor library in the search results.
- Click on it to select it.
- Click the Install button to add it to your Arduino IDE.
Program Code
// www.matthewtechub.com
// Calculate and Print Slope in X and Y Directions with MPU6050
#include <Wire.h>
#include <Adafruit_MPU6050.h>
#include <Adafruit_Sensor.h>

Adafruit_MPU6050 mpu;

void setup() {
  Serial.begin(9600);
  while (!Serial)
    delay(10); // Wait for Serial Monitor to open

  // Try to initialize the MPU6050
  if (!mpu.begin()) {
    Serial.println("Failed to find MPU6050 chip");
    while (1) {
      delay(10);
    }
  }
  Serial.println("MPU6050 Found!");

  // Set the accelerometer range
  mpu.setAccelerometerRange(MPU6050_RANGE_2_G);

  // Set the gyro range
  mpu.setGyroRange(MPU6050_RANGE_250_DEG);

  // Set the filter bandwidth
  mpu.setFilterBandwidth(MPU6050_BAND_21_HZ);

  delay(100);
}

void loop() {
  sensors_event_t a, g, temp;
  mpu.getEvent(&a, &g, &temp);

  // Calculate tilt angles in degrees
  float angleX = atan2(a.acceleration.y, a.acceleration.z) * 180.0 / PI;
  float angleY = atan2(-a.acceleration.x, a.acceleration.z) * 180.0 / PI;

  // Normalize angles to a range of -90° to 90°
  if (angleX > 90) angleX = 180 - angleX;
  if (angleX < -90) angleX = -180 - angleX;

  if (angleY > 90) angleY = 180 - angleY;
  if (angleY < -90) angleY = -180 - angleY;

  // Calculate slopes for X and Y axes
  float slopeX = tan(angleX * PI / 180.0);  // Convert angle to radians and calculate slope
  float slopeY = tan(angleY * PI / 180.0);  // Convert angle to radians and calculate slope

  // Print tilt angles and slopes
  Serial.print("Tilt Angle X: ");
  Serial.print(angleX);
  Serial.print("° | Slope X: ");
  Serial.print(slopeX);
  Serial.print(" | Tilt Angle Y: ");
  Serial.print(angleY);
  Serial.print("° | Slope Y: ");
  Serial.println(slopeY);

  Serial.println("-------------------");
  delay(500);
}
- The code initialises and configures the MPU6050 sensor.
- In the `loop()` function, it reads acceleration data to compute tilt angles for the X and Y axes.
- It calculates slopes from these angles and prints both angles and slopes to the Serial Monitor.
- The angles are normalised, and slopes are derived using the tangent function.
Code Explanation
// Calculate and Print Slope in X and Y Directions with MPU6050
#include <Wire.h>
#include <Adafruit_MPU6050.h>
#include <Adafruit_Sensor.h>

Adafruit_MPU6050 mpu;
Includes Libraries: This code includes necessary libraries for communicating with the MPU6050 sensor (`Wire.h` for I2C communication and `Adafruit_MPU6050.h` for sensor functions).
void setup() {
  Serial.begin(9600);
  while (!Serial)
    delay(10); // Wait for Serial Monitor to open
Setup Function: Initializes serial communication at 9600 baud rate and waits until the Serial Monitor is ready.
  // Try to initialize the MPU6050
  if (!mpu.begin()) {
    Serial.println("Failed to find MPU6050 chip");
    while (1) {
      delay(10);
    }
  }
  Serial.println("MPU6050 Found!");
MPU6050 Initialization: Attempts to initialize the MPU6050 sensor. If initialization fails, it prints an error message and halts execution.
  // Set the accelerometer range
  mpu.setAccelerometerRange(MPU6050_RANGE_2_G);

  // Set the gyro range
  mpu.setGyroRange(MPU6050_RANGE_250_DEG);

  // Set the filter bandwidth
  mpu.setFilterBandwidth(MPU6050_BAND_21_HZ);

  delay(100);
}
MPU6050 Configuration: Configures the sensor with a specific accelerometer range, gyroscope range, and filter bandwidth to ensure accurate readings.
void loop() {
  sensors_event_t a, g, temp;
  mpu.getEvent(&a, &g, &temp);
Loop Function: Runs repeatedly. It retrieves the sensor data for acceleration, gyroscope, and temperature.
  // Calculate tilt angles in degrees
  float angleX = atan2(a.acceleration.y, a.acceleration.z) * 180.0 / PI;
  float angleY = atan2(-a.acceleration.x, a.acceleration.z) * 180.0 / PI;
Angle Calculation:
- `angleX` is computed by using `atan2` to get the angle of tilt around the X-axis from the acceleration data.
- `angleY` is computed similarly for the Y-axis.
- The angles are converted from radians to degrees by multiplying with `180.0 / PI`.
  // Normalize angles to a range of -90° to 90°
  if (angleX > 90) angleX = 180 - angleX;
  if (angleX < -90) angleX = -180 - angleX;

  if (angleY > 90) angleY = 180 - angleY;
  if (angleY < -90) angleY = -180 - angleY;
Angle Normalization: Adjusts the angles to ensure they fall within the valid range for tilt calculations. This step is generally used to correct angles that might exceed the expected range.
  // Calculate slopes for X and Y axes
  float slopeX = tan(angleX * PI / 180.0);  // Convert angle to radians and calculate slope
  float slopeY = tan(angleY * PI / 180.0);  // Convert angle to radians and calculate slope
Slope Calculation:
- `slopeX` and `slopeY` are calculated using the tangent function (`tan()`).
- The angles are first converted to radians (`angleX * PI / 180.0`) before applying the tangent function to get the slope.
  // Print tilt angles and slopes
  Serial.print("Tilt Angle X: ");
  Serial.print(angleX);
  Serial.print("° | Slope X: ");
  Serial.print(slopeX);
  Serial.print(" | Tilt Angle Y: ");
  Serial.print(angleY);
  Serial.print("° | Slope Y: ");
  Serial.println(slopeY);
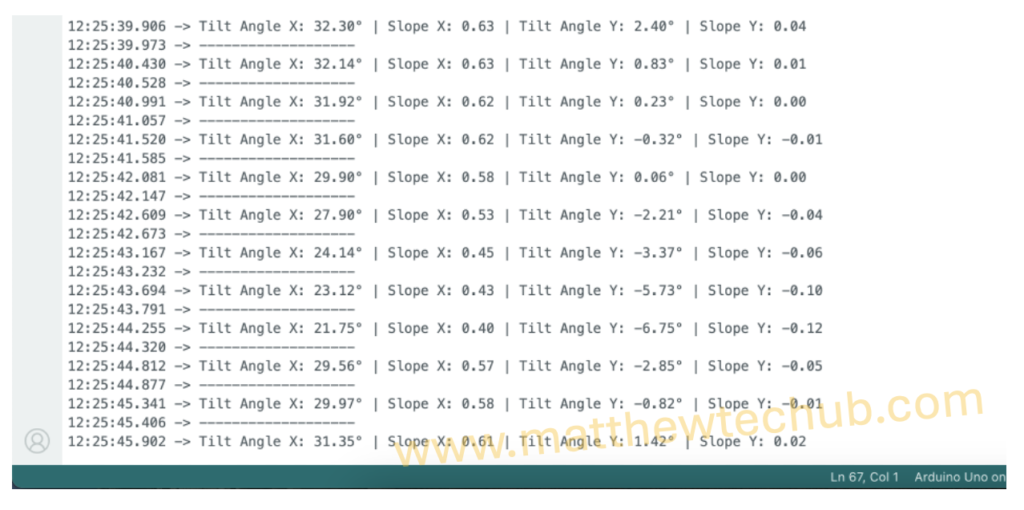
Output: Prints the calculated tilt angles and slopes for both the X and Y directions to the Serial Monitor.
  Serial.println("-------------------");
  delay(500);
}
Delay and Separation: Adds a 500-millisecond delay between readings to make the output more readable, and prints a separator line for clarity.
Screenshot