About the Project
This project uses an MPU6050 sensor to calculate the height of an object through tilt angle measurement and trigonometry. By detecting the tilt along the Y-axis and applying the known distance between the sensor and the object, the system calculates the object’s height in real-time.
Height Calculation
The height of the object is determined by measuring the tilt angle of the MPU6050 sensor along the Y-axis. Using trigonometric principles, the height is calculated by applying the tangent of the angle to the known distance from the sensor to the object.
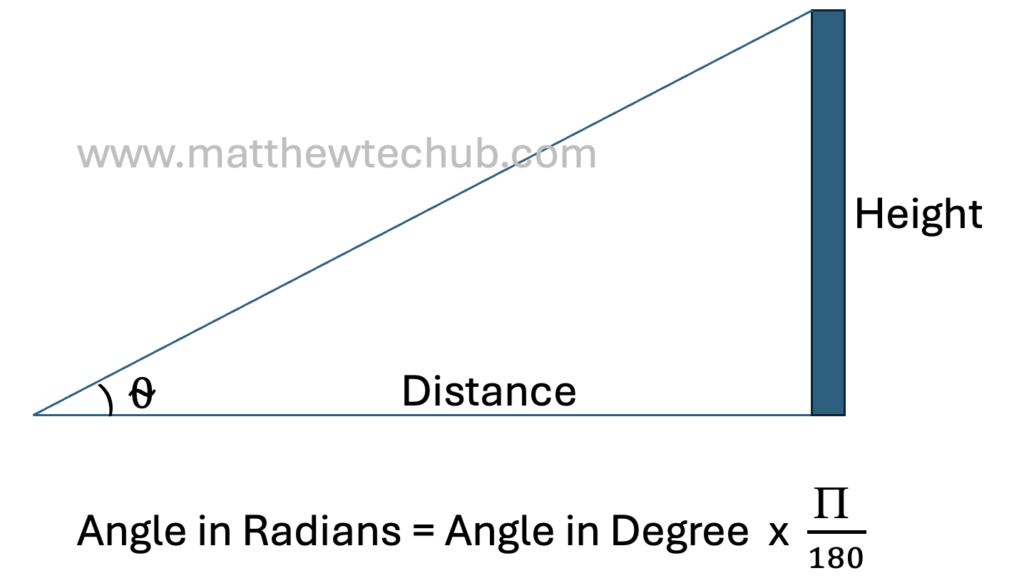
To calculate the height of an object using an MPU6050 sensor, the system uses trigonometry, specifically the tangent function. The formula is:
Height = Distance X tan(angle)
Where:
- Distance is the horizontal distance from the sensor to the object.
- Angle is the tilt angle measured by the MPU6050 sensor in degrees, which is converted to radians before applying trigonometric functions.
Angle in degree is obtained from the gyro accelerometer. Since trigonometric functions in programming (like tan()) use radians, the angle in degrees must be converted to radians as shown below.
Example
Let’s assume:
- Distance = 20 meters (the horizontal distance from the sensor to the object).
- Measured Tilt Angle = 30°.
Step 1: Convert the angle to radians:
Angle in Radians=30×π180=0.5236 radians
Step 2: Calculate the height using the tangent function:
Height=20×tan(0.5236) = 11.54meters
Gyro Accelerometer
The Gyro Accelerometer is a sensor that integrates both an accelerometer and a gyroscope. It measures linear acceleration and rotational velocity along three axes (X, Y, Z). This sensor is widely used in motion-sensing applications, such as drones, robotics, and gaming devices, for tracking movement and orientation.
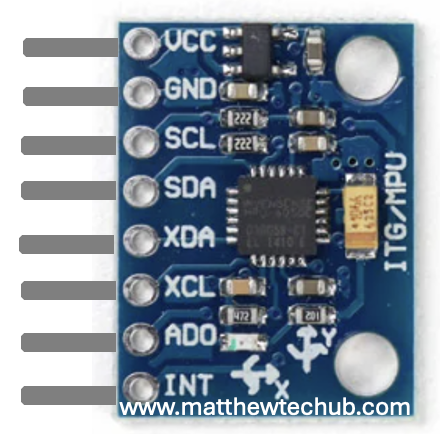
MPU 6050 Module Pin Diagram
The MPU-6050 is a motion tracking sensor combining a 3-axis gyroscope and a 3-axis accelerometer.
MPU6050 Working
This project utilizes an MPU6050 sensor connected to an Arduino Uno to measure and analyse tilt angles. The MPU6050 combines a gyroscope and accelerometer to capture rotational speed and linear acceleration along the X, Y, and Z axes. By detecting rotational rates and changes in velocity, the sensor provides detailed data on both the device’s orientation and movement.
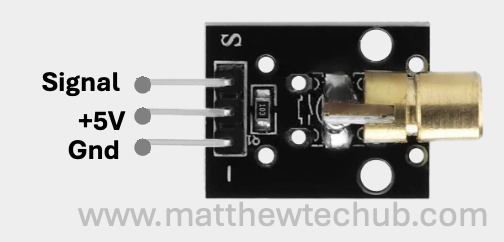
Laser Module
The Arduino laser module emits a focused beam of light, commonly used for precise distance measurement, alignment, and object detection. The module is compact and easy to integrate with Arduino for accurate and reliable measurements.
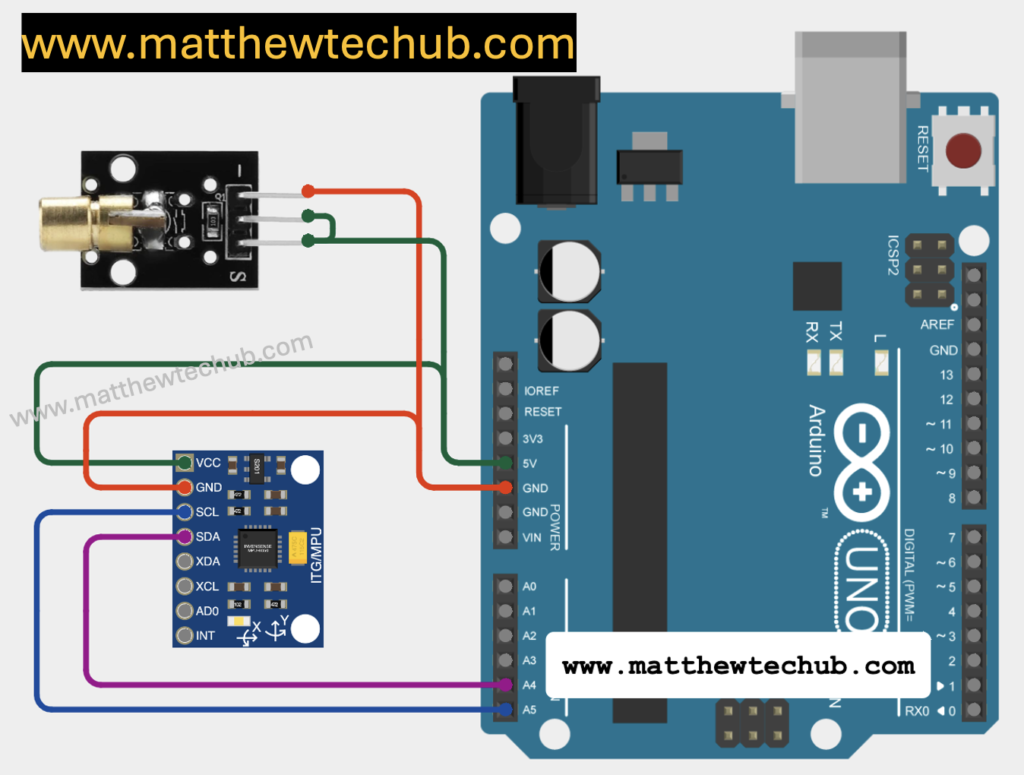
Circuit Wiring
Library Installation
To use the Wire, Adafruit_MPU6050, and Adafruit_Sensor libraries in your Arduino project, you need to install them in the Arduino IDE. Here’s a step-by-step guide on how to install these libraries:
- Install the Wire Library
The Wire library is a core library included with the Arduino IDE, so you don’t need to install it separately. It provides support for I2C communication, which is used to interface with the MPU6050 sensor.
- Install the Adafruit_MPU6050 Library
This library is specific to the MPU6050 sensor and is provided by Adafruit. Follow these steps to install it:
- Open the Arduino IDE.
- Go to the Library Manager:
- Click on Sketch in the top menu.
- Select Include Library > Manage Libraries….
- Search for the Library:
- In the Library Manager, type Adafruit MPU6050 into the search box.
- Install the Library:
- Find the Adafruit MPU6050 library in the search results.
- Click on it to select it.
- Click the Install button to add it to your Arduino IDE.
- Install the Adafruit_Sensor Library
The Adafruit_Sensor library is a dependency for the Adafruit_MPU6050 library and provides a common interface for various Adafruit sensors.
- Open the Arduino IDE.
- Go to the Library Manager:
- Click on Sketch in the top menu.
- Select Include Library > Manage Libraries….
- Search for the Library:
- In the Library Manager, type Adafruit Sensor into the search box.
- Install the Library:
- Find the Adafruit Sensor library in the search results.
- Click on it to select it.
- Click the Install button to add it to your Arduino IDE.
Program Code
// www.matthewtechub.com
// Calculate Object Height Using MPU6050 Tilt and Laser Module
#include <Wire.h>
#include <Adafruit_MPU6050.h>
#include <Adafruit_Sensor.h>

Adafruit_MPU6050 mpu;

// Define the fixed distance between the measuring system and the object (in meters)
const float objectDistance = 20.0; // 20 meters

void setup() {
  Serial.begin(9600);
  while (!Serial)
    delay(10); // Wait for Serial Monitor to open

  // Try to initialize the MPU6050
  if (!mpu.begin()) {
    Serial.println("Failed to find MPU6050 chip");
    while (1) {
      delay(10);
    }
  }
  Serial.println("MPU6050 Found!");

  // Set the accelerometer range
  mpu.setAccelerometerRange(MPU6050_RANGE_2_G);

  // Set the gyro range
  mpu.setGyroRange(MPU6050_RANGE_250_DEG);

  // Set the filter bandwidth
  mpu.setFilterBandwidth(MPU6050_BAND_21_HZ);

  delay(100);
}

void loop() {
  sensors_event_t a, g, temp;
  mpu.getEvent(&a, &g, &temp);

  // Calculate tilt angle in degrees for Y-axis (vertical tilt)
  float angleY = atan2(-a.acceleration.x, a.acceleration.z) * 180.0 / PI;

  // Normalize angle to a range of 0° to 90° (since we are pointing upward)
  if (angleY < 0) angleY = -angleY; // Take absolute value to make the angle positive

  // Calculate the height of the object using trigonometry
  float angleRad = angleY * PI / 180.0; // Convert angle to radians
  float objectHeight = objectDistance * tan(angleRad); // Calculate height using tangent

  // Print the tilt angle and calculated height
  Serial.print("Tilt Angle Y: ");
  Serial.print(angleY);
  Serial.print("° | Calculated Height: ");
  Serial.print(objectHeight);
  Serial.println(" meters");

  Serial.println("-------------------");
  delay(500);
}This code assumes you have a setup where the sensor is positioned such that it measures the angle from the horizontal, and you are using trigonometry to determine the height of an object based on that angle.
Program Code Explanation
Libraries and Initialization
#include <Wire.h>
#include <Adafruit_MPU6050.h>
#include <Adafruit_Sensor.h>

Adafruit_MPU6050 mpu;
- Wire..h: This library is used for I2C communication, allowing your Arduino to communicate with the MPU6050 sensor.
- Adafruit_MPU6050.h and Adafruit_Sensor.h: These libraries provide functions to interface with the MPU6050 sensor, which includes accelerometer and gyroscope functionalities.
- Adafruit_MPU6050 mpu;: This creates an instance of the MPU6050 sensor, which will be used to access the sensor’s data.
Fixed Distance
const float objectDistance = 20.0; // 20 meters- Object Distance: This is the distance from the sensor to the object whose height you want to measure. In this example, it’s set to 20 meters. This distance is crucial for calculating the height using trigonometric functions.
Setup Function
void setup() {
  Serial.begin(9600);
  while (!Serial)
    delay(10); // Wait for Serial Monitor to open

  // Try to initialize the MPU6050
  if (!mpu.begin()) {
    Serial.println("Failed to find MPU6050 chip");
    while (1) {
      delay(10);
    }
  }
  Serial.println("MPU6050 Found!");

  // Set the accelerometer range
  mpu.setAccelerometerRange(MPU6050_RANGE_2_G);

  // Set the gyro range
  mpu.setGyroRange(MPU6050_RANGE_250_DEG);

  // Set the filter bandwidth
  mpu.setFilterBandwidth(MPU6050_BAND_21_HZ);

  delay(100);
}
- begin(9600);: Initializes serial communication at a baud rate of 9600. This is used to send data to your computer.
- while (!Serial) delay(10);: Waits until the Serial Monitor is ready. This is useful when uploading code to ensure the serial communication starts properly.
- begin(): Initializes the MPU6050 sensor. If the initialization fails, it prints an error message and halts the program.
- setAccelerometerRange(MPU6050_RANGE_2_G);: Sets the accelerometer range to ±2g. This means the sensor can measure accelerations from -2g to +2g.
- setGyroRange(MPU6050_RANGE_250_DEG);: Sets the gyroscope range to ±250 degrees per second.
- setFilterBandwidth(MPU6050_BAND_21_HZ);: Sets the filter bandwidth to 21 Hz. This helps filter out noise from the sensor readings.
- delay(100);: Provides a short delay to ensure everything is properly initialized before the program starts.
Main Loop
void loop() {
  sensors_event_t a, g, temp;
  mpu.getEvent(&a, &g, &temp);
- sensors_event_t a, g, temp;: Defines variables to hold the accelerometer, gyroscope, and temperature data.
- getEvent(&a, &g, &temp);: Retrieves the sensor data and stores it in the `a`, `g`, and `temp` variables.
  // Calculate tilt angle in degrees for Y-axis (vertical tilt)
  float angleY = atan2(-a.acceleration.x, a.acceleration.z) * 180.0 / PI;
- atan2(-a.acceleration.x, a.acceleration.z): Calculates the angle of tilt along the Y-axis (vertical) based on the X and Z accelerometer readings. The negative sign is used to correct the direction of tilt.
- angleY: Converts this angle from radians to degrees. `atan2` returns the angle in radians, and multiplying by `180.0 / PI` converts it to degrees.
  // Normalize angle to a range of 0° to 90° (since we are pointing upward)
  if (angleY < 0) angleY = -angleY; // Take absolute value to make the angle positive
- if (angleY < 0) angleY = -angleY;: Ensures the angle is positive, as tilt angles should be between 0° and 90° for upward measurement.
  // Calculate the height of the object using trigonometry
  float angleRad = angleY * PI / 180.0; // Convert angle to radians
  float objectHeight = objectDistance * tan(angleRad); // Calculate height using tangent
- angleRad: Converts the angle from degrees to radians for use in trigonometric functions.
- objectHeight: Uses the tangent function to calculate the height of the object. In trigonometry, the height can be calculated as `distance * tan(angle)`. Here, `objectDistance` is the hypotenuse of the right triangle formed with the object’s height as the opposite side and `angleRad` as the angle between the hypotenuse and the adjacent side.
  // Print the tilt angle and calculated height
  Serial.print("Tilt Angle Y: ");
  Serial.print(angleY);
  Serial.print("° | Calculated Height: ");
  Serial.print(objectHeight);
  Serial.println(" meters");

  Serial.println("-------------------");
  delay(500);
}
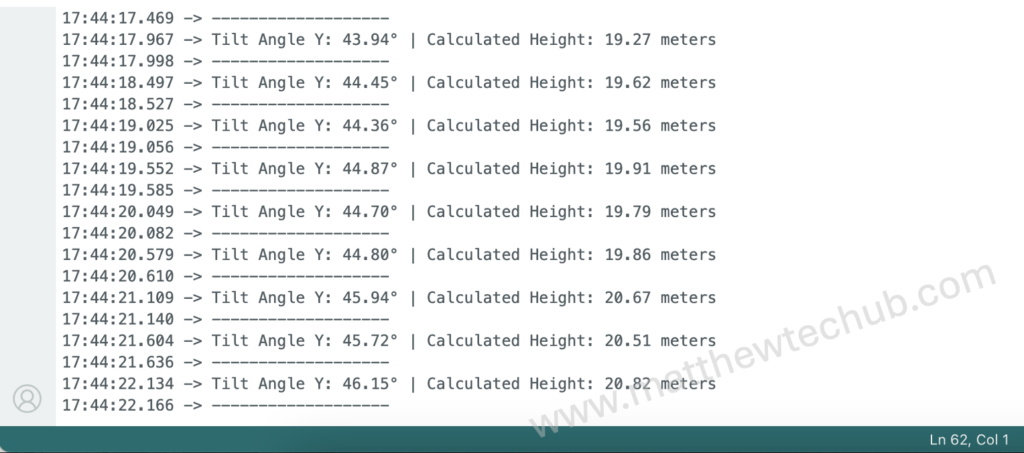
- print(): Outputs the tilt angle and calculated height to the Serial Monitor.
- delay(500);: Pauses the loop for 500 milliseconds before repeating. This helps in reducing the amount of data printed to the Serial Monitor and gives you time to observe the output.
Screenshot
